
Stepwise Tutorial: How to Connect to VNC Server Over Internet
Can VNC be used over internet? Yes, but you’ll need to forward ports and set up dynamic DNS. This post provides a stepwise tutorial on how to connect to VNC Server over internet. Keep reading if you are interested.
By Ellie / Updated on December 13, 2024
Can VNC be used over Internet?
Can VNC be used over Internet? Absolutely! You have the ability to establish a connection with a VNC (Virtual Network Computing) server through the Internet. Originally, VNC software was primarily intended for seamless operation within local networks or VPNs. Nonetheless, thanks to advancements in networking technology, it is now feasible to connect to VNC Servers over the internet too. This endeavor necessitates the configuration of the host computer's firewall and router to enable internet connectivity.
How to connect to VNC Server over Internet
In this step-by-step guide, you will learn how to connect to VNC Server over Internet using VNC Viewer. Follow these instructions to establish a successful connection even when you are away from your host computer.
Part 1. Install a VNC Server
To establish a remote connection, the first step is to install a VNC server on the computer you wish to access remotely. In this guide, we will be using TightVNC as an example, although there are other viable options like UltraVNC.
By default, TightVNC installs itself as a system service, ensuring it runs continuously in the background as long as your computer is powered on. However, you have the flexibility to disable the service manually if desired. It also automatically configures itself to bypass the Windows firewall. If you employ a different firewall, ensure that TightVNC is not being blocked; otherwise, the connection will be hindered.

It is crucial to secure your VNC server with a robust password, particularly if you plan on exposing it to the internet.

Once the installation is complete, TightVNC will be up and running on your computer. To configure your server, you can access the TightVNC Service - Control Interface option in your Start menu.

One important adjustment to consider is the ports used by TightVNC. By default, VNC operates on port 5900. However, to enhance security, it is recommended to change this default port to a different one. Most individuals scanning for open VNC servers will focus on port 5900, but they are less likely to detect VNC servers running on random ports such as 34153.
For added security, you may also want to modify or disable the Web Access port, as this will further safeguard your VNC Server from potential threats.

Part 2. Forward ports & set up dynamic DNS
Now that your computer is running a VNC server, it grants you the ability to connect to it from other computers within your local network. However, if you desire to establish a connection to the internet, there are a few additional steps to follow.
The first step involves forwarding the VNC server's port on your router. It's important to note that the process varies depending on the specific router you have. To accomplish this, you'll need to access your router's web interface and navigate to the port forwarding settings.
Another consideration is setting up a dynamic DNS hostname for your home network. This becomes relevant because internet service providers often change the IP address assigned to home networks. By configuring a dynamic DNS hostname, you ensure that even if your home IP address changes, you can still connect to your home computer.
Remember to consult your router's documentation or seek online resources for detailed instructions on port forwarding and dynamic DNS setup specific to your router model.
By following these steps, you can enable internet-based connections to your VNC server, expanding access beyond your local network.
Step 1. Locate the port forwarding rules on your router
To begin, you need to find the port forwarding rules section on your router. While it's impractical to cover every possible router interface, we can provide examples to give you a general understanding. It is strongly recommended that you consult your router's manual or online resources for specific instructions related to your router model.
For instance, let's take a look at the port forwarding menu in the Xfinity app's xFi Gateway:

In contrast, here's an example of the port forwarding menu on a D-Link DIR-890L router running the DD-WRT firmware:

As you can observe, there is significant variation in complexity and menu location between different router interfaces. Thus, it is best to refer to the manual or conduct an online search for precise instructions tailored to your specific router model.
Once you have located the appropriate menu, you can set up the port forwarding rule.
Step 2. Create a port forwarding rule
Once you have familiarized yourself with port forwarding and dynamic DNS setup, creating the actual port forwarding rule is a straightforward process. Within the port forwarding configuration of your router, we shall generate a pair of fresh port forwarding regulations. The first rule will be dedicated to the Subsonic music server, while the second will cater to the newly established Minecraft server.

Regardless of the differences in router software, the general input remains the same. It is customary to assign a name to the port forwarding rule that reflects the server or service it pertains to. If necessary, you can append additional information for clarity, such as "Webserver" or "Webserver-Weather" when dealing with multiple rules. Remember the TCP/UDP protocol discussed earlier? You must specify whether it is TCP, UDP, or both. While some individuals meticulously match protocols to applications for enhanced security, we often opt for the convenience of selecting "Both" to save time
Certain router firmware, including the advanced DD-WRT shown in the screenshot above, may provide the option to specify a "Source" value. This allows you to restrict the port forwarding to a list of specific IP addresses for added security. However, be aware that using this feature introduces complexities, as it assumes remote users (including yourself when away from home and friends connecting) have static IP addresses.
Next, you will enter the external port, which is the port open on the router and accessible from the internet. You have the freedom to choose any number between 1 and 65353. However, keep in mind that lower port numbers are typically reserved for standard services like email and web servers, while higher numbers are commonly associated with popular applications. For safety, we recommend selecting a port number above 5,000. To ensure there are no conflicts with existing services you are already using; it is advisable to use the Ctrl+F function to search a comprehensive list of TCP/UDP port numbers.
Finally, provide the internal IP address of the device, specify the port used on that device, and, if applicable, toggle the rule on. Don't forget to save the settings to ensure they take effect properly.
Step 3. Test your port forwarding rule
To verify whether your port forwarding setup is successful, the most straightforward method is to connect using the intended routine for the specific port. For instance, you can ask a friend to connect their Minecraft client to your home server. However, this may not always be feasible, especially if you are not physically present at home.
Fortunately, there is a convenient online tool called YouGetSignal.com that offers a port checker. By using this tool, you can test if your Minecraft server port forward has been properly configured. Simply enter your IP address and the corresponding port number, then click on the "Check" button.
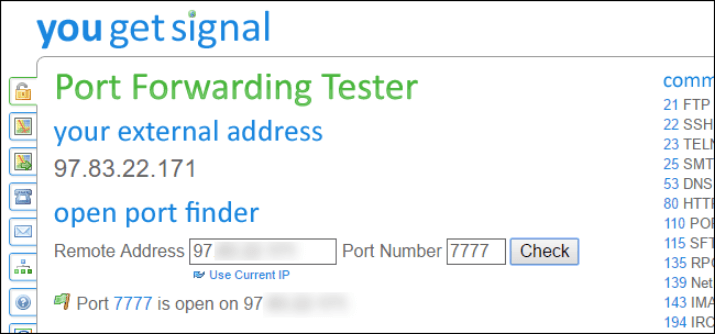
Upon performing the check, you should receive a message similar to "Port X is open on [Your IP]," as depicted above. In the event that the port is identified as closed, it is recommended to verify both the configurations within the port forwarding menu of your router and the accuracy of the IP and port information entered by the tester.
Part 3. Connect to your computer
To establish a connection, you can utilize a VNC client on a separate computer. TightVNC provides a VNC client that can be installed on another computer. During the installation process, you can choose to exclusively install the viewer by deselecting the server option. Once the installation is complete, you can locate the TightVNC Viewer in the Start menu.

To connect, simply enter the appropriate address for your home computer. There are various types of addresses you can use:
- If you are on the same local network as the computer, employ the computer's local IP address.
- If you are accessing the computer over the Internet, utilize your home network's IP address.
- If dynamic DNS has been set up, use your dynamic DNS hostname when accessing your computer over the Internet.
If you have configured a different port for your VNC server (which is recommended), append the port number after two colons (::) in the address.

After successfully establishing the connection between the VNC client and the VNC server on the remote computer, you can see the remote computer's desktop displayed within a window on your screen. This window acts as a portal to interact with and control the remote computer as if you were physically present at its location. You can now perform tasks, open applications, access files, and operate the remote computer just as if you were sitting in front of it.

AnyViewer: Easier way to connect to servers over the internet
If you’re searching for a more convenient method to establish internet connections with servers, you may find the perfect solution in AnyViewer, the finest VNC alternative. Tailored specifically for Windows computers, AnyViewer is a professional and cost-free remote access software that offers a multitude of advantages.
AnyViewer excels in encompassing all the benefits that VNC provides while effectively addressing its limitations, resulting in an enhanced remote access experience. Let's delve into the distinguishing features that make AnyViewer stand out:
- AnyViewer is entirely free to use, whether for personal or commercial purposes, eliminating any financial barriers.
- With support for multiple monitors, AnyViewer empowers you to manage and control multiple displays with utmost convenience effortlessly.
- Enjoy optimized bandwidth usage with AnyViewer, granting you the freedom to select high resolutions without compromising network performance.
- Developed by a team of highly skilled technical professionals, AnyViewer guarantees a fast and stable connection, ensuring an uninterrupted remote access experience.
By opting for AnyViewer as your VNC alternative, you gain access to a dependable and efficient remote access solution. Not only does it retain the advantages of VNC, but it also overcomes its limitations, making it an ideal choice for seamless connectivity.
Step 1. Download, install, and launch AnyViewer on both computers. On the Controller computer, go to Log in, and then click Sign up. (If you already have signed up on its official website, you can log in directly.)

Step 2. Fill in the signup information.

Step 3. Then you can see you successfully logged in to AnyViewer. Your device will automatically be assigned to the account you’ve logged in to.

Step 4. Log in to the same AnyViewer account on the two devices; then, you can achieve a direct connection by clicking One-click control to achieve unattended remote support.

Step 5. After connecting successfully, you’ll see the remote desktop. Then you can completely control it and provide remote support just like you’re sitting in front of it.
- ★Tips: You can also upgrade your account to a Professional or Enterprise plan. What can a professional or enterprise plan bring you:
- More devices can be assigned to the same account for unattended remote support.
- Connectin privacy mode to protect privacy, which means the Controller can black the remote PC screen and disable the remote keyboard & mouse click.
- Faster file transfer speed. Transfer speed for a free account is 500 KB/s, and for a paid account is up to 10 MB/s.
The bottom line
This post primarily introduces how to connect to VNC Server over the internet. If you're looking for a hassle-free and cost-effective way to establish remote connections over Internet, we highly recommend choosing AnyViewer as your go-to VNC alternative. Experience the convenience, stability, and superior performance that AnyViewer brings to the table, and enjoy a seamless remote access experience like never before.
