
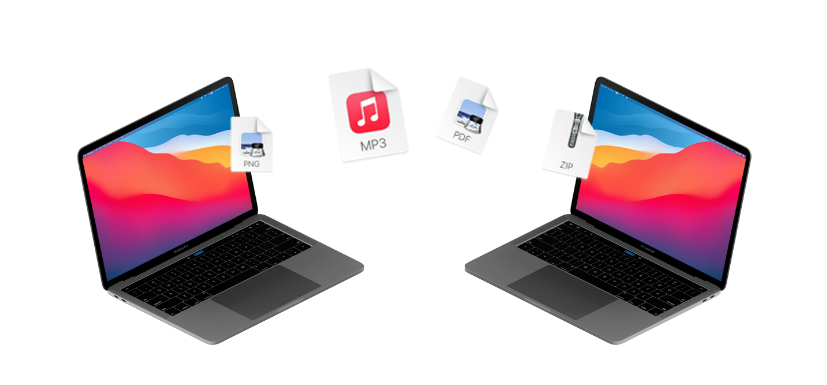
Top 10 Ways to Transfer Files from Mac to Mac
Discover top ten streamlined methods for transferring files from Mac to Mac. With step-by-step instructions, empower yourself to seamlessly exchange documents, photos, and videos between Mac devices.
By Ellie / Updated on March 28, 2025
How do I transfer files directly from Mac to Mac?
I'm looking for some advice on how to transfer files directly from one Mac to another. I often find myself needing to share documents, photos, and other files between my Mac devices, but I'm not sure of the best way to do it efficiently and securely. Could you please share your experiences and recommendations for transferring files from Mac to Mac?”
- Question from Reddit
When it comes to transferring files between Mac computers, there are several methods available, each with its own set of advantages and limitations. Whether you're sending documents, photos, videos, or any other type of file, it's essential to choose the most efficient and secure method for your needs.
How to transfer files from Mac to Mac [10 ways]
In this article, we've thoroughly explored methods for transferring files between two Mac computers. Dive in as we break down each step in detail. Let's delve deeper into this topic.
|
Ways |
Application scenarios |
Highlights |
|
|
|
|
|
|
|
|
|
|
|
|
|
|
|
|
|
|
|
|
|
|
|
|
|
|
|
|
|
Way 1. AnyViewer [highly-recommended]
While various methods exist for transferring data between Macs, there are times when you need to remotely access one Mac from another or transfer files between devices that are not on the same local network. In such cases, AnyViewer is the perfect remote desktop solution. It's a versatile remote access tool that allows you to control your Mac from anywhere or transfer files securely over the internet.
Why Choose AnyViewer?
- Cross-Platform Compatibility – AnyViewer works across macOS, Windows, iOS, and Android, allowing you to access different devices seamlessly.
- Secure File Transfer – Quickly transfer files with an intuitive drag-and-drop feature, all protected with high-level encryption to ensure data security.
- Remote Desktop Control – Need to access applications or files on an old Mac? AnyViewer lets you remotely control your Mac as if you were sitting right in front of it.
- Easy Setup – No complex configurations required. Install AnyViewer, log in, and connect to your Mac from anywhere in just a few clicks.
- Free Version Available – Enjoy essential remote access and file transfer features at no cost, making AnyViewer an excellent choice for both personal and professional use.
How to transfer files from from Mac to Mac using AnyViewer:
Step 1. Download and install AnyViewer on both the source and destination Macs.
Step 2. Sign up for a free AnyViewer account or use the software without an account for limited features.
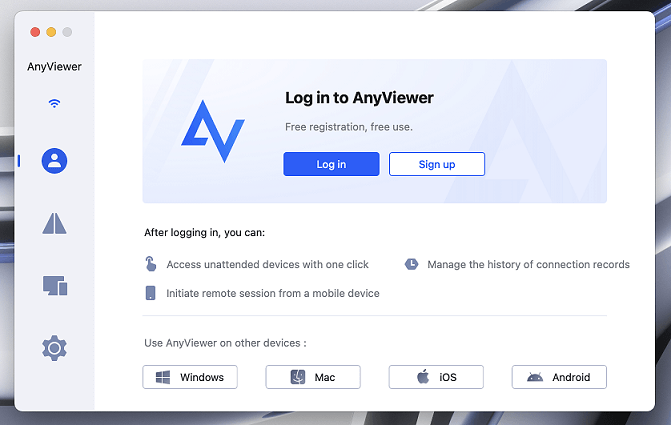
Step 3. On the old Mac, sign in to AnyViewer, then select the device you want to transfer files to (in this case, your MacBook Air).
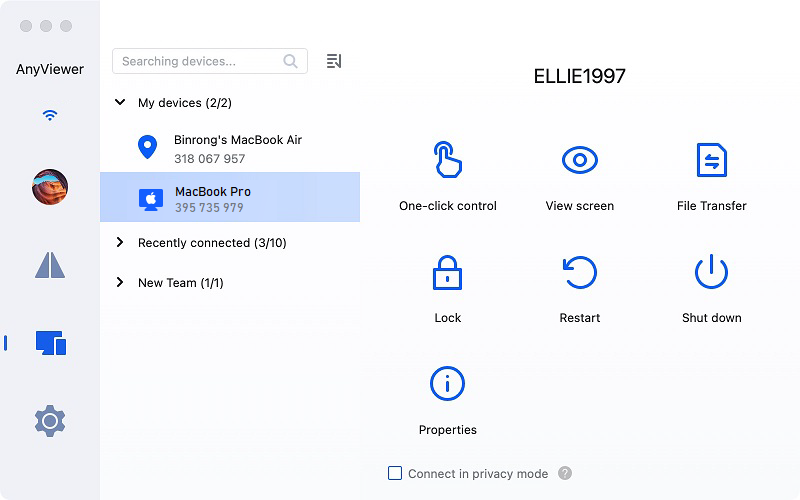
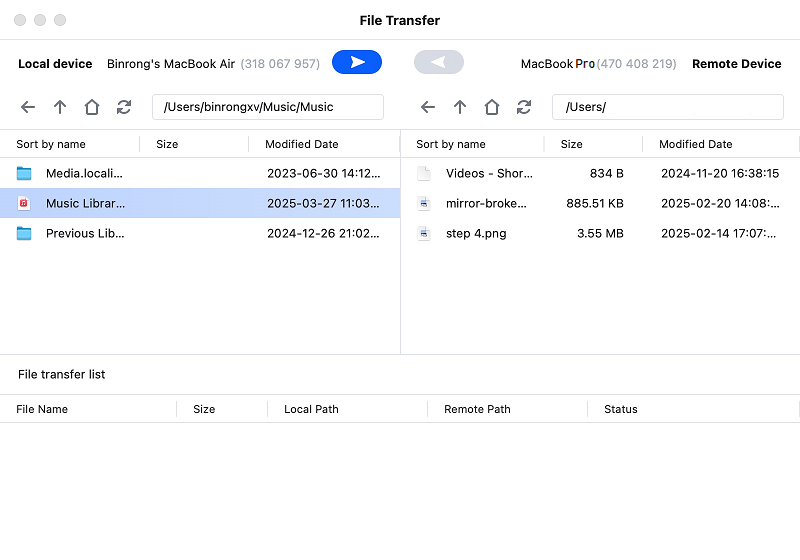
Step 4. Once connected, you can access the remote Mac's files and drag-and-drop them to your local machine or vice versa.
To boost transfer speed and overall performance, consider upgrading to an AnyViewer Professional or Enterprise plan. These premium plans offer several key advantages, including:
- Maximum Transfer Speed – Enjoy speeds of up to 10 MB/s for faster file transfers.
- Simultaneous Transfers – Transfer up to 5 files at the same time, improving efficiency.
- Unlimited Files per Transfer – Move as many files as needed in a single session without restrictions.
- Large File Support – Transfer individual files up to 1 TB in size, making it ideal for handling big data files.
Way 2. AirDrop
AirDrop, an integral feature of Mac OS, facilitates data sharing by leveraging Bluetooth for device detection and subsequently transfers files via Wi-Fi to Apple devices. With AirDrop activated, you can seamlessly transfer documents, videos, folders, and various other files between Mac computers.
Before initiating the file transfer process:
- Ensure Bluetooth is enabled on both Macs.
- Confirm that both computers are connected to the same Wi-Fi network.
Step 1. Open Finder on both Macs and navigate to AirDrop under Favorites in the left sidebar. In the AirDrop pane, choose either Contacts Only or Everyone from the "Allow me to be discovered by" options based on your preference.
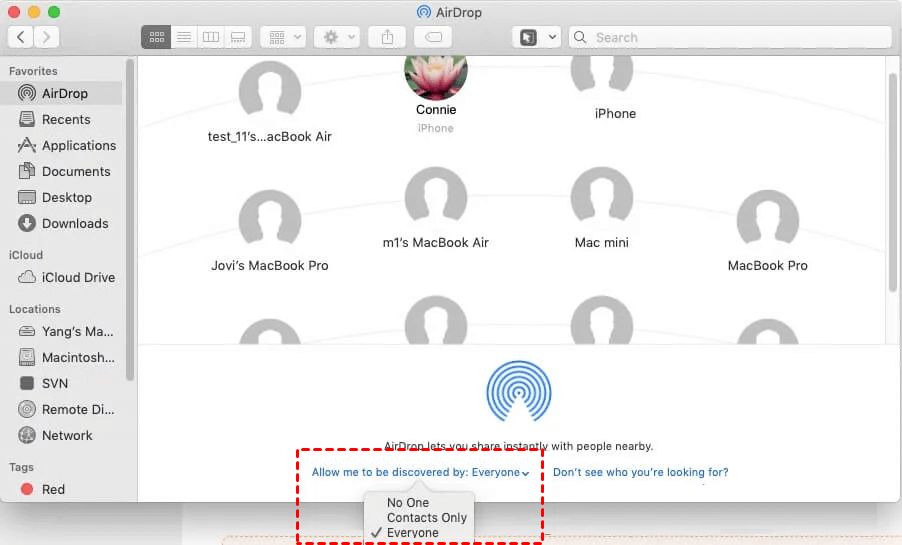
Step 2.On the Mac from which you wish to share files, right-click the desired file, then select Share > AirDrop. Next, select the destination Mac from the pop-up window.
Step 3. The selected file will be promptly sent to the receiving Mac.
Way 3. Migration Assistant
Migration Assistant, a utility software crafted by Apple Inc., serves the purpose of seamlessly transferring all your documents, user accounts, computer settings, and applications from various sources such as a Mac, a Windows PC, another computer, or a full drive backup, to a new Mac via Thunderbolt Bridge. This tool can be employed either during the initial setup of a new Mac or manually executed on a system that has already been configured.
Preparations:
- Ensure both Mac computers are updated with the latest available software updates.
- Position the two computers close to each other with Wi-Fi activated.
- For older Macs, navigate to the Apple menu > System Preferences > Sharing to verify that the Mac computer name is listed in the Computer Name box.
- Charge both Macs to ensure successful data transfer.
- Save any editing documents and close all applications currently in use.
Read below to transfer your data from the old Mac to the new one:
On your new Mac:
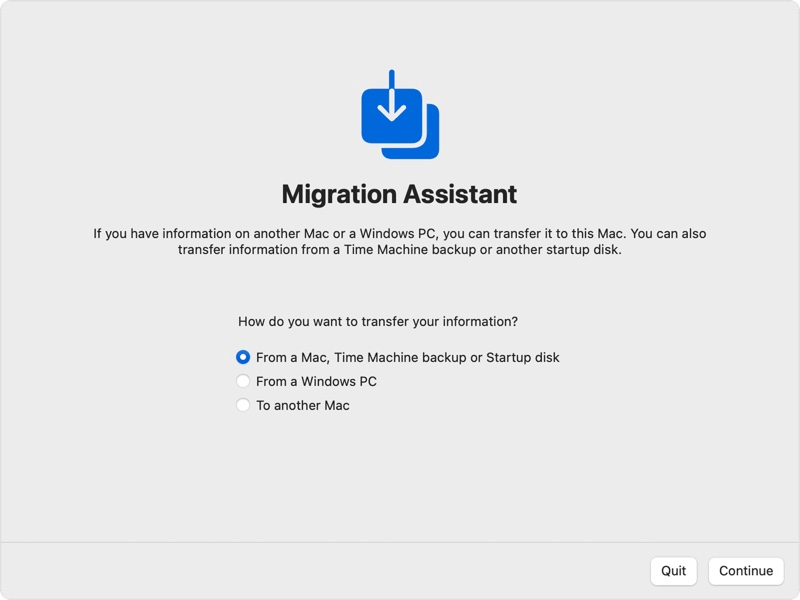
Step 1. Launch Finder, then navigate to Applications > Utilities > Migration Assistant. Click Continue.
Step 2. When prompted for permission to make changes, enter your administrator password and click OK.
Step 3. Choose the option to transfer from a Mac, Time Machine backup, or startup disk. Click Continue.
On your old Mac:
Step 1. Keep Migration Assistant open and click Continue.
Step 2. Select the option to transfer to another Mac, then click Continue.
On your new Mac:
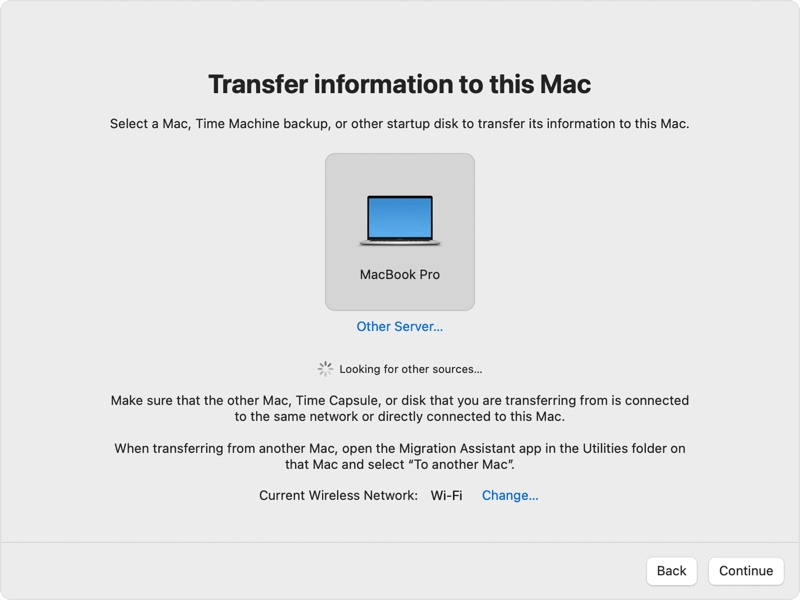
Choose "Other Mac" when prompted to select a source (Mac, Time Machine backup, or other startup disk). Click Continue.
On your old Mac:
If a security code is displayed, verify it matches the code shown on your new Mac. Click Continue.
On your new Mac:
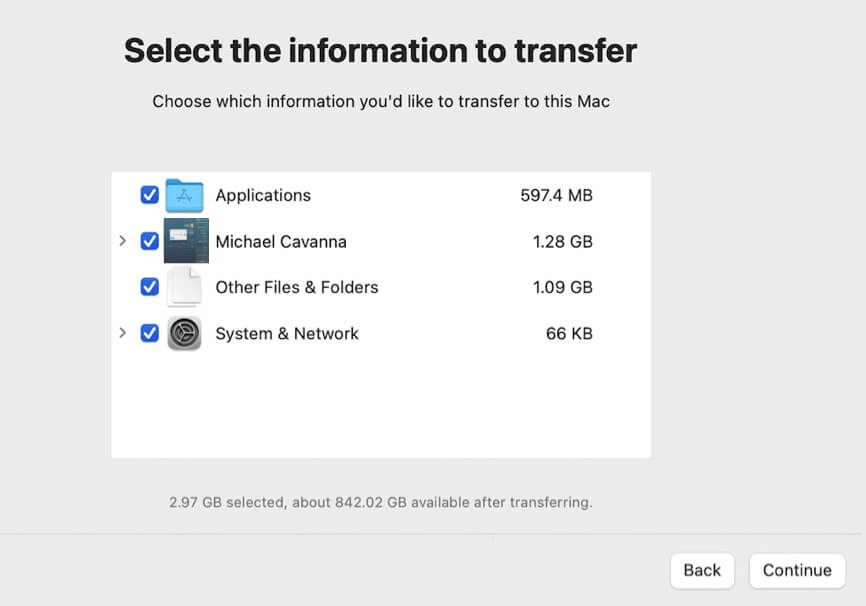
Step 1. Select the specific information you wish to transfer.
Step 2. Click Continue to initiate the transfer. Note that larger transfers may require several hours to complete.
Step 3. Once Migration Assistant has completed the transfer, quit the application on both computers.
Way 4. iMessage
Apple's Messages application on your Mac provides a convenient method for wirelessly transferring data between Mac computers.
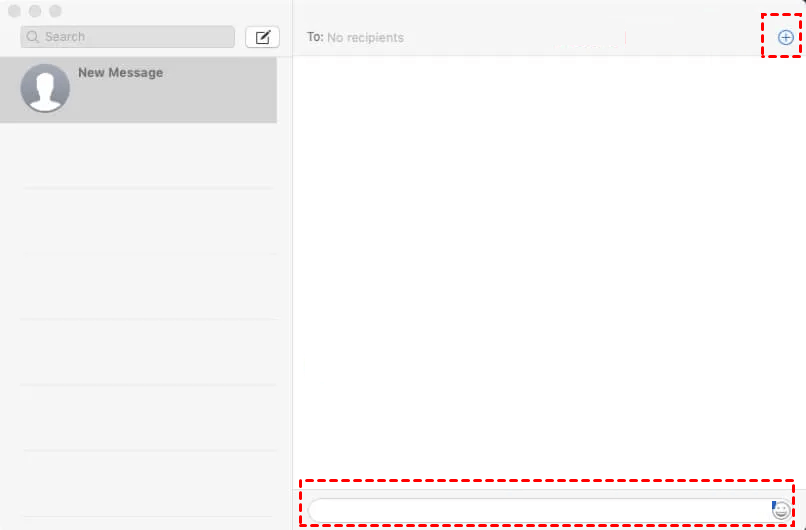
Step 1. Open Finder, navigate to Applications, and launch Messages on your Mac. Add a new iMessage conversation.
Step 2. Click the "+" icon located at the upper right corner of the window to add the address of the receiving Mac.
Step 3. Drag and drop the files you wish to send into the bottom iMessage text box, then press the Return key on your keyboard.
Step 4. On the receiving Mac, right-click the file within the iMessage conversation to save it to a local folder.
Way 5. File Sharing
Each Mac comes equipped with a file-sharing system known as File Sharing, accessible through Apple's Sharing utility. This feature enables Mac computers within the same network to exchange content seamlessly.
To begin, ensure the following steps are taken:
- Verify if both Macs are connected to the same network.
- Navigate to the Apple icon > System Preferences > Sharing, and confirm the presence of File Sharing on both Macs.
On the Mac from which you wish to share files:
Add the desired files or folders to the "Shared Folders" field.
![]()
On the other Mac:
Step 1. Open Finder and navigate to the top Finder menu. Click "Go" > "Network." In the network window, locate your Mac's name.
Step 2. Click on your Mac's name, then select "Connect as" > "Connect." In the pop-up window, choose one of the "Connect As" options based on how you typically log in to this Mac (Guest, registered user, using an Apple ID). Enter your account password and click "Connect."
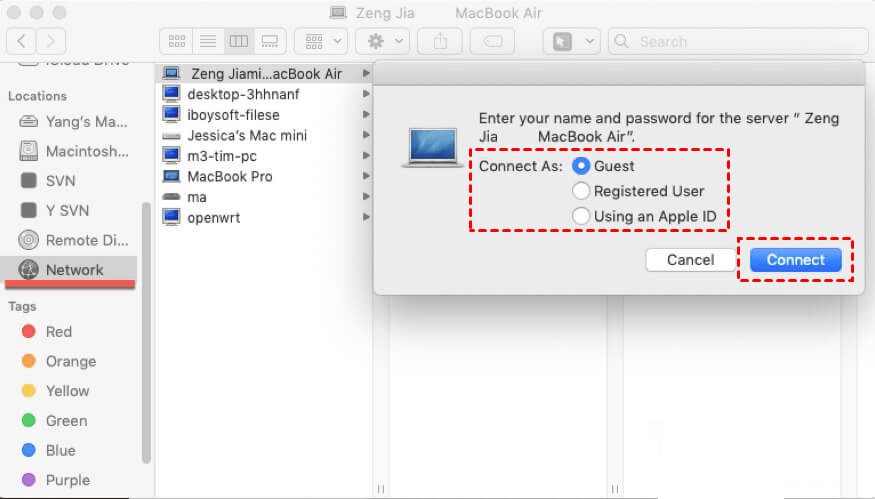
Step 3. The shared folders will now appear on this Mac. You can view or copy them to this Mac as needed.
Way 6. iCloud storage
Utilizing iCloud Drive for file transfer offers a straightforward method, allowing wireless migration of files to other Mac computers.
Here's the process:
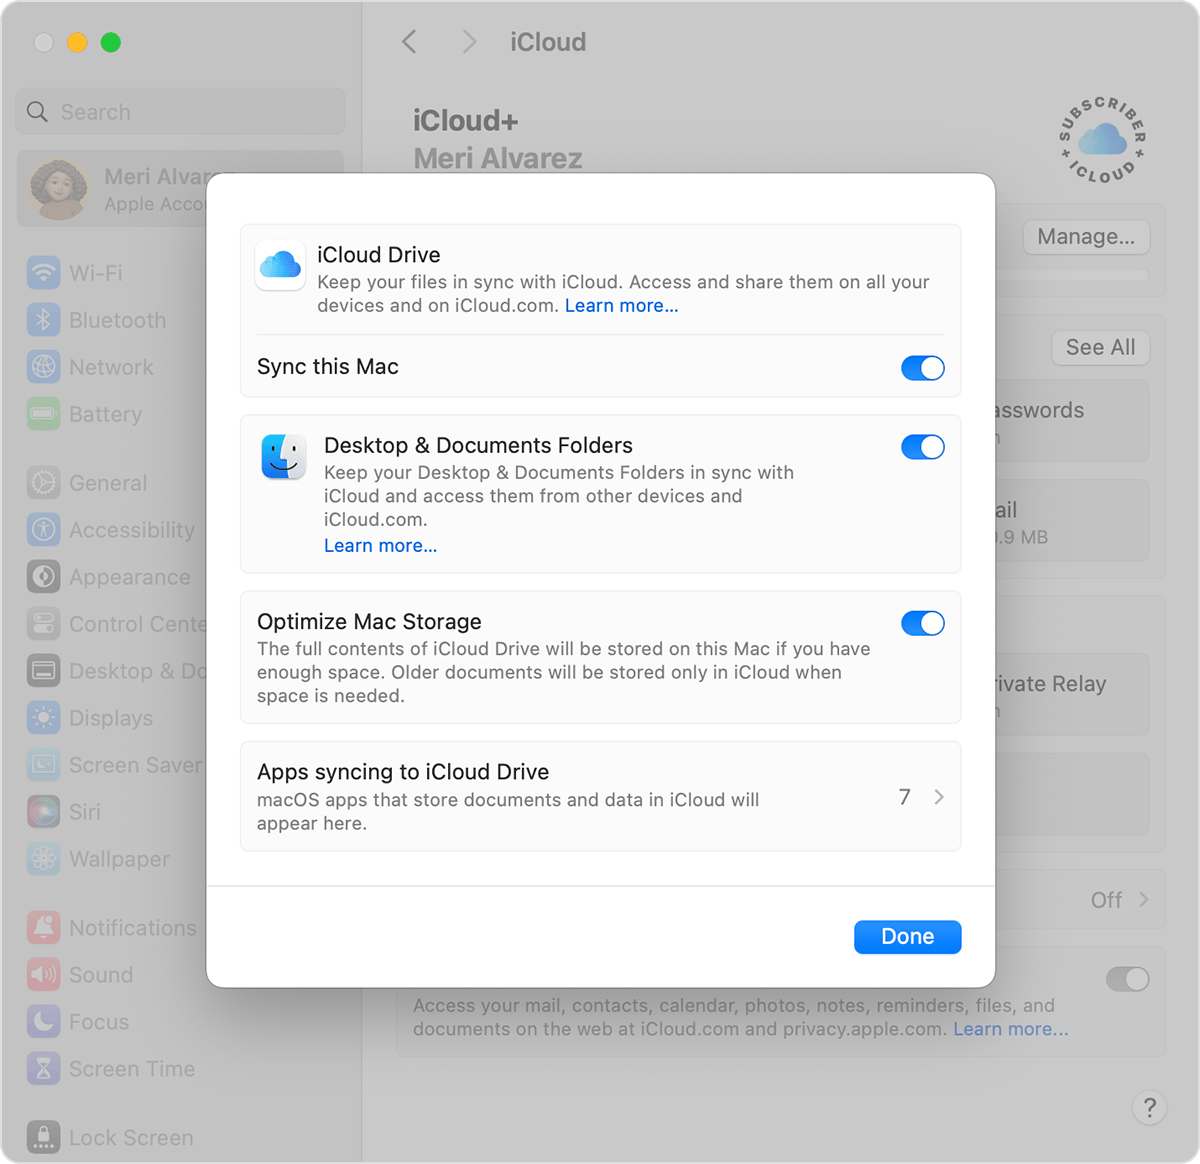
Step 1. On both Macs, go to System Preferences > Apple ID > iCloud. Make sure iCloud Drive is enabled.
Step 2. On your old Mac, move the files you want to transfer into the iCloud Drive folder. These files will upload to the cloud.
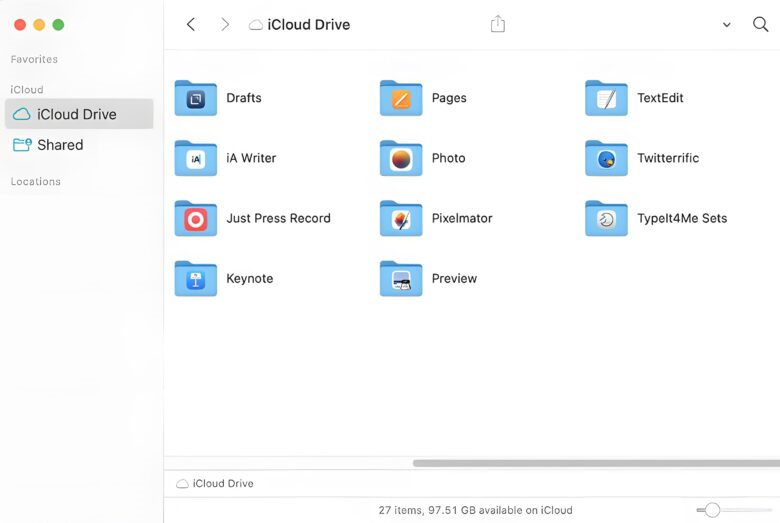
Step 3. On the new MacBook Air, open Finder and click on iCloud Drive in the sidebar. The transferred files will be available to download or edit.
Way 7. Time Machine backups
If you have reservations about the security of wireless data migration for sensitive files or find it time-consuming, especially with large files, using Time Machine backups offers a more efficient and secure solution to transfer all data from an old Mac to a new one. This includes preferences, applications, user accounts, and other files.
Here are the detailed steps for transferring files to a new MacBook using a Time Machine backup:
Step 1. If you haven't already done so, back up your old Mac. (Skip this step if you've already backed up).
Step 2. Connect the Time Machine backup disk to your new Mac using a USB cable. If it's a USB flash drive, plug it directly into the Mac.
Step 3. Restart your new Mac and enter macOS Recovery Mode.
Step 4. In macOS Recovery Mode, select "Restore From Time Machine Backup" and click Continue.
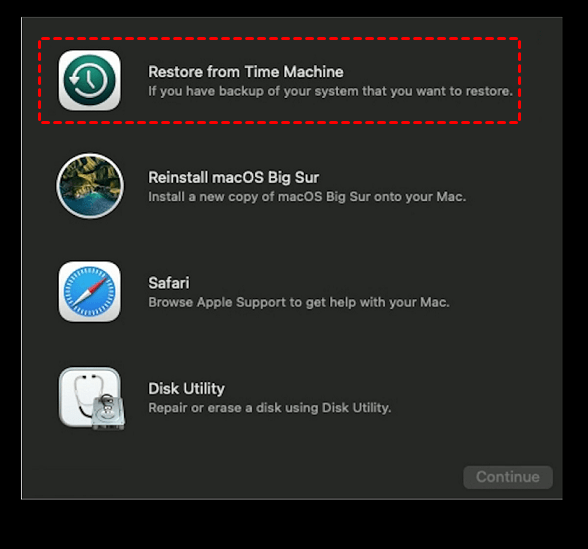
Step 5. Choose your Time Machine backup disk and click Continue.
Step 6. Select the latest backup and follow the on-screen instructions to complete the data transfer process.
Step 7. Once the transfer is finished, restart your new Mac and verify that the migrated files are present.
Way 8. Target Disk Mode
Target Disk Mode allows you to connect two Macs using a USB or Thunderbolt cable, effectively transforming the internal hard drive of one Intel-based Mac into an external hard drive for the other Mac. This mode is commonly used for fast data transfer between old and new Macs.
Here's how to utilize Target Disk Mode to transfer data from an old Mac to a new Mac:
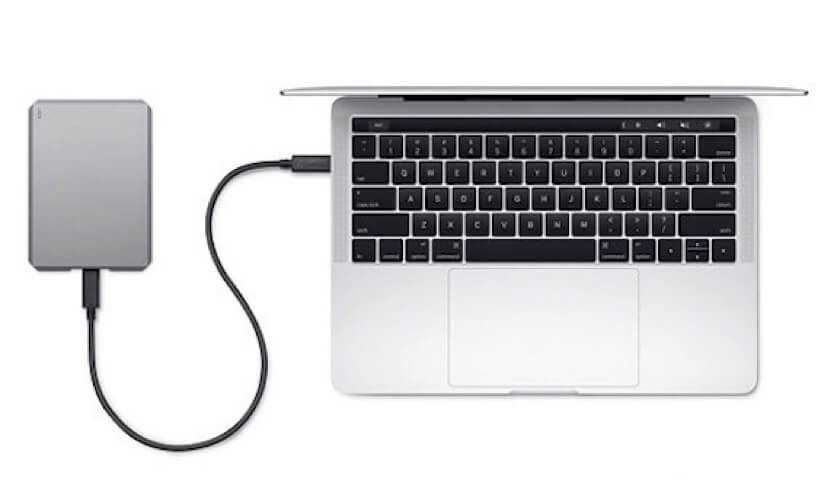
Step 1. Connect the two computers using a Thunderbolt or FireWire cable.
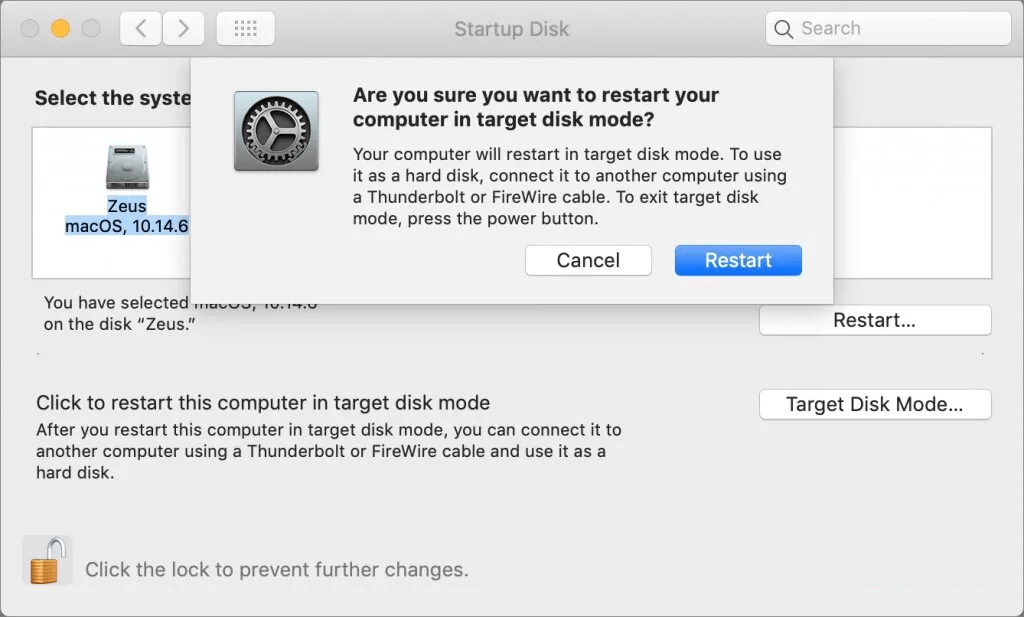
Step 2. On the old Mac, navigate to the Apple menu > System Preferences > Startup Disk. Select "Target Disk Mode" to restart the Mac in this mode. You'll see a Thunderbolt icon displayed on the screen indicating the activation of Target Disk Mode.
Step 3. On the destination Mac, open Finder. You'll notice the internal hard drive of the old Mac appears under the "Locations" tab in the left sidebar of Finder. You can now copy or move all desired files from the old Mac's drive to your new Mac.
Way 9. Use an external storage device
If you lack a Time Machine backup hard drive but possess an external storage device, such as a USB flash drive or an external hard drive, you can employ it as an intermediary for transferring data between MacBooks.
Firstly, connect the external drive to the Mac from which you wish to transfer files. Then, proceed to copy the desired files or folders onto the drive. After completion, safely eject the drive by right-clicking on it.
Next, detach the external drive from the source Mac and reconnect it to the target Mac. You can then proceed to transfer the files from the drive to the target Mac.
Way 10. Bluetooth Sharing
Furthermore, you can utilize Bluetooth Sharing within the Sharing utility to transfer data between Mac machines via Bluetooth. For successful data transfer, ensure the Macs are positioned nearby.
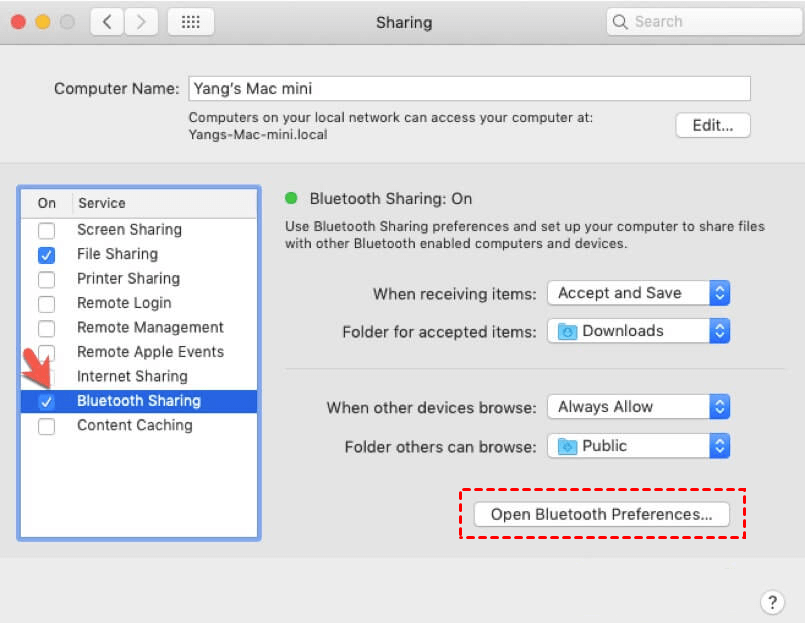
On both Mac machines, navigate to System Preferences > Sharing and enable Bluetooth Sharing. Additionally, verify that Bluetooth is turned on by opening Bluetooth Preferences.
Next, on the Mac from which you'll send files, locate the target Mac device listed in the Bluetooth window and double-click it. This action will prompt a Finder window to appear. Select the files you wish to share with the other Mac and click "Send."
On the receiving Mac, a popup will appear prompting the user to accept or decline the incoming files. Click "Accept" to save them on the Mac.
The bottom line
In conclusion, transferring files between Macs offers multiple options, each suited to different needs. The best method depends on factors like file size, security, and network availability. For fast, secure, and hassle-free solutions, AnyViewer stands out as the top choice. It enables unlimited remote file transfers between Macs with high-speed performance, strong encryption, and an intuitive interface. Whether you're moving large files or accessing data remotely, AnyViewer ensures a seamless experience. Download AnyViewer today and enjoy effortless file transfers between your Mac devices!
