
10 Tested Fixes to TeamViewer Not Connecting Issues
If TeamViewer isn’t connecting, this guide offers 10 quick solutions to fix the issue. From network checks to software updates, these tips can help. If the problem persists, AnyViewer is a great alternative for reliable and fast remote access.
By Ellie / Updated on March 7, 2025
Why is TeamViewer not connecting?
Having trouble connecting to a remote PC with TeamViewer? You're not the only one. Many users have recently encountered TeamViewer not connecting errors and are searching for reliable fixes. This issue can be incredibly frustrating and may appear in different forms, such as:
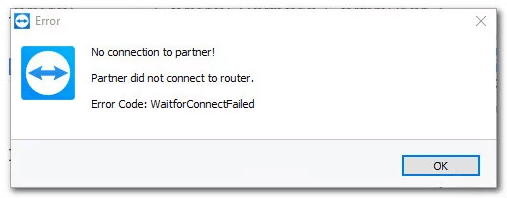
- Partner did not connect to router
- Not ready. Please check your connection
- Connection failed (no route)
- Protocol negotiation failed
If TeamViewer is not connecting, several factors could be causing the issue. Here are some common reasons why the software might not work properly:
- Connection Problems – You may struggle to establish a connection between devices, experience slow data transfer speeds, or face unexpected disconnections.
- Outdated Software – Running an older version of TeamViewer can lead to compatibility issues. Ensure you update the software to the latest version.
- Permission Restrictions – Lack of proper permissions can prevent users from accessing key TeamViewer functions, granting remote access, or modifying settings.
How to fix TeamViewer not connecting [10 solutions]
Below are effective solutions to resolve various TeamViewer not working errors. Follow the step-by-step guide for each method to troubleshoot the issue. After applying each fix, check your connection to ensure the problem is resolved. Let’s get started!
Solution 1. Restart your network connection
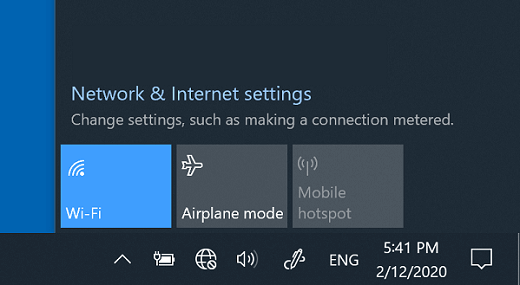
One of the most common reasons behind TeamViewer unable to connect is an unstable internet connection or a glitch in your network settings. To fix this, ensure both devices have a stable and uninterrupted internet connection. Go to the right-bottom corner of both desktops, and check whether WiFi or LAN is successfully connected.
If the issue persists, try restarting your modem or router. If that doesn’t help, contact your internet service provider for further assistance.
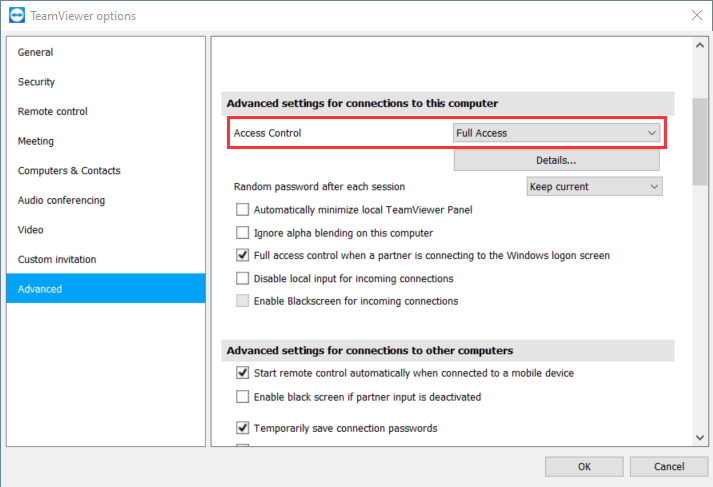
Solution 2. Configure access settings on TeamViewer
Sometimes, the connection may fail because the device you are trying to connect to is denying any incoming remote control sessions. You need to give full access to computers connecting to this device.
Go to Options (on the top right corner) > Advanced. Under Advanced settings for connections to this computer, choose Full Access. Besides, check Full access control when a partner is connecting to the Windows login screen box.
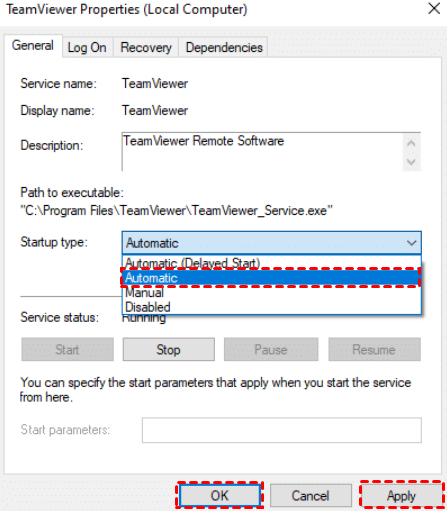
Solution 3. Restart and configure the TeamViewer service
At times, a minor glitch in the TeamViewer application can disrupt remote connections, causing the TeamViewer not connecting error. A quick fix is to force restart the TeamViewer service by following these steps:
Step 1. Type Service in the Windows search bar and open it.
Step 2. Scroll down to TeamViewer, right-click it, and select Restart.
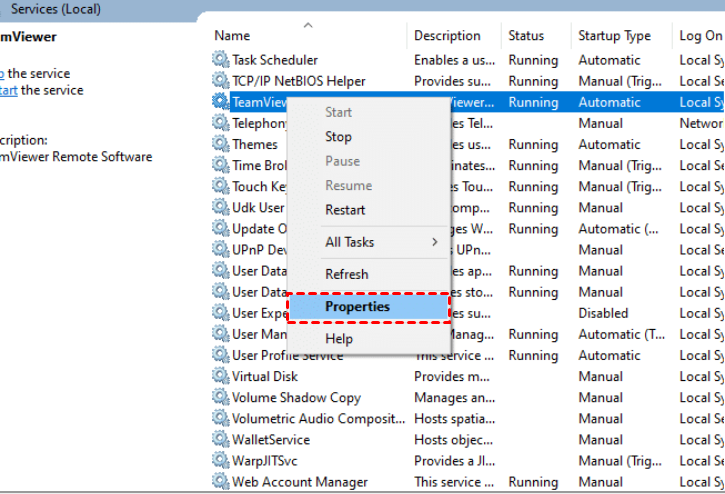
Step 3. Open Properties, navigate to Startup Type, and set it to Automatic for smooth operation.
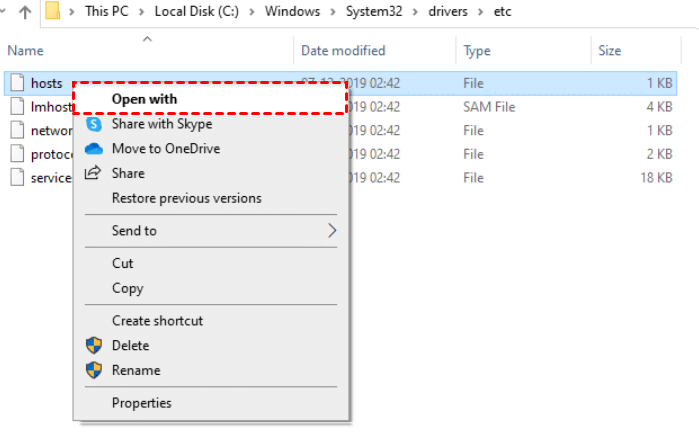
Solution 4. Delete TeamViewer from the hosts file
A corrupted TeamViewer file on your computer may be responsible for the TeamViewer not connecting error. Removing this file from your system may help resolve the issue.
Step 1. Press Win + E to launch Windows Explorer.
Step 2. Navigate to the "View" tab and check the box for "Hidden items."

Step 3. Go to the specified file path and open the "hosts" file using Notepad.
Step 4. Press Ctrl + F, type "TeamViewer," and click "Find Next."
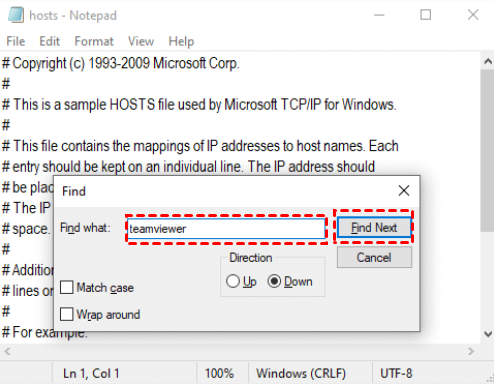
Step 5. If no results appear, there are no corrupt TeamViewer files on your PC. If you see entries like "#TeamViewer," right-click them and delete them.
Step 6. Press Ctrl + S to save the file, close Notepad, and check if the connection issue is resolved.
Solution 5. Remove assignment from the remote side
If you're still facing the "TeamViewer not connected" issue, try resetting the "Assignment" settings on the remote PC. Many users have found this solution helpful.
Here's how to do it:
Step 1. Open Settings and navigate to General.
Step 2. Under "Account Assignment," click "Remove." After a few seconds, click "Assign to account" to reconfigure the settings.
Step 3. While in this section, also enable the "Manage this device" option to ensure it appears automatically in your contact list.
Step 4. Click OK to save the changes.

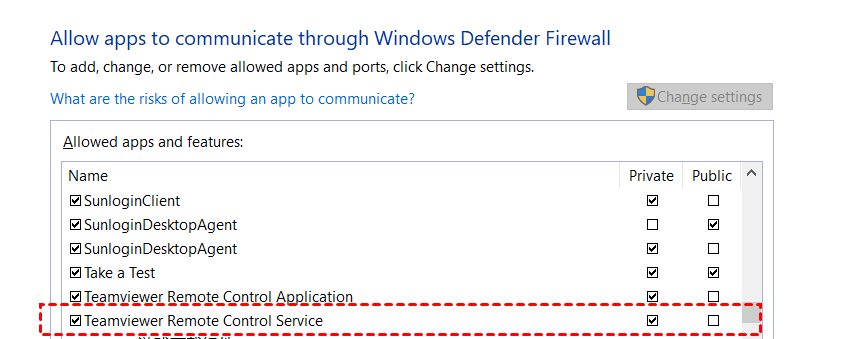
Solution 6. Allow TeamViewer to through the firewall
In many cases, Windows Defender Firewall blocks TeamViewer’s connection requests as a security measure. To resolve this, adjust your firewall settings to ensure TeamViewer is allowed to establish a connection.
Open Control Panel, go to Windows Defender Firewall > Allow apps, click Change settings, and tick TeamViewer Remote Control Service to allow TeamViewer through Windows Defender Firewall.
Solution 7. Check the proxy settings
After adjusting the firewall settings, you may need to configure the proxy settings if the TeamViewer not connecting error persists. Follow these steps:
Step 1. Open Control Panel again, go to Network and Internet > Internet Options. Under the Connections tab, click on LAN Settings.
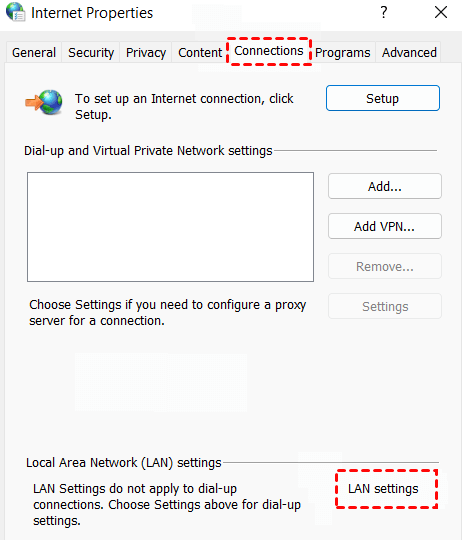
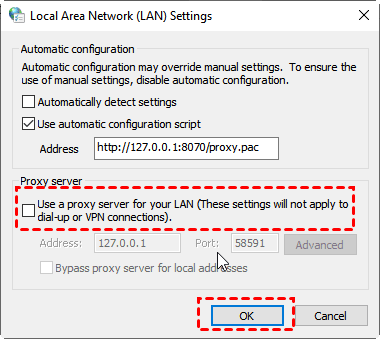
Step 2. Now, uncheck the box against Use Proxy Server for your LAN and click OK.
Solution 8. Change DNS address
If you're still encountering issues with TeamViewer not connecting, adjusting your PC’s DNS address might help.
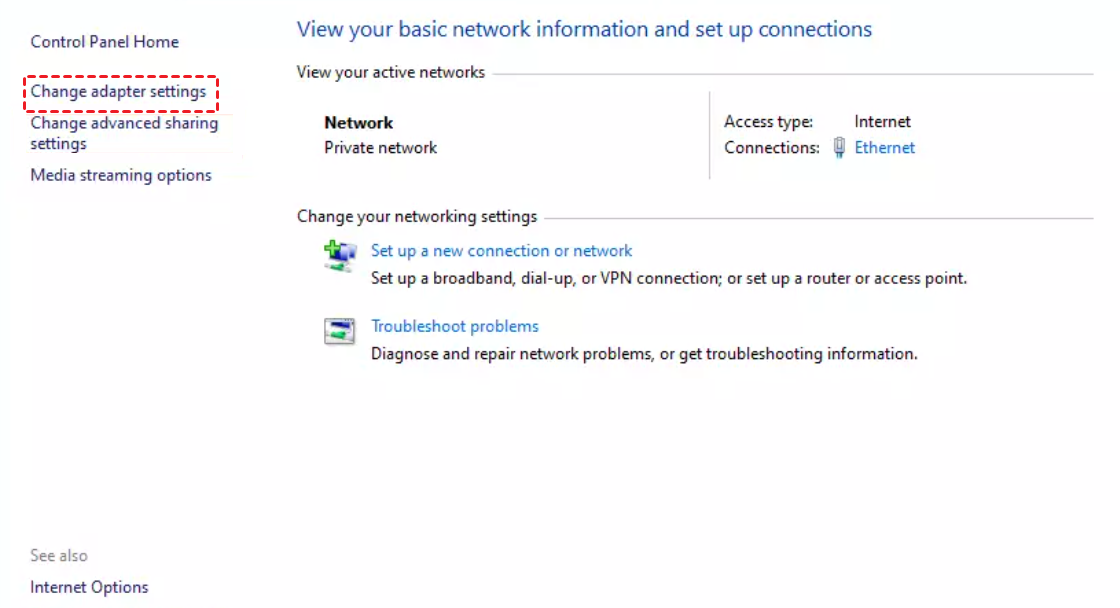
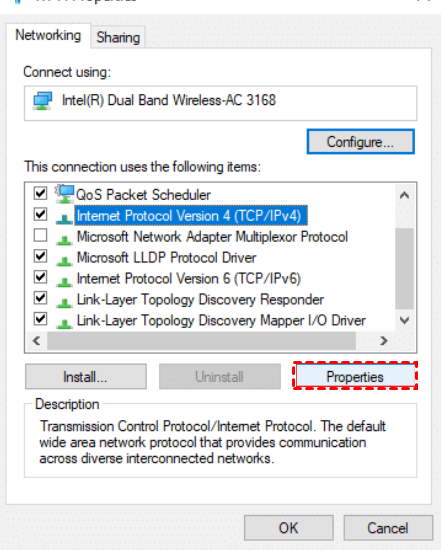
Step 1. Open the Control Panel and go to Network and Internet > Network and Sharing Center. Then, click Change adapter settings on the left panel.
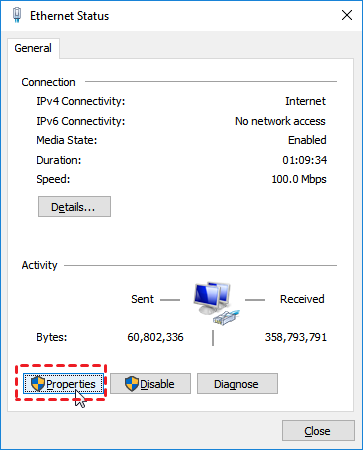
Step 2. Double-click your current network connection and select Properties.
Step 3. Find and select Internet Protocol Version 4 (TCP/IPv4), then click Properties.
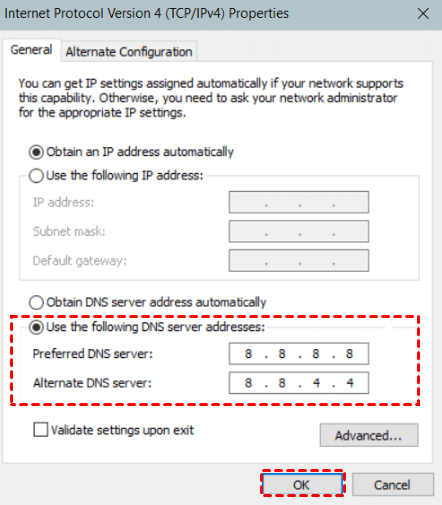
Step 4. Select Use the following DNS server addresses and enter the following:
- Preferred DNS server: 8.8.8.8
- Alternate DNS server: 8.8.4.4
Click OK to apply the changes.
Solution 9. Disable IPv6
If your device doesn’t support the IPv6 protocol, disabling it could resolve the connection issue.
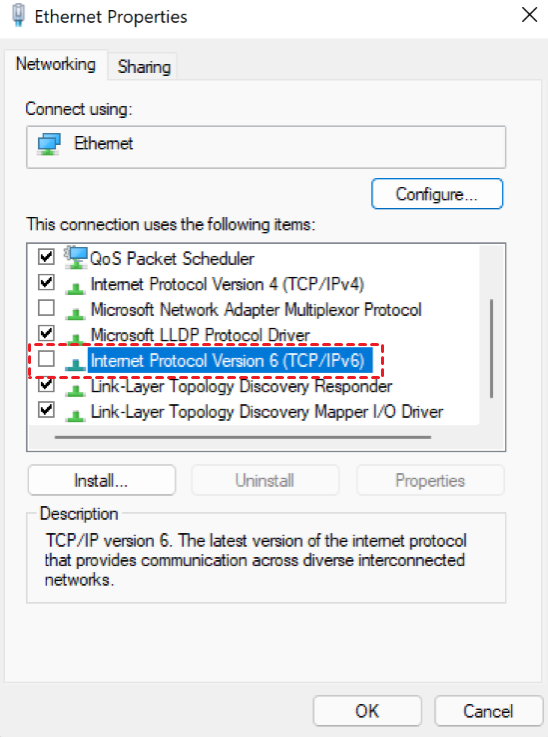
Step 1. Open the Control Panel, go to Network and Internet > Network and Sharing Center, then click Change adapter settings on the left pane.
Step 2. Double-click your active network connection and select Properties.
Step 3. Find Internet Protocol Version 6 (IPv6), uncheck the box next to it, and click OK to apply the changes.
Solution 10. Update TeamViewer to the newest version
An outdated TeamViewer client can easily results in connection problems. Always check the latest release from TeamViewer's menu page. If you find an update, download and install it.
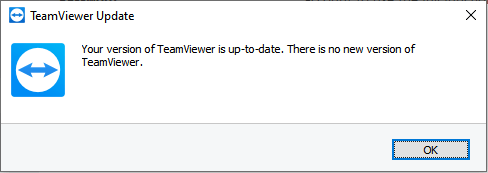
Step 1. Click the menu icon > Check for new version.
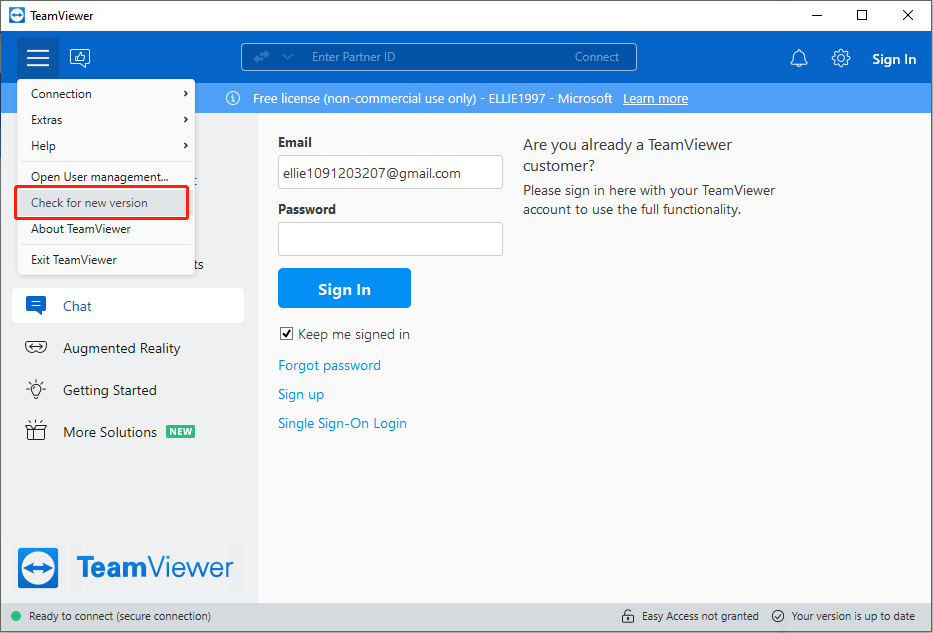
Step 2. See if your version of TeamViewer is up-to-date. Update if there are any available updates.
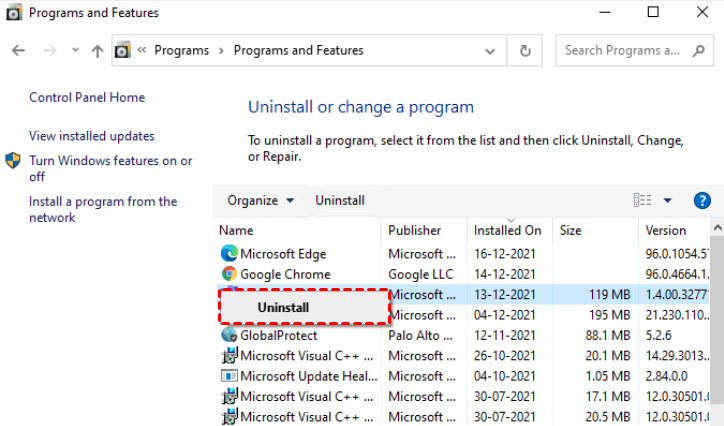
Alternatively, you can open Control Panel > Programs and Features, and right-click TeamViewer > Uninstall to uninstall TeamViewer. Then download its newest version from its official website.
Bonus tip: Try a TeamViewer alternative for seamless experience
If you're unsure why TeamViewer isn't connecting or can't seem to fix the issue, having a reliable alternative can save you time and frustration. It is highly recommended to use AnyViewer as the best TeamViewer alternative. Like TeamViewer, AnyViewer is free remote desktop software that offers fast and stable connections.
This tool allows you to control multiple Windows PCs from any device (Windows or Mac), offering both attended and unattended access. Features like multi-device file transfer, permission management, and screen sharing make it an ideal choice for both personal and business use.
Key features:
- No freezing, lagging, or connection drop issues
- Easy and quick setup and usage
- Comprehensive solutions for all remote tasks
- Privacy mode for enhanced privacy
- Multiple payment plan options available
Step 1. Install and run AnyViewer on both of your computers. Navigate to Log in and then Sign up on the Controller computer (if you have already registered on the official website, you can log in directly).

Step 2. You should now see that you have successfully logged into AnyViewer. Your device will be assigned to the account to which you have logged in automatically.

Step 3. Log in to the same AnyViewer account on the two devices, then you can click One-click control to achieve a direct connection, click View the screen to see another’s screen, or click File transfer to share files between computers.

Closing words
In conclusion, if you're facing issues with TeamViewer not connecting, it's essential to troubleshoot the common causes, such as network problems, outdated software, or incorrect settings. By following the solutions outlined in this guide, you can often resolve these errors and restore smooth remote access.
However, if the issue persists or you prefer a more reliable solution, AnyViewer serves as an excellent alternative. Offering fast, stable connections with enhanced privacy and user-friendly features, AnyViewer ensures seamless remote desktop control for both personal and business use.
