
Remote Desktop Public Mode [Definition & Tutorial]
You can choose between public and private modes when remotely accessing your business computer via the Windows Remote Desktop protocol. This post mainly introduces Remote Desktop public mode, including its definition and when and how to use it.
By Ellie / Updated on December 13, 2024
What is Remote Desktop public mode?
When utilizing the Windows Remote Desktop protocol to connect to your business computer remotely, you can configure it in either public or private mode. RemoteDesktoppublic mode serves as a security measure by restricting the storage of sensitive information on the remote machine, including security credentials, for a limited duration.

In private mode, your Windows Remote Desktop enables the caching of passwords and bitmaps on your remote computer. This convenient feature facilitates quicker access to password-protected applications like your email program. It is recommended to set it to private mode for computers frequently accessed in trusted environments like homes or workplaces.
Conversely, when operating in public mode, the remote computer refrains from caching bitmaps and passwords. Consequently, it does not retain this data, necessitating the manual entry of passwords whenever you log in to these applications. Public mode is more suitable for computers located in public spaces such as coffee shops or hotels, as it reduces the risk of unauthorized access by turning off the caching of sensitive information.
When to use Remote Desktop public mode?
When should you use Remote Desktop Connection public mode? Suppose you frequently utilize a particular computer, such as one in your home or workplace. In that case, it is advisable to set your Remote Desktop to private mode as it offers a higher level of safety. However, the risk of unauthorized access significantly increases when dealing with computers in public spaces like coffee shops or hotels. In such scenarios, configuring your Windows Remote Desktop to public mode becomes crucial, as it minimizes the likelihood of unwanted individuals entering your computer.
How to enable Remote Desktop public mode
Here are the steps to run Remote Desktop Connection in public mode:
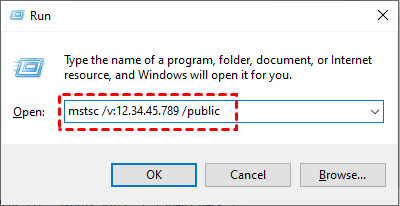
Step 1. Press Win + R to open the Run box. Type in "mstsc /v:12.34.45.789 /public". Replace 12.34.45.789 with the IP address of your business computer and click "OK" to execute the command.
Step 2. Now you have switched your Remote Desktop session to public mode.
AnyViewer: Safe & free Remote Desktop alternative
Like Remote Desktop, AnyViewer is a free remote access tool that allows users to control and access a remote computer from another location. AnyViewer ensures data safety in all scenarios using Elliptic Curve Cryptography (ECC) end-to-end encryption.
While AnyViewer and Remote Desktop serve similar purposes, there are some advantages that AnyViewer offers over Remote Desktop that make it the best Remote Desktop alternative:
- Ease of setup: AnyViewer is known for its easy use and quick setup. It doesn't require complex network configuration or firewall changes, making it more accessible for non-technical users. Remote Desktop, however, typically requires some network and firewall configurations to establish a connection.
- Accessibility outside the local network: AnyViewer allows access and control of remote devices over the internet, even if they are behind firewalls or NAT routers. This feature simplifies remote support scenarios, allowing users to access their computers from anywhere in the world. Remote Desktop, by default, is limited to local network connections. Configuring Remote Desktop over LAN requires additional setup.
- Additional features: AnyViewer offers a range of additional features that enhance the remote access experience. These include file transfer capabilities, chat functionality, and the ability to reboot and reconnect to a remote computer. While Remote Desktop provides basic remote control features, it lacks some of the advanced functionalities offered by AnyViewer.
- Commercial and personal use: AnyViewer is available for both commercial and personal use, making it suitable for individuals, small businesses, and large enterprises. Remote Desktop, on the other hand, is primarily intended for use within an organization's network and may require specific licenses for commercial usage.
Step 1. Download, install, and launch AnyViewer on both computers. On the Controller computer, go to Log in, and then click Sign up. (If you already have signed up on its official website, you can log in directly.)

Step 2. Fill in the signup information.

Step 3. Then you can see you successfully logged in to AnyViewer. Your device will automatically be assigned to the account you’ve logged in to.

Step 4. Log in to the same AnyViewer account on the two devices, and then you can achieve a direct connection by clicking One-click control to achieve unattended remote access.

Step 5. After connecting successfully, you’ll see the remote desktop. Repeat the same steps, and you can start the second remote session.
- Notes:✎...
- You can also upgrade your account to a Professional or Enterprise plan. What can a professional or enterprise plan bring you:
- More devices can be assigned to the same account for unattended remote support.
- Connect in privacy mode to protect privacy, which means the Controller can black the remote PC screen and disable the remote keyboard & mouse click.
- Faster file transfer speed. Transfer speed for a free account is 500 KB/s, and for a paid account is up to 10 MB/s.
The bottom line
In conclusion, adjusting the Windows Remote Desktop Protocol to public or private mode offers distinct advantages based on the location of your computer and the level of security required. By following the provided steps, you can easily configure your Remote Desktop session to the desired mode and enhance the overall security of your computer.
If you want a free Remote Desktop alternative, AnyViewer is highly recommended. AnyViewer is safe to use under all conditions. Besides, it has many advantages over Remote Desktop; for example, it offers more features. Try it right now.
