
How-To: Set Up Remote Desktop Connection from Computer with Multiple Monitors
This guide shows how to set up Remote Desktop Connection from computer with multiple monitors or use third-party tools like AnyViewer, Splashtop, and TeamViewer for better remote work.
By Ellie / Updated on March 14, 2025
Can you set up Remote Desktop Connection from computer with multiple monitors?
Remote Desktop Connection is a Windows built-in feature that allows you to access and control a computer or server from a different location over a network. This feature is commonly used by IT professionals, business owners, and individuals who need to work from home or access office computers from afar. The process of connecting remotely can vary, but it's generally easy to set up once you know the right steps.

In today's era of multi-tasking and complex workflows, using multiple monitors while working remotely is crucial for efficiency. With multiple monitors, users can enhance their productivity by keeping several applications open at once. But what if you need to access your computer remotely from a device that also supports multiple monitors using Remote Desktop Connection? Can you set up a remote desktop connection with multiple monitors on Windows 11 and 10? Absolutely. Let's dive deeper into how you can do that.
How to set up Remote Desktop Connection from computer with multiple monitors [3 methods]
Here are the three methods to set up Remote Desktop Connection from computer with multiple monitors.
Method 1. Accessing multiple monitors on Windows via Remote Desktop
Let’s dive straight into the process of extending your Remote Desktop connection to two or more monitors.
Step 1. Contact someone with physical access to the computer you want to connect to.
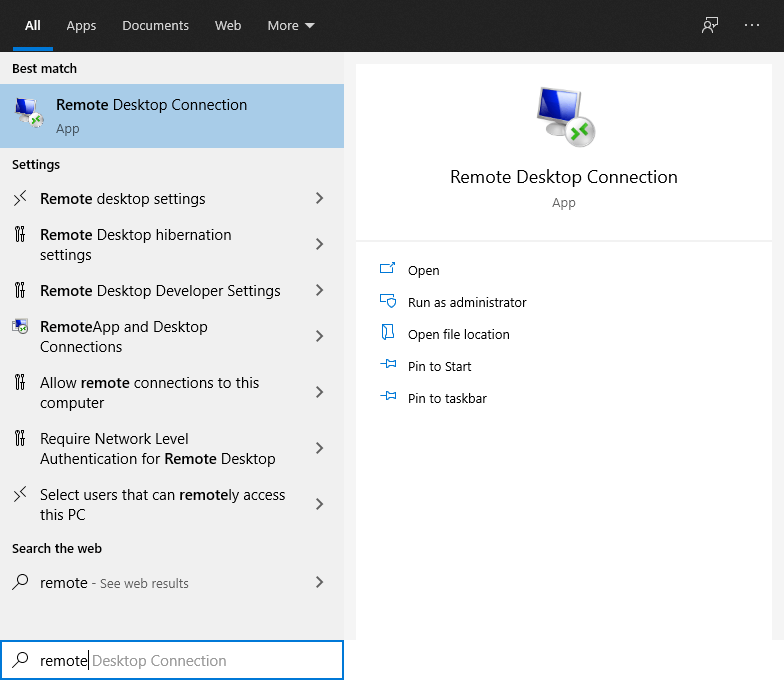
Step 2. Ask them to open the search bar, type "remote desktop," and select the "Remote Desktop Connection" app.
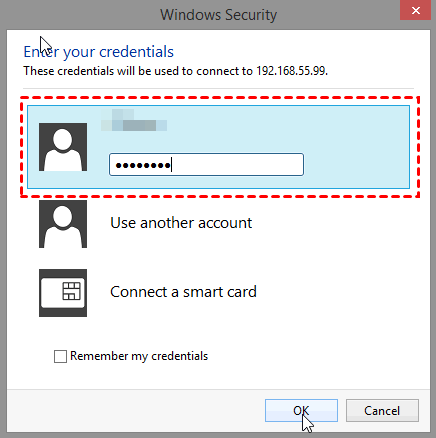
Step 3. Have them input the required credentials to grant full access to the system.
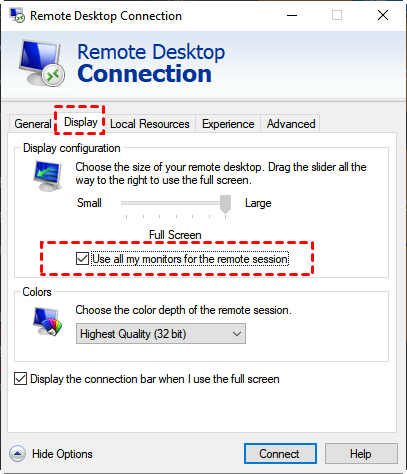
Step 4. Go to the "Display" tab in the Remote Desktop Connection window.
Step 5. Check the box labeled "Use all my monitors for the remote session."
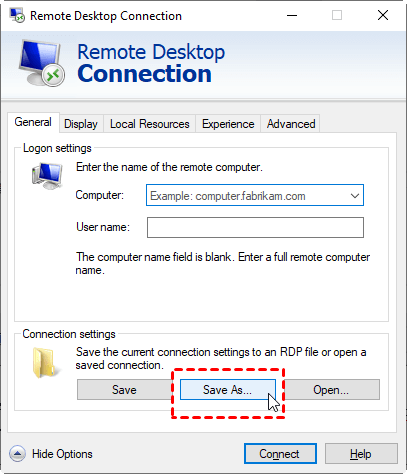
Step 6. In the "General" tab, click "Save As" to save the RDP settings as a template.This allows you to skip entering credentials and re-enabling multi-monitor options in future connections.
Method 2. Using a command to launch Remote Desktop with multiple monitors
If you can’t find the Remote Desktop Connection app through the search bar or if the multi-monitor option is missing, there’s another way to access it. You can open the app and automatically enable multiple monitors using a command.
Step 1. Press the Windows key + R to open the Run window.
Step 2. Type "mstsc.exe /multimon" and hit Enter. This will launch the Remote Desktop Connection app with the multi-monitor feature already activated.

Step 3. You can check to ensure the box for using all monitors is selected, but note that this setting only applies to the current session.
Step 4. This method doesn’t save connection settings or login credentials, making it perfect for a one-time connection.
Method 3. Manually modifying the RDP file for multi-monitor support
For those familiar with more advanced tasks, there’s a third method that involves editing the RDP file. If you're not well-versed in IT, it's best to stick with the Remote Desktop Connection app approach.
Step 1. Search for "default.rdp" on your computer and open the file with Notepad.
Step 2. To enable multi-monitor support, add the line "Use Multimon:i:1" to the file.
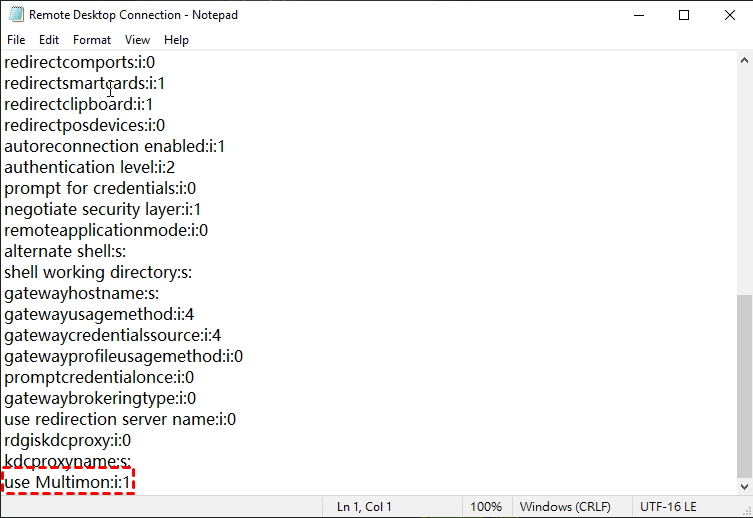
Step 3. For added security, you can specify which monitors should be visible during the remote session by adding the line "selectedmonitors:s:x1,x2,x16".
Step 4. Replace "x1, x2, x16" with the monitor numbers you want to display. The first number refers to the primary monitor.
Bonus tip: Recommended third-party software for remote multi-monitor use
If you're using a different operating system or need additional features beyond what Windows provides, there are third-party tools that can help you achieve the same multi-monitor experience. These tools often have additional functionality such as cross-platform support (Windows to Mac, etc.), advanced encryption, or cloud-based access.
Tool 1. AnyViewer [highly-recommended]
AnyViewer provides an exceptional dual-screen remote control experience with minimal latency and advanced security. Ideal for professionals who need to manage multiple tasks simultaneously, it ensures smooth and responsive access to remote devices.
To set up a remote desktop connection with multiple monitors using AnyViewer, follow these steps:
Step 1. Download and install the AnyViewer application on both your local device and the remote computer.
Step 2. Open AnyViewer, log into your account, and choose the remote device you wish to access. Click One-click control to achieve unattended remote access.

Step 3. After connecting, the remote computer’s screens will be displayed as separate tabs within the interface.
Step 4. To view each screen on a different monitor, drag one of the screen tabs out of the title bar and drop it into a separate window. You can then move the windows to your two monitors and adjust them to maximize or display in full-screen mode for an optimal dual-screen experience.

Tool 2. Splashtop
Splashtop is a robust remote desktop solution that supports multi-monitor configurations, allowing users to easily switch between screens or view them side by side for a seamless workflow. With secure connections and a range of advanced features, it is a reliable choice for businesses and IT professionals.
To set up and use Splashtopfor a multi-monitor remote session, follow these steps:
Step 1. Download and install the Splashtop application on both your local device and the remote computer.
Step 2. On the remote computer, navigate to the display settings and make sure multi-monitor functionality is enabled. Otherwise, Splashtop dual monitor may not working well.

Step 3. Launch Splashtop, log into your account, and select the remote computer you wish to connect to.
Step 4. Once connected, use the toolbar to switch between screens or activate multi-monitor mode to view all screens simultaneously.

Tool 3. TeamViewer
TeamViewer simplifies switching between multiple monitors during remote connections. If the remote device has the same number of screens as your local setup, you can easily distribute them across your monitors for a smooth, seamless experience.
To set up multi-screen remote access using TeamViewer, follow these steps:
Step 1. Open TeamViewer (Classic) and navigate to the Remote Control tab.
Step 2. Enter the TeamViewer ID of the remote device in the "Control Remote Computer" field and click "Connect."
Step 3. When prompted, enter the password from the remote computer's TeamViewer interface (or a pre-configured personal password) and click "Log On."
Step 4. Once connected, go to the View tab and select how you’d like to display the remote screens:
- Choose a specific monitor to view.
- Display all monitors simultaneously in a single window.
- Enable Monitors as individual tabs to open each screen in a separate tab. Otherwise, TeamViewer may not detecting the other monitor.

Step 5. If "Open new connections in tabs" is disabled in the Remote Control options, the remote monitors will open in separate session windows.

Conclusion
In conclusion, setting up Remote Desktop Connection from computers with multiple monitors is a straightforward process, and there are multiple methods to achieve this depending on your preferences and technical comfort. Whether you're using Windows' built-in options or third-party tools like AnyViewer, Splashtop, or TeamViewer, each offers a seamless multi-monitor experience that boosts productivity. With these options, you can effectively manage and view multiple screens remotely, ensuring your workflow remains uninterrupted and efficient.
