
Quick Assist the Requested Operation Requires Elevation [4 Ways]
It can be annoying to see your computer prompting the error - "Quick Assist the requested operation requires elevation". If you are experiencing this problem, don't worry because you have come to the right place. This article offers four ways to help you solve this problem.
By Carolyn / Updated on December 13, 2024
How do I fix the requested operation requires elevation?
When you try to access files or install programs on your computer, you may encounter the error message "The requested operation requires elevation". Are you looking to find a quick way to solve the Quick Assist the requested operation requires elevation? This error indicates that the task you are trying to perform on your computer requires additional privileges or authentication by an administrator.

Encountering this problem can be frustrating, especially if you don't understand it and don't know how to fix it. If you are experiencing the same problem, you don't have to panic. In this article, we will guide you with the right solution to fix this error.
How to fix Quick Assist the requested operation requires elevation [4 ways]
In some cases, you may receive an error message that reads "Requested operation requires elevation" when using Quick Assist. This article describes 4 ways to resolve the problem of Quick Assist the requested operational requires elevation. You can choose the one way that works right for you.
Way 1. Run the Quick Assistas an Administrator
When you run Quick Assist as an administrator, it is given administrative-level privileges to perform most of the tasks normally restricted to regular user accounts on Windows.
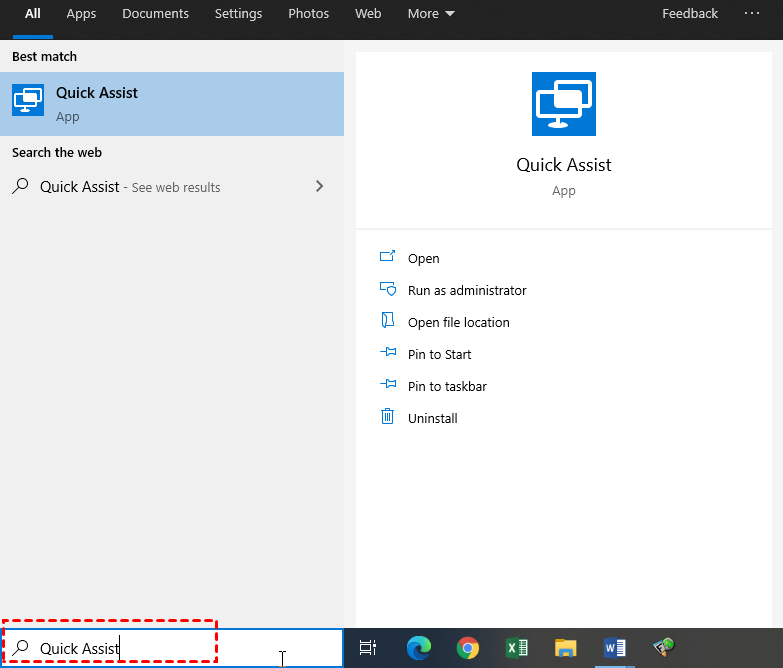
Step 1. From the Start menu, look for Quick Assist. Or you can Press “Win + S”, and type “Quick Assist” in the search box.
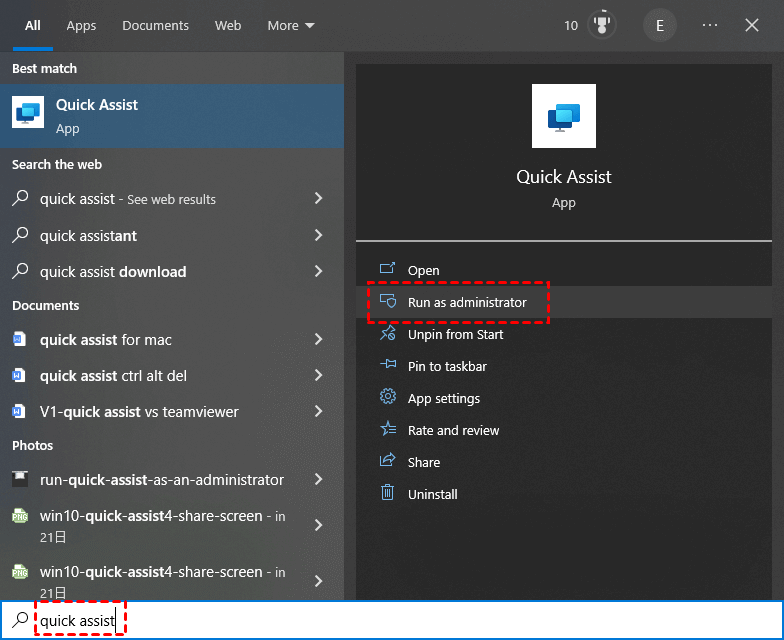
Step 2. Then select “Run as administrator” on the right to open Quick Assistant in administrator mode.
Way 2. Disable UAC
UAC is a security feature in Windows that restricts you from performing Quick Assist with your regular account. Therefore, you can try disabling UAC to see if it is the culprit. First, follow the instructions below:
Step 1. Launch the Control Panel by searching on the Windows search bar.
Step 2. Search to find "Security and Maintenance" and click on it.

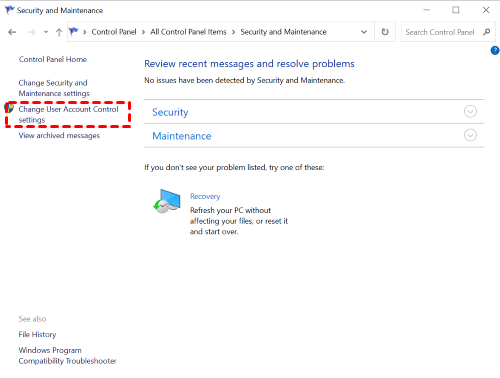
Step 3. Look for "Change User Account Control Settings" on the left and click on it.
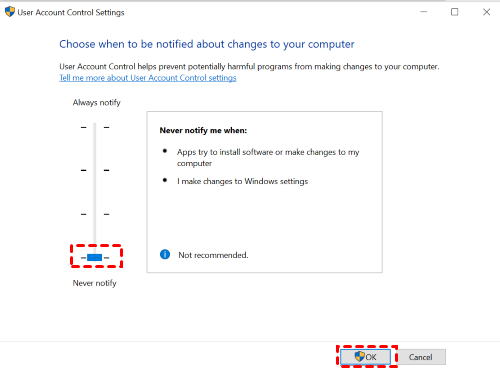
Step 4. Drag the blue slider to the bottom and press “OK” to save the changes.
Way 3. Run SFC Scan
Corrupted or damaged applications on your system may prompt the error the requested operation requires elevated privileges. Let's fix it with an SFC scan.
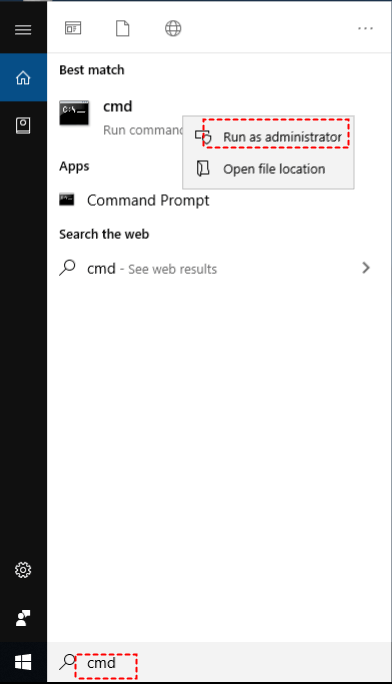
Step 1. Search for a "command prompt" by typing "cmd" into the Windows search box.
Step 2. Right-click the result to run it as administrator.
Step 3. Enter "sfc /scannow" and press the “Enter” key.
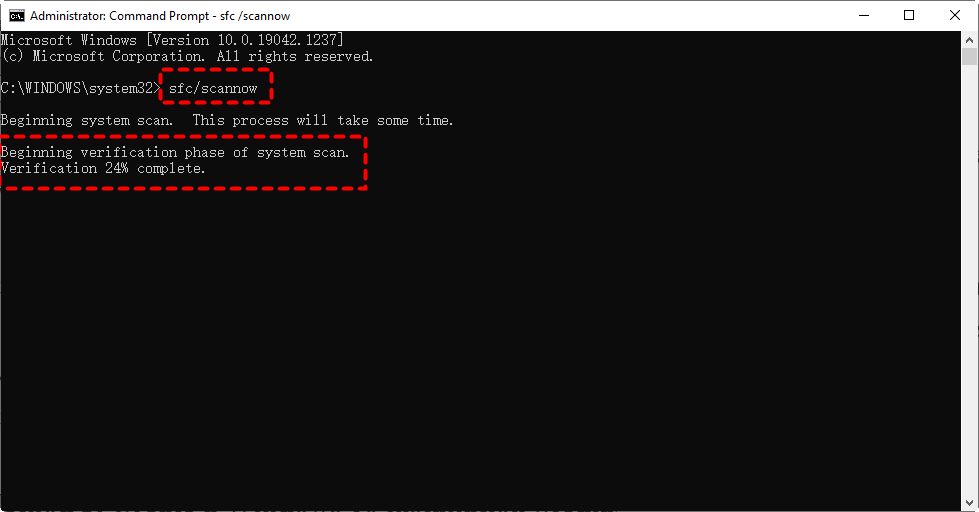
Step 4. The scan will run and repair any damaged applications.
Way 4. Temporarily disable anti-virus software
Sometimes, antivirus software may interfere with Quick Assist, triggering an error such as "The requested operation needs to be elevated". If this is the case, we recommend that you temporarily disable the antivirus software and then try to perform the operation again.
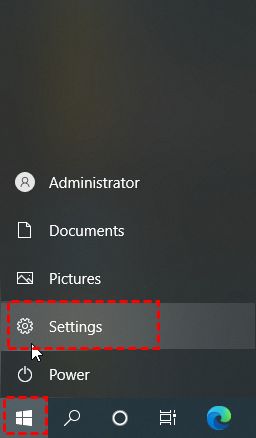
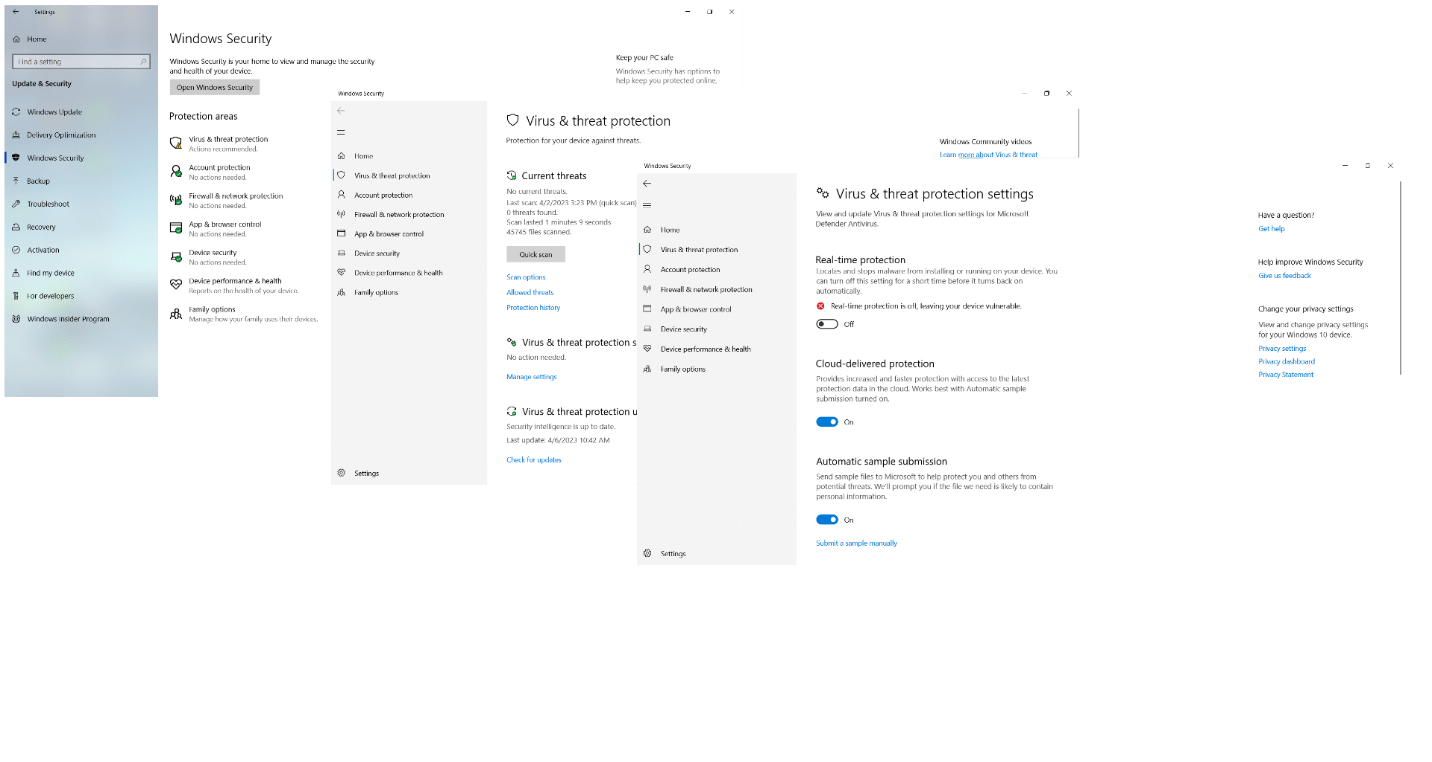
Step 1. Open the Windows Start menu located in the lower left corner of the screen and select the “Settings” gear icon.
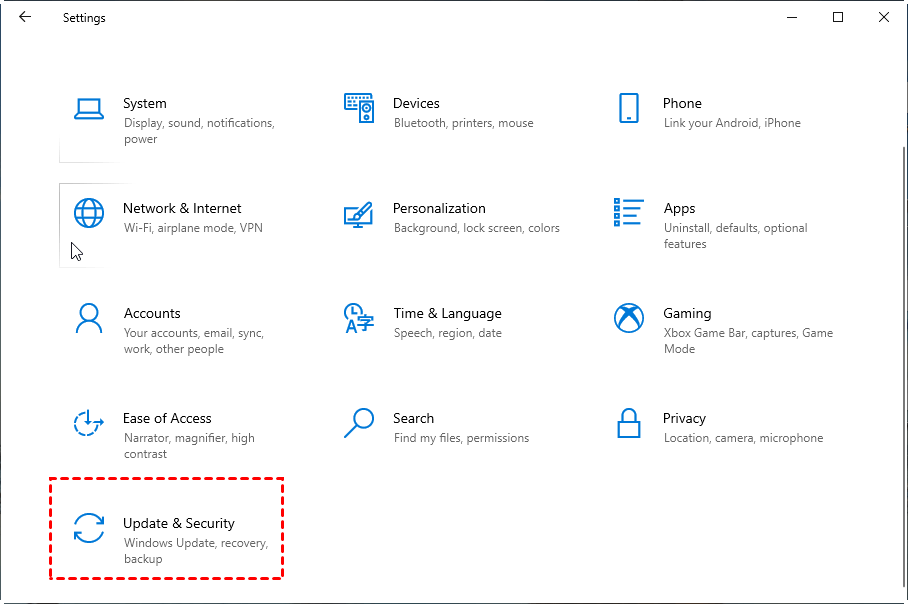
Step 2. Click on the “Update and Security” option, then navigate to the left menu and open “Windows Security”.
Step 3. Select the "Virus and Threat Protection" option once you're in the Windows Security window.
Step 4. Navigate to "Virus and Threat Protection Settings" and click the "Manage Settings" option.
Step 5. To disable this feature, turn off the "Real-Time Protection" switch. This will temporarily disable Windows security tools on your computer.
Bonus tip: The perfect alternative to Quick Assist for remote support
Tired of fixing Quick Assist not working? Why not try a stable and safe Quick Assist alternative to AnyViewer? It is a free remote support software providing stable, fast remote connections and works with more Windows operating systems. In addition, you can use it to provide not only attended remote support, but also unattended remote support. Download the Quick Assist alternative for free, install it, and run it on two devices.
Advantages of AnyViewer over quick assist:
- AnyViewer supports all Windows operating systems and Windows Server, while Quick Assistant is only available on Windows 10, 11.
- AnyViewer has flexible file transfer features while Quick Assist lacks file transfer features.
- AnyViewer allows chatting during a remote session, which is not supported by Quick Assist.
- AnyViewer has a fast and stable connection environment, while Quick Assist is slow to respond and often has problems.
Option 1. Unattended remote support
When you want to access an unattended device through AnyViewer and provide remote support, you can follow the steps below. This method is suitable for remote support of your own computer or a security device that you trust.
Step 1. Install and start AnyViewer on both computers, then go to "Login" on both computers and press "Sign up" (you can log in immediately if you have already joined its official website).

Step 2. Enter your information and click “Sign up” to create an AnyViewer account.

Step 3. You can then see that you have successfully logged in to AnyViewer. Your device will be automatically assigned to the account you logged in with.

Step 4. Go to "Devices", click on the computer you want to connect to and click "One-click control" to establish a session.

- ★Tips: AnyViewer free users support unattended remote access for only 3 assigned devices. It is recommended that you upgrade to a cost-effective Professional or Enterprise plan to enjoy the following rights:
-
Assign up to 100 devices for unattended access.
- Enjoy up to 10 concurrent sessions.
- Access in Privacy Mode, which allows you to disable the keyboard and mouse on the remote PC and black out the remote screen.
- Start a connection with high-image quality.
Option 2. Attended remote support
When you want to access an attended device through AnyViewer and provide remote support, you can perform the following steps. This method is suitable for remote support of unfamiliar devices or when a higher level of security is required.
Step 1. Launch AnyViewer on the host computer, go to the “Connect” section, copy your “device ID” and send it to your partner.
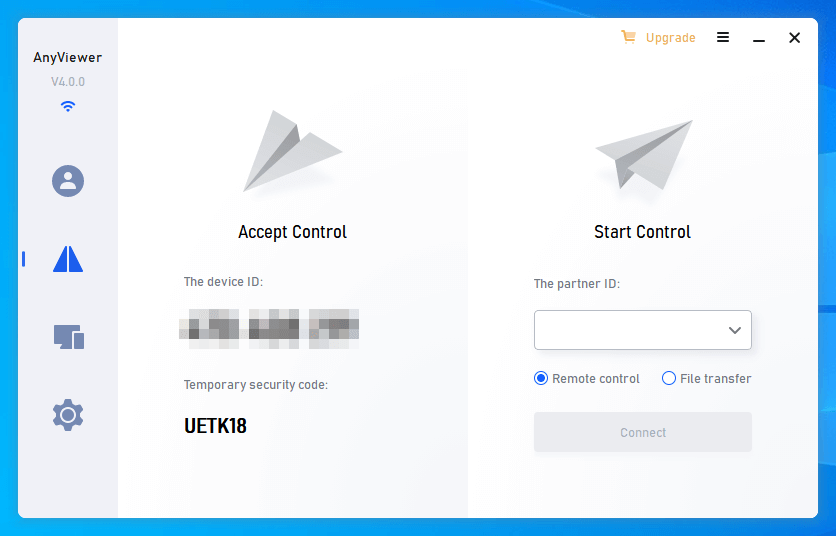
Step 2. Launch AnyViewer on the client's computer, go to the "Connect" section, enter the Partner ID, tick “Remote control” mode, and click “Connect”.
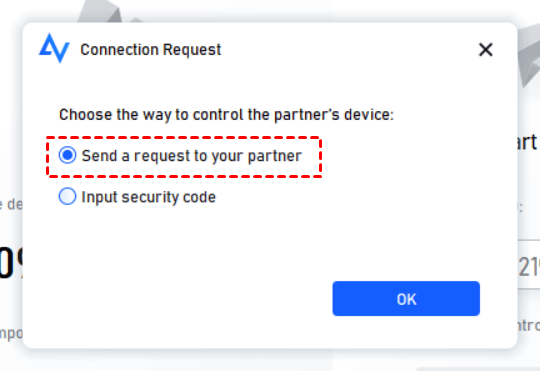
Step 3. Select "Send a request to your partner" and press the "OK" button.
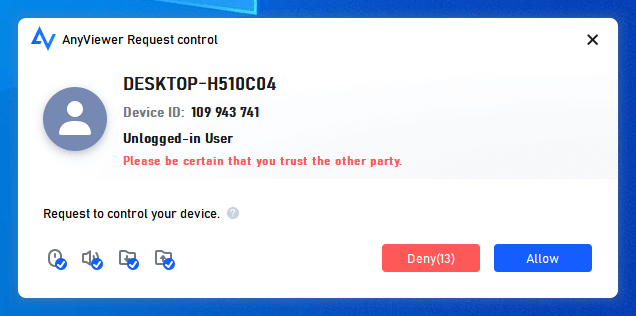
Step 4. The host computer will receive a request. To configure the remote control, click the "Allow" button.
Conclusion
Quick Assist helps users to perform remote tasks, but it often encounters some troubles. This article helps you how to fix the problem that the Quick Assist the requested operation requires elevation. If you are looking for other remote access tools to avoid another error, then AnyViewer is the best choice for you.
