
Top 4 Ways for NAS Drive Remote Access
Curious about NAS Drive remote access? Delve into this post that extensively covers four distinct methods for seamless remote access to your NAS drive. Keep reading to uncover the details if you're intrigued.
By Ellie / Updated on December 13, 2024
What is NAS drive?
A NAS (Network Attached Storage) drive is a storage device that is connected to a network and provides file-level data access to various clients. Unlike traditional external hard drives that are directly connected to a single computer, a NAS drive is a standalone device that can be accessed by multiple devices simultaneously over a local area network (LAN) or the internet.
How to achieve NAS drive remote access [4 ways]
Explore various methods for NAS drive remote access with the following approaches:
- Connect to the NAS drive on your desktop through AnyViewer
- Establish a personalized ID or address using QuickConnect
- Configure a hostname for your NAS IP address through DDNS
- Utilize port forwarding to map a port on your router to the IP address of your NAS
Way 1. AnyViewer [Most-recommended]
AnyViewer simplifies the process of remote desktop access, allowing users to effortlessly connect to and manage a computer or device from anywhere. When the NAS drive is linked to a computer or device, accessing the drive remotely is a straightforward task with AnyViewer.
Here's how you can use AnyViewer to access a computer with a connected NAS drive:
Step 1. First, install AnyViewer on the computer connected to the NAS drive. Get it from the official website.
Step 2. If you don't have an AnyViewer account, create one.

Step 3. Install AnyViewer on the device you want to use (like another computer or mobile). Log in with your account.

Step 4. Find the computer with the NAS drive on your AnyViewer list. Click "One-click control" to connect remotely.

Step 5. Once connected, use the remote desktop to access the NAS drive just like you're right there at the computer. It is also recommended to upgrade to a Professional or Enterprise plan for a better remote access experience.
Way 2. QuickConnect
QuickConnect provides a convenient way to access DSM over the internet by using a customizable ID or address, like QuickConnect.to/example (or QuickConnect.cn/example if in China). To identify the packages and services compatible with QuickConnect, consult the relevant article.
To get started with QuickConnect, follow the steps outlined below.
Step 1. Depending on your DSM version, follow these steps:
- For DSM 7.0 and above: Navigate to Control Panel > External Access > QuickConnect.
- For DSM 6.2 and below: Navigate to Control Panel > QuickConnect.
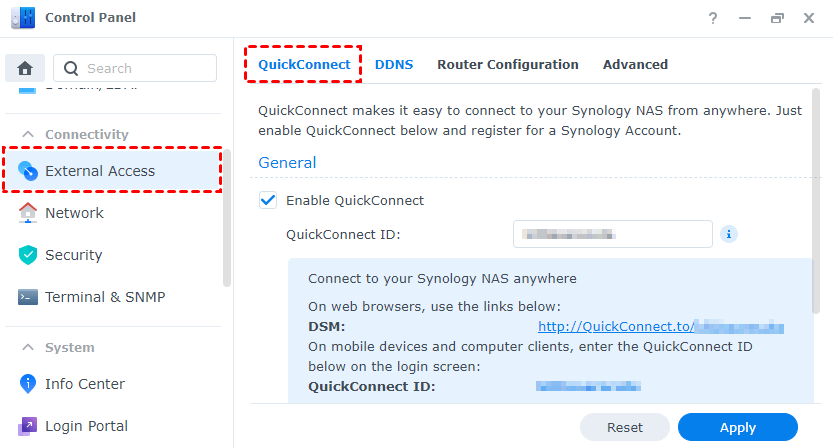
Step 2. Check the Enable QuickConnect box. If you haven't signed in or registered for a Synology Account, click Log in to or register a Synology account.
Step 3. Enter your chosen QuickConnect ID in the QuickConnect ID field. Check the Terms of Service and Privacy Policy box, then click Apply.
Step 4. If the QuickConnect ID is available, a section will appear showing your QuickConnect ID and the DSM access address.
Step 5. For additional options or permission settings:
- For DSM 7.0 and above: Click the Advanced Settings button.
- For DSM 6.2 and below: Go to the Advanced tab.
Step 6. With QuickConnect active, access DSM services in these ways:
- Using a computer: Open a web browser and enter your QuickConnect URL (e.g., http://QuickConnect.to/example123 or http://QuickConnect.cn/example123). You'll be redirected to the DSM login screen.

- On a mobile device: Open a Synology mobile app (e.g., DS file). Enter your QuickConnect ID, DSM account, and password, then click Login.
Way 3. DDNS
DDNS (Dynamic Domain Name System) streamlines the process of connecting to your Synology NAS over the Internet by associating a hostname, like example123.synology.me, with its corresponding IP address.
Adhere to the following steps to learn how to access NAS drive remotely using DDNS.
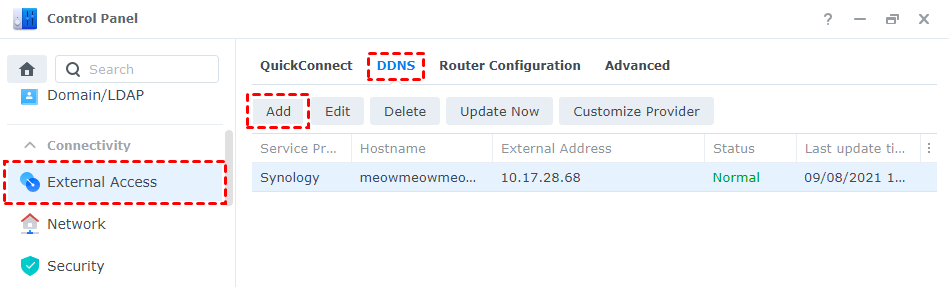
Step 1. Head to Control Panel > External Access > DDNS.
Step 2. Click on Add.
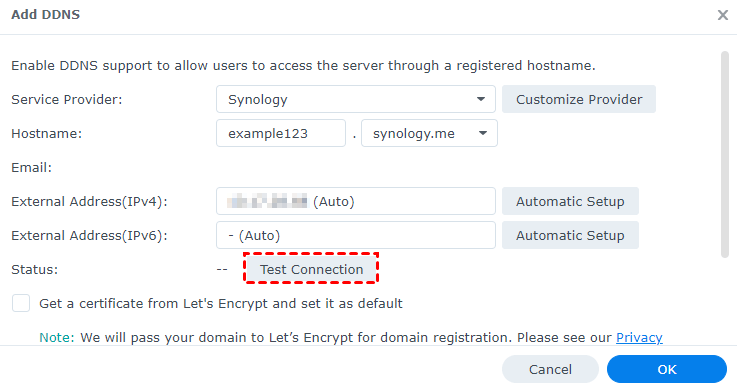
Step 3. A dialog box will pop up, allowing you to modify the following settings:
- Service provider: Choose a provider. Opt for Synology for a free hostname or select another provider if you prefer.
- Hostname: Enter a DDNS hostname, like example123.synology.me.
- Username/Email: For non-Synology providers, input your username/email.
- Password/Key: For non-Synology providers, provide your password/key.
- External address: For non-Synology providers, enter the external IP address of the Synology NAS using the hostname.
Step 4. Click Test Connection to verify the accuracy of the settings.
Step 5. If Synology is your service provider, customize the following settings:
- Get a certificate from Let's Encrypt and set it as default: Check this box to apply a Let's Encrypt SSL certificate for your Synology DDNS and set it as the default for DSM. If an SSL certificate is already matched, the checkbox will be disabled.
- Enable Heartbeat: Check this box to receive status alerts for the mapped hostname.
Step 6. Click OK to save and complete the process.
Step 7. Proceed to the next section to set up port forwarding on your NAS.
Once the setup is done, access your Synology NAS over the Internet by entering the DDNS hostname in a web browser, followed by a colon and the DSM port number (5000 for HTTP, 5001 for HTTPS). For instance, if your DDNS is example123.synology.me and you're using HTTPS, type "example123.synology.me:5001" to access DSM.
Way 4. Port forwarding
Port forwarding is a method that lets outside devices access services on your local network. It works by linking an external port on your router to the internal IP address of your NAS. To make this happen, you need to set up port forwarding rules on your NAS.
Your NAS has an IP address that identifies it, but for different services like MailPlus or Surveillance Station, you might want to create separate rules. This means opening specific ports for each service so that external sources can access them using the service's unique IP address and port number.
Before you start setting up these rules, make sure you have administrative access to your router. For detailed guidance on configuring your router for DSM, check the articles for DSM 7.0 and DSM 6.2. Follow the steps below or watch a video tutorial for help with setting up port forwarding rules.
Step 1. Navigate to Control Panel > External Access > Router Configuration.
Step 2. Click Create, then select Set up Router to launch the setup wizard.
Step 3. Start the wizard, and DSM will test the necessary network settings. There are two possible results:
- If a UPnP router is detected, click Next, view your router information, and click Done to finish.
- If no UPnP router is detected, click Next, manually set up a connection to your router by entering the information, and click Done to complete the setup.
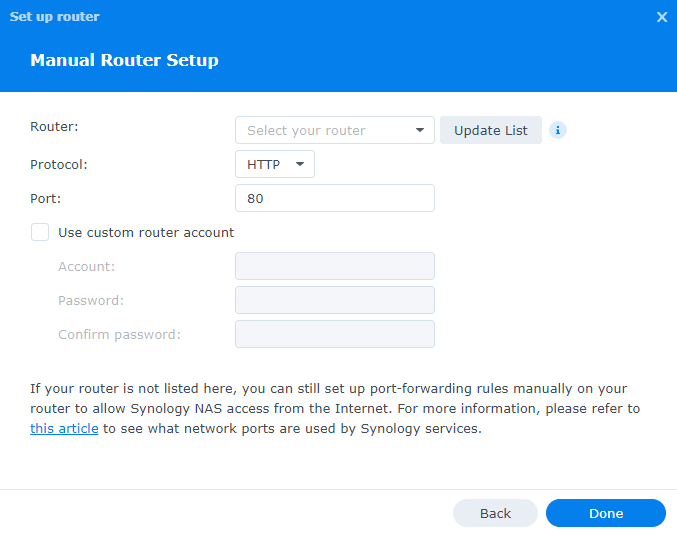
Step 4. Click Create to start the port forwarding setup wizard.
Step 5. Choose one of the setup methods and follow the instructions:
- For built-in applications (e.g., FTP, Web Station), select them and click Done.
- For custom ports, add a port forwarding rule by defining the protocol, local port, and router port. Then, click Done.
Step 6. Click Done again on the Router Configuration page to wrap up the setup process.
The bottom line
In conclusion, achieving seamless NAS drive remote access is pivotal for efficient data management. The explored methods—AnyViewer, QuickConnect, DDNS, and Port Forwarding—offer diverse approaches catering to different user preferences. Whether through user-friendly interfaces or technical configurations, AnyViewer is the most recommended tool that empowers users to control any PC remotely and effortlessly access their NAS drives remotely, ensuring convenience and flexibility in data utilization.
