
Top 5 Built-in Microsoft Remote Support Tools
Microsoft's remote support tools are essential for IT professionals handling remote device management and troubleshooting. This post introduces the top five built-in tools by Microsoft. Keep reading to discover their features and benefits for your remote support needs
By Ellie / Updated on November 28, 2025
Does Microsoft have built-in remote support tools?
Remote support tools are essential for IT professionals to manage, troubleshoot, and support remote devices. Microsoft offers a range of built-in tools designed to facilitate efficient remote IT support services. These tools allow you to take remote control of another person's computer so you can help them troubleshoot it while you're on the phone with them.

In the following sections, we’ll walk you through five of the most commonly used Microsoft-built-in remote support tools that can help IT teams streamline troubleshooting and device management. While Microsoft provides solid native options, it’s worth noting that many powerful third-party remote support tools are available, offering additional features, cross-platform compatibility, and more flexible deployment options for different business needs.
The built-in Microsoft remote support tools [5 options]
Here are the top five built-in Microsoft remote support tools, along with detailed steps for using them.
Option 1. Remote Desktop (RDP)
Remote Desktop Protocol (RDP) is a feature that allows users to connect to another computer over a network connection. It provides access to the desktop of the remote computer and lets you control it as if you were sitting right in front of it.
Key features include:
- Access to files and applications: Access to files and applications on the remote computer.
- Multiple sessions: Supports multiple remote sessions simultaneously.
- Security: Strong encryption and security features.
- Integration: Easy integration with Active Directory for enterprise environments.
Let’s see how to use Remote Desktop (RDP) to provide remote support on Windows 10 and 11:
Configure the PC you want to access remotely by following these steps:
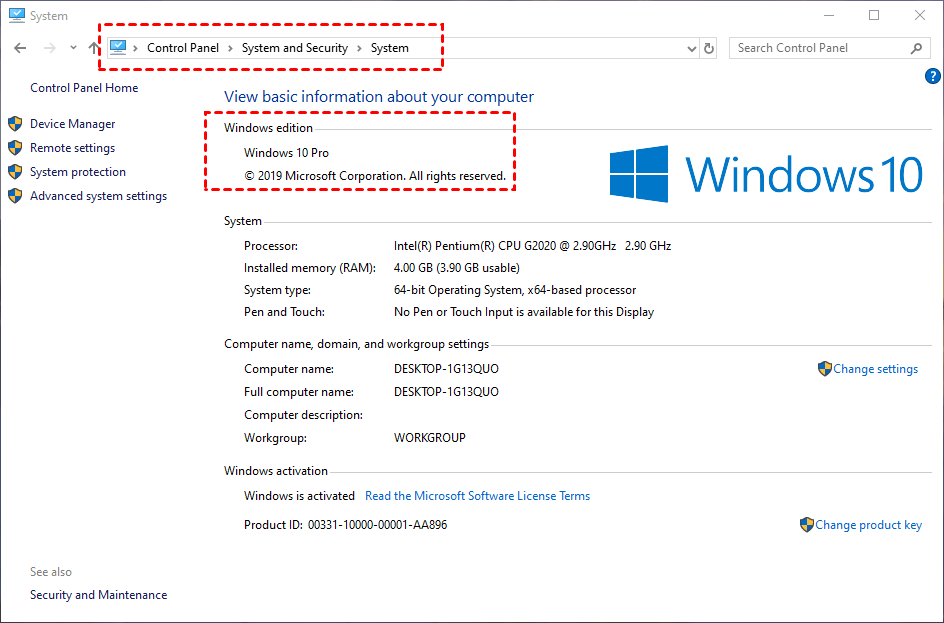
Step 1. Verify you have Windows Pro or a higher version. To do this, navigate to Control Panel > System and Security > System and check the Windows edition section. If you have Windows Home or Standard, you will need to upgrade, as these versions do not support Remote Desktop Protocol (RDP).
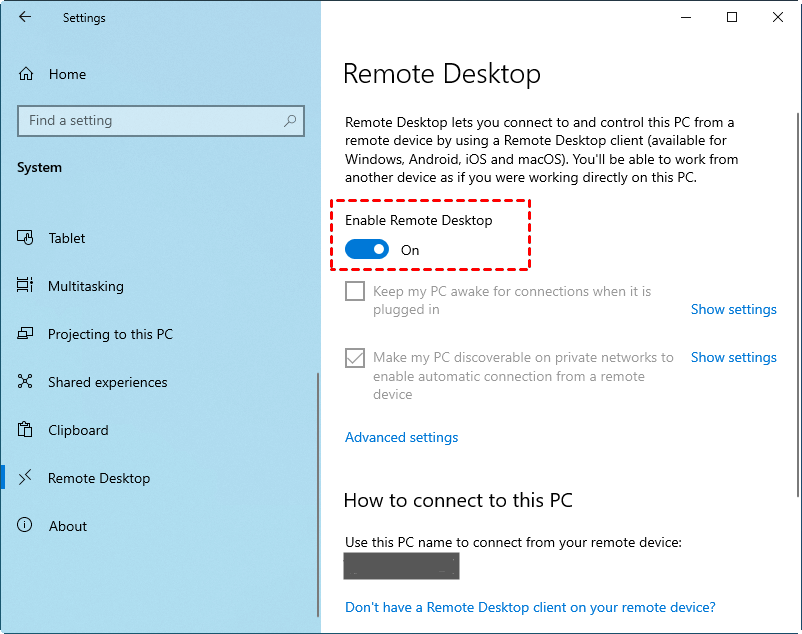
Step 2. Once confirmed, go to Start > Settings > System > Remote Desktop, and switch on Enable Remote Desktop.
Step 3. Take note of the PC's name listed under How to connect to this PC. This information will be necessary for future connections.
Use Remote Desktop to connect to the configured PC by following these steps:
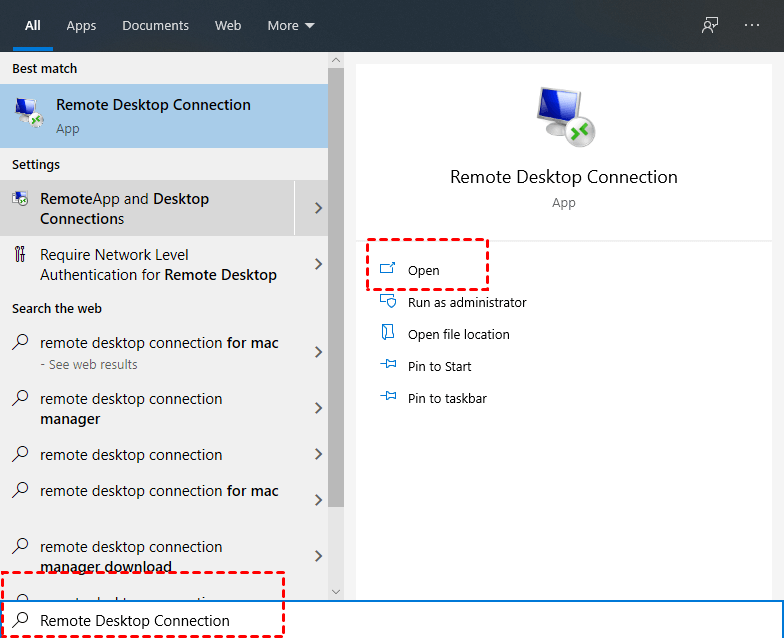
Step 1. In the taskbar search box, enter Remote Desktop Connection and select it from the results.
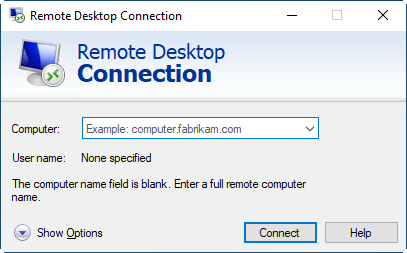
Step 2. In the Remote Desktop Connection window, input the name of the PC you want to connect to and click Connect.
Option 2. Quick Assist
Quick Assist is a simple tool included with Windows 10 and Windows 11 that allows you to receive or provide assistance remotely. It's particularly useful for troubleshooting and support purposes.
Key features include:
- Easy setup: Minimal setup is required, making it user-friendly.
- Real-time collaboration: View or control a user's screen to guide them through troubleshooting steps.
- Security: Sessions are encrypted to ensure data privacy.
See how to use this built-in Microsoftremote support tool on Windows 10 and 11:
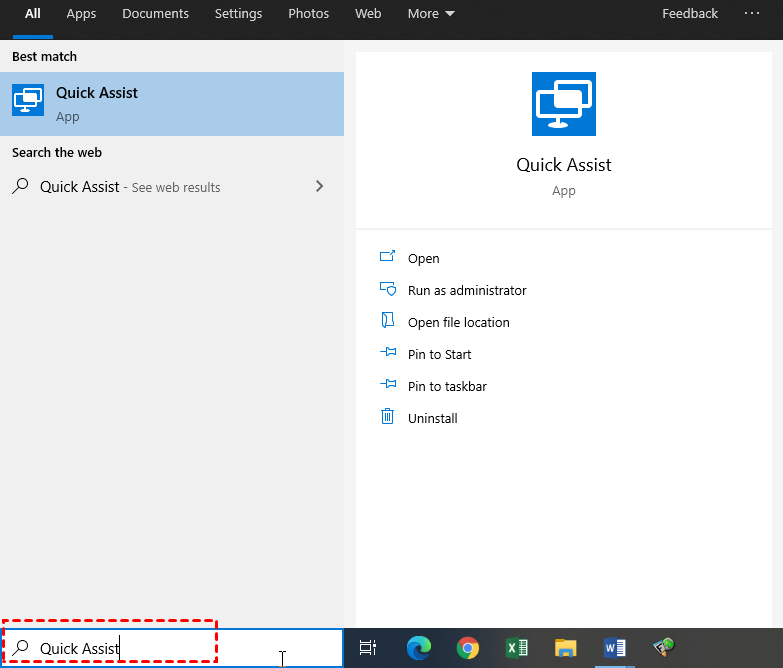
Step 1. On your computer, search for "Quick Assist" in the search box.
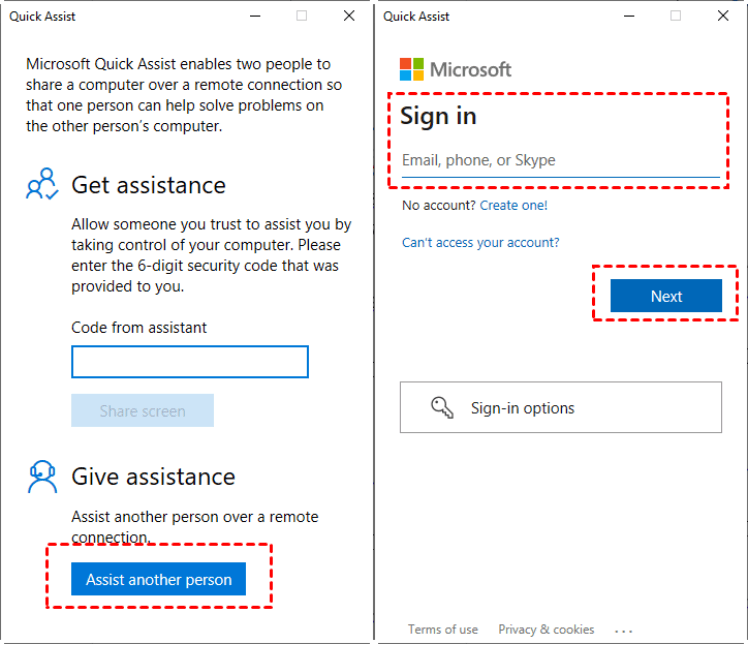
Step 2. In the Quick Assist window, click on "Give Assistance" and then select "Assist another person."
Step 3. A new window will appear. Enter the corresponding email or phone number, or use your Skype account if you have one, and click "Next."
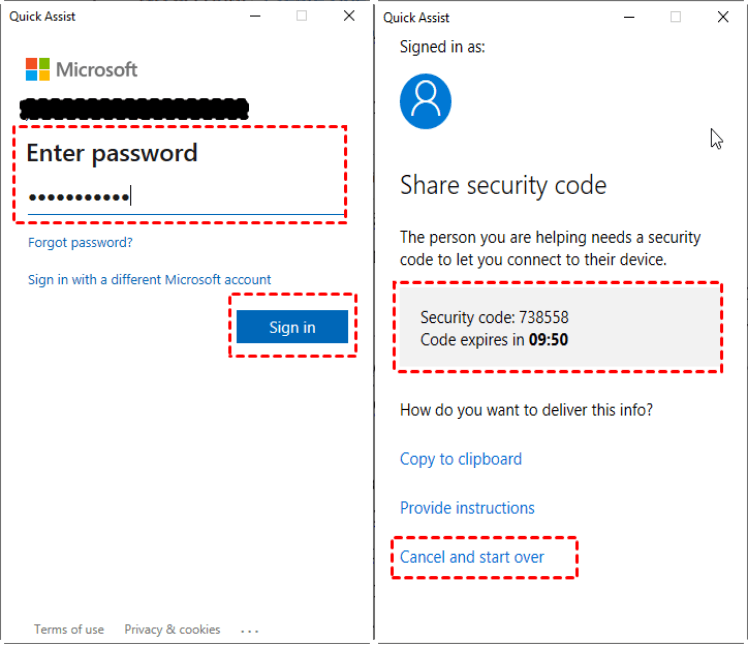
Step 4. Input your Microsoft account password and select "Sign in."
Step 5. You will receive a security code valid for 10 minutes. If the code expires, you can click "Cancel and restart" to get a new one.
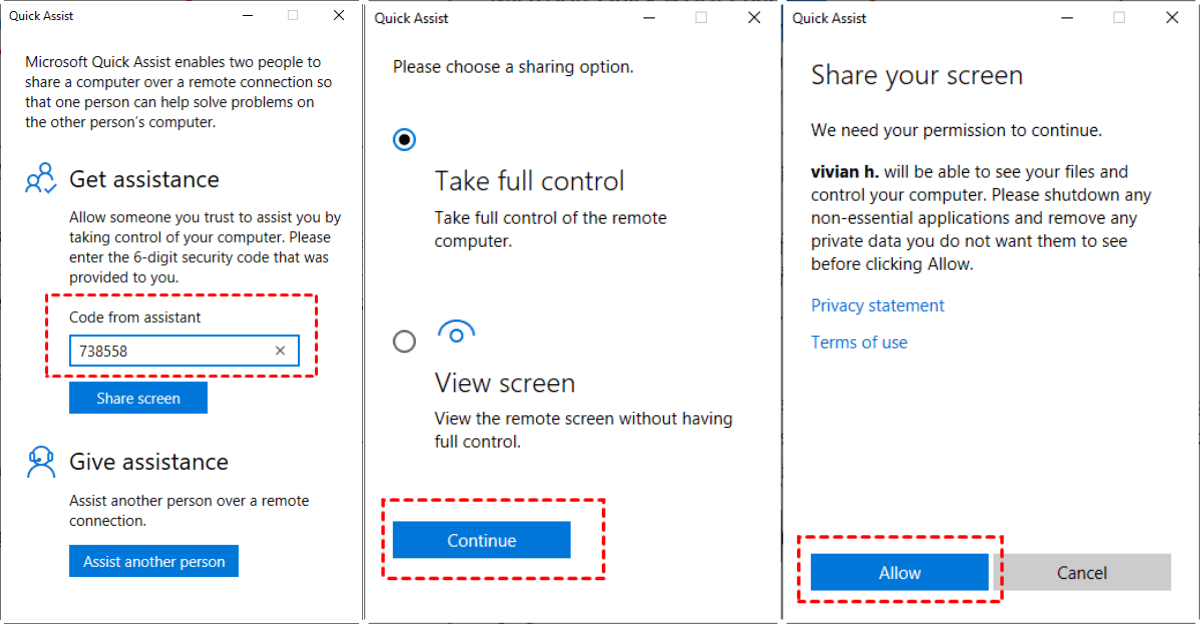
Step 6. On the computer needing remote support, open "Quick Assist," enter the security code on the main interface, and click "Share Screen."
Step 7. Choose either "Full Control" or "View Screen," then click "Continue."
Step 8. On the computer receiving support, click "Allow" in the "Share your screen" pop-up window to enable remote assistance between the two Windows 10 computers.
Step 9. You can now assist with the remote computer.
Option 3. Windows Remote Assistance
Windows Remote Assistance is another tool designed to help users get assistance from someone else. It's similar to Quick Assist but offers a few different features.
Key features include:
- Interactive sessions: Allows an invited person to view your computer screen and, with permission, control your computer.
- Invitation-based access: Users must send an invitation to the person they want help from, ensuring control over who can access their system.
- Built-in chat: Includes a chat feature for communication during the assistance session.
See how to use this built-in Windows built-in remote support tool on Windows 10 and 11:
Step 1. Begin by opening the Run box and typing "msra". Press Enter to launch Windows Remote Assistance.
Step 2. On the host PC, choose "Invite someone you trust to help you," then click "Save this invitation as a file."

Step 3. Save the file to the desktop, double-click on it, and the password will be displayed. Share both the file and password with the client PC.
Step 4. On the client PC, select "Help someone who has invited you," open the file, enter the password, and click "OK."
Step 5. A pop-up request will appear on the host computer; click "Yes". Now, both screens will display the same content.
Option 4. Remote Help
Remote Help offers a cloud-based solution designed for secure help desk connections, featuring role-based access controls. This service allows support staff to establish remote connections to users' devices. Once connected, support personnel can view the device's display and, with user permission, assume full control. This capability enables helpers to make configurations or take necessary actions directly on the device during the session.
Key features include:
- Role-based access control (RBAC): Secure session management for authorized personnel.
- Support for non-enrolled devices: Extends coverage beyond Intune.
- Authentication requirements: Utilizes Microsoft Entra for secure access.
- Compliance and access control: Device compliance warnings and customizable access levels.
- Audit and monitoring: Tools in Microsoft Intune track support sessions for transparency.
Let’s see how to use Remote Help to provide remote support on Windows 10 and 11:
System Requirements and Supported Platforms
Remote Help is compatible with Windows 10/11, certain Android Enterprise devices, and macOS versions 11 through 14. To utilize this feature, you'll need an Intune subscription along with a Remote Help or Intune Suite license for all IT support staff and users.
Enabling Remote Help
Step 1. Sign in to the Microsoft Intune admin center.
Step 2. Navigate to "Tenant administration > Remote Help."
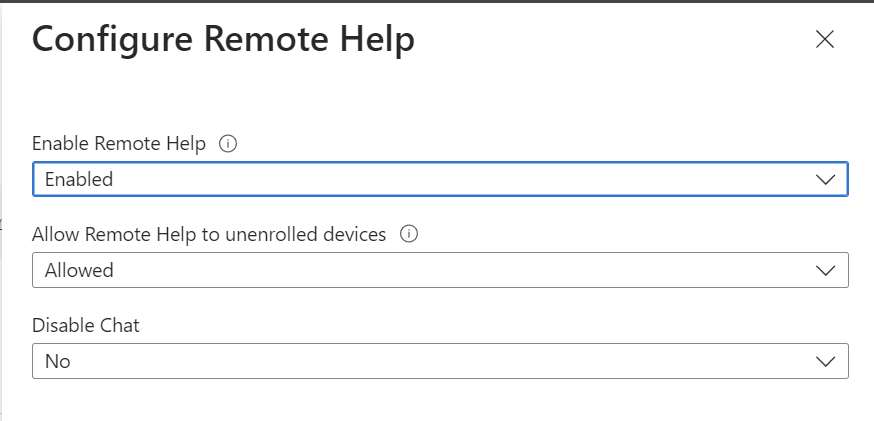
Step 3. In Settings, click "Configure," enable Remote Help, allow support for non-enrolled devices, and activate chat functionality. Save your changes.
Note: Activation of licenses or starting a trial for Remote Help may take some time (typically between 30 minutes to 8 hours). During this period, messages indicating that Remote Help is not enabled for your tenant may still appear.
Configuring Permissions for Remote Help
Step 1. Intune utilizes RBAC to manage helper access levels, ensuring minimal privileges for user privacy.
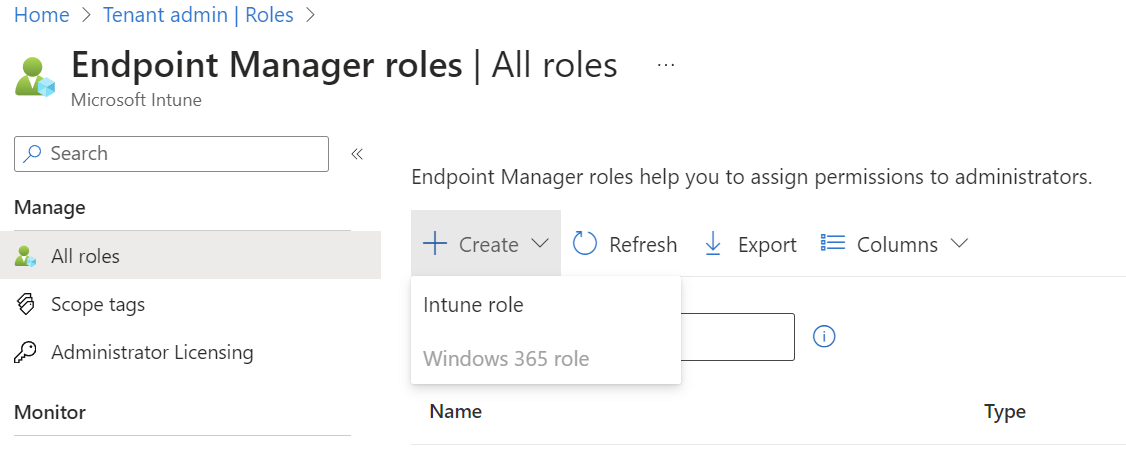
Step 2. In the Intune admin center, go to "Tenant Admin > Roles."
Step 3. Click "Create > Intune Role."
Step 4. Define desired permissions and save the role.
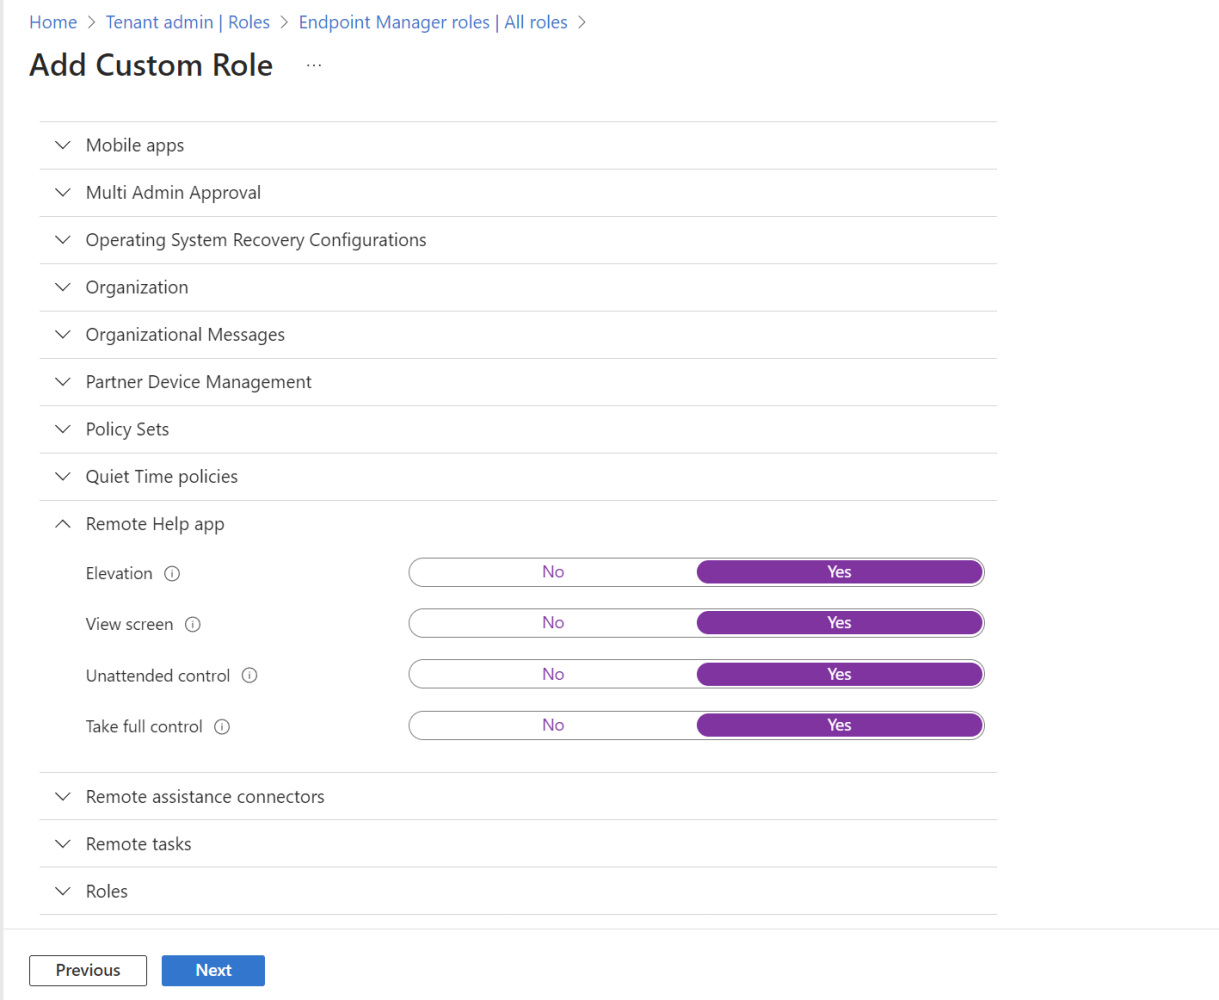
Important: Permissions are hierarchical; for instance, enabling "Take full control" implicitly allows "View screen" access, even if set to "No."
Assigning Users to Roles
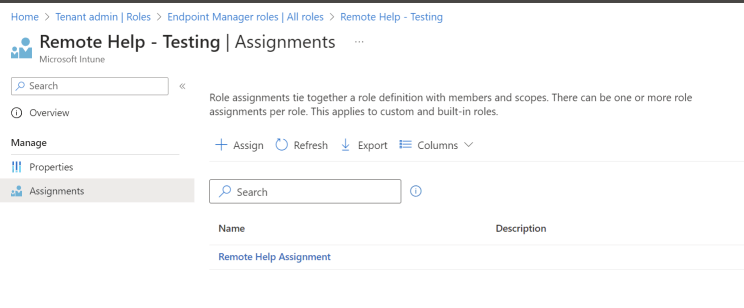
Step 1. In the Microsoft Intune admin center, navigate to "Tenant administration > Roles."
Step 2. Select the previously created role.
Step 3. Click "Assignments," choose the user group, and follow the assignment wizard.
Important: Helpers can only assist within their designated scope, ensuring support remains within organizational boundaries.
Downloading and Running Remote Help
Step 1. Download the latest version of Remote Help directly from Microsoft at aka.ms/downloadremotehelp.
Note: You can deploy Remote Help as a Win32 app via Intune. For instructions, visit Microsoft's guide.
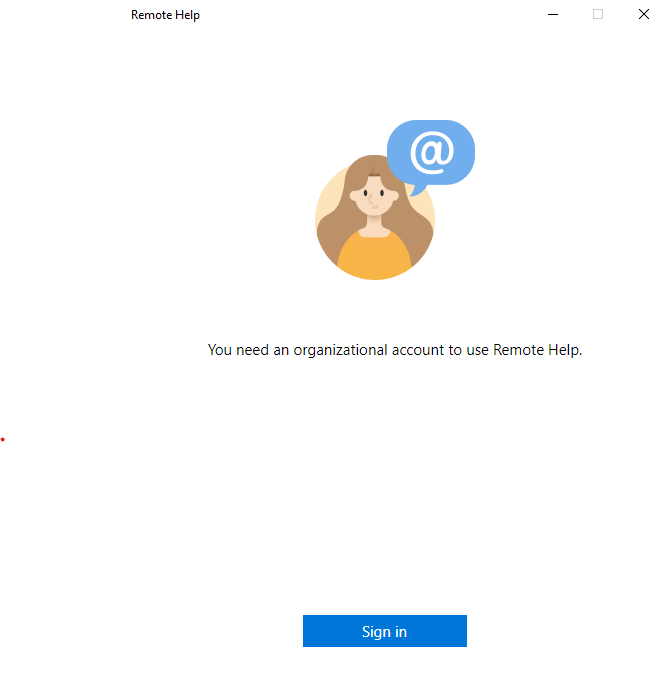
Step 2. Run the Remote Help app.
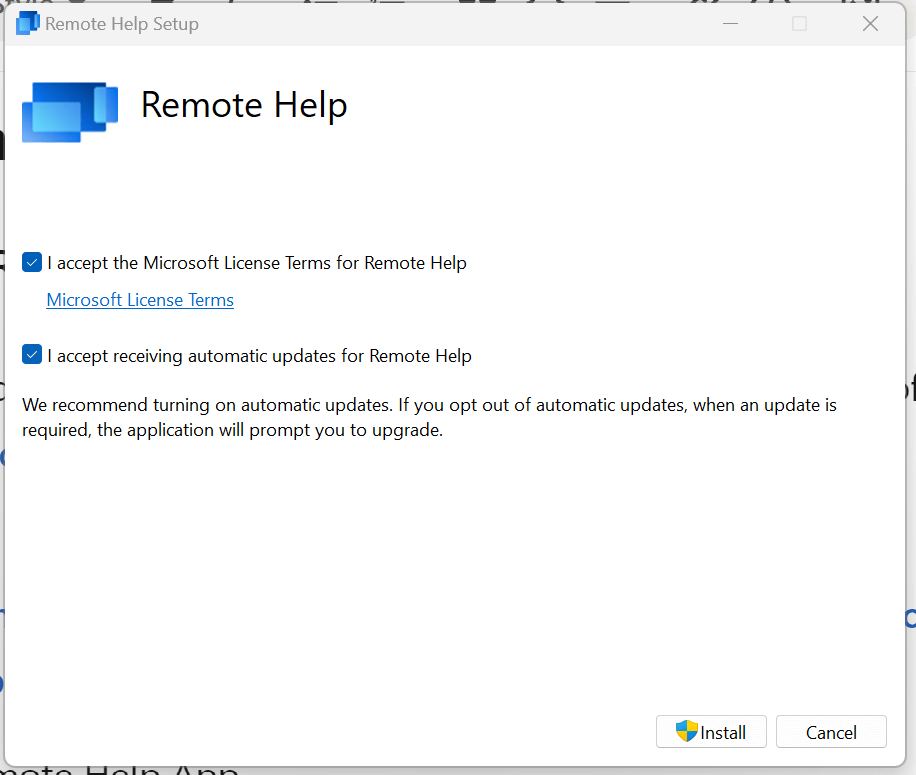
Step 3. Sign in and accept the terms.
Step 4. Remote Help is now active.
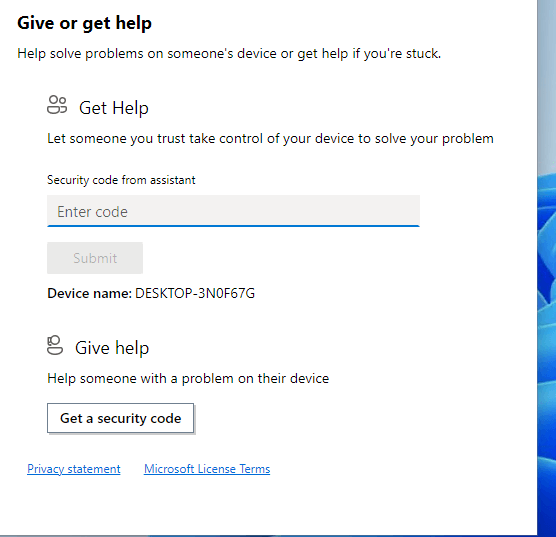
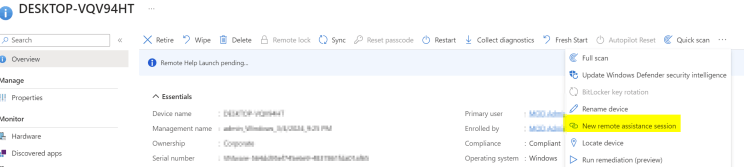
Step 5. From the Intune Portal, locate the device and click "Remote Help" to initiate a connection. It's that straightforward!
Option 5. Microsoft Teams
Microsoft Teams is a collaboration platform that also offers remote support capabilities. It allows teams to communicate, collaborate, and provide remote assistance effectively.
Key features include:
- Meetings and screen sharing: Conduct remote meetings and share screens to provide support or collaborate on tasks.
- Chat and collaboration: Use persistent chat and collaboration features to resolve issues in real-time.
- Integration: Integrates with other Microsoft tools and third-party applications to streamline workflows.
Let’s see how to use Microsoft Teams to provide remote support on Windows 10 and 11:
Enabling remote control in Teams
Step 1. Access the Teams Admin Center and log in with your Microsoft account.
Step 2. Navigate to Meetings > Meeting Policies in the left panel.
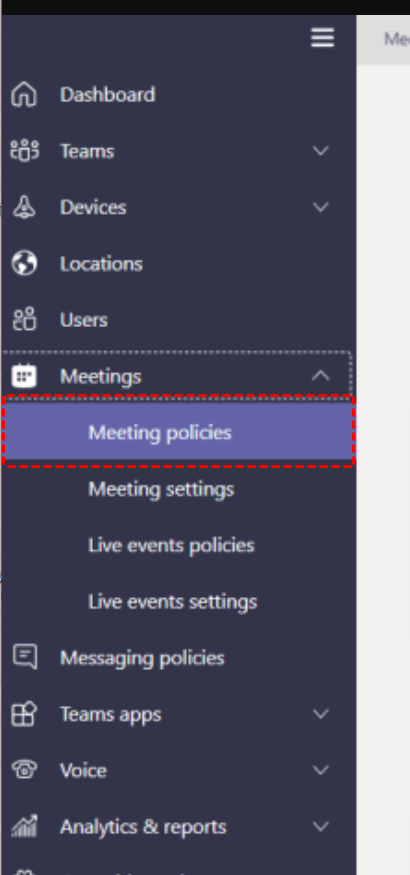
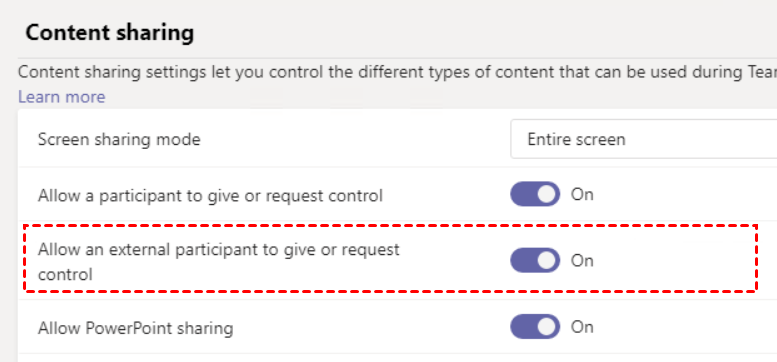
Step 3. Locate the Content sharing section and enable "Allow an external participant to give or request control."
Giving control in Teams
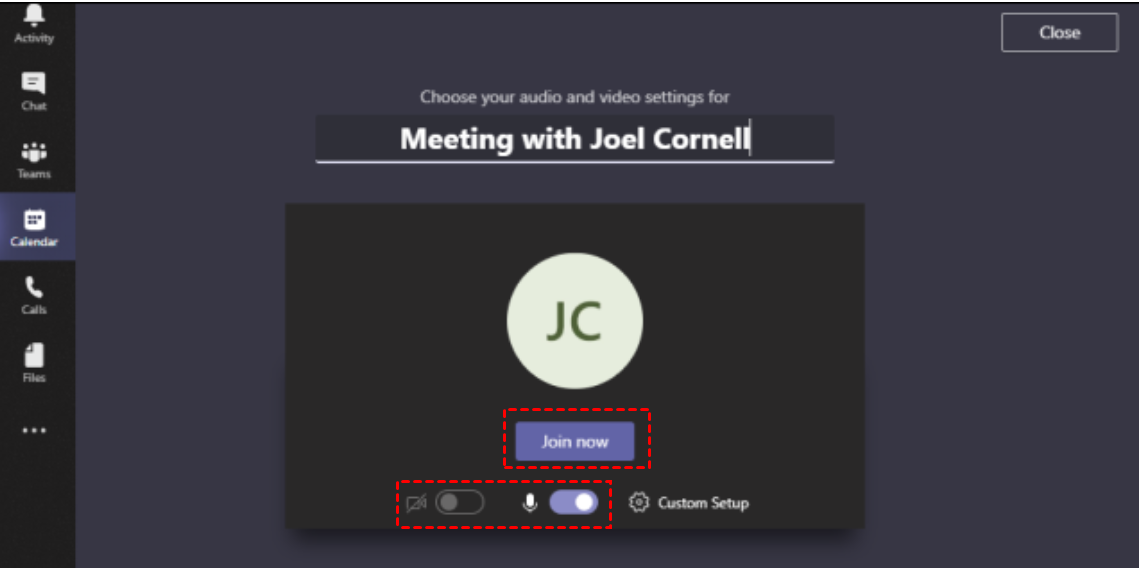
Step 1. Open Microsoft Teams and go to the Calendar tab.
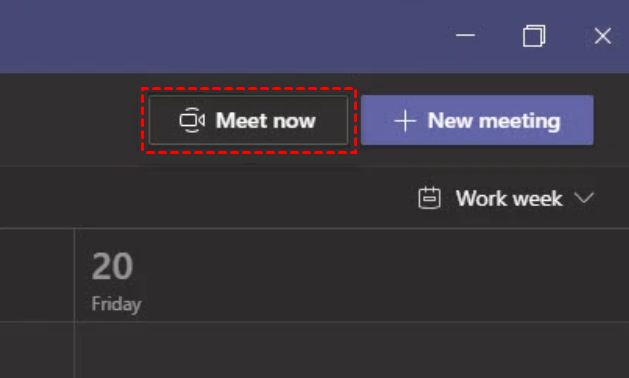
Step 2. Click "Meet Now," give your meeting a name, adjust video and audio settings, then click "Join now."
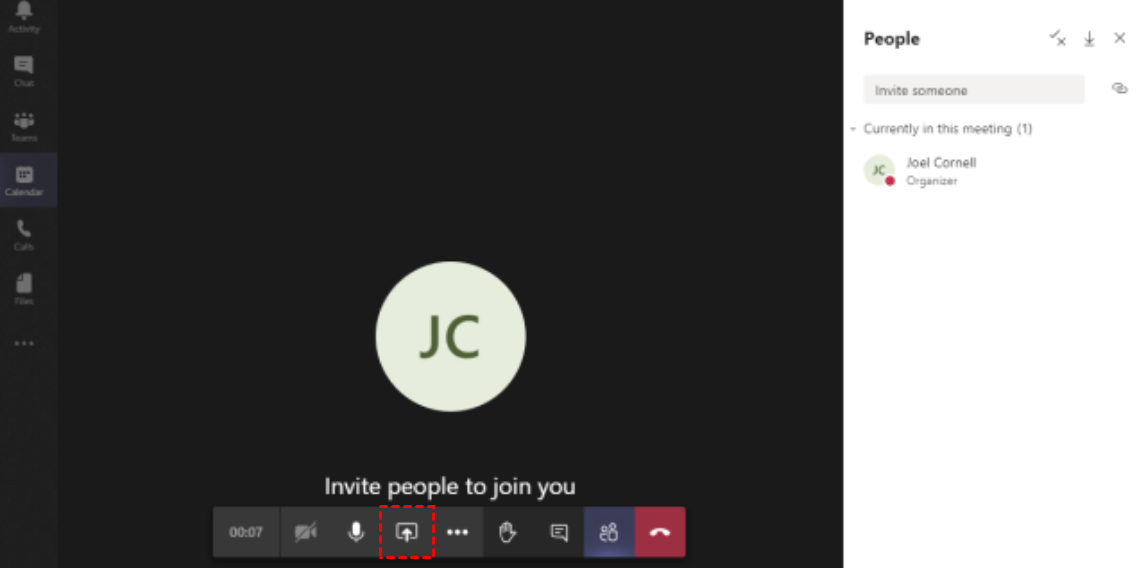
Step 3. Share your desktop by sending an invitation link and clicking the up arrow.
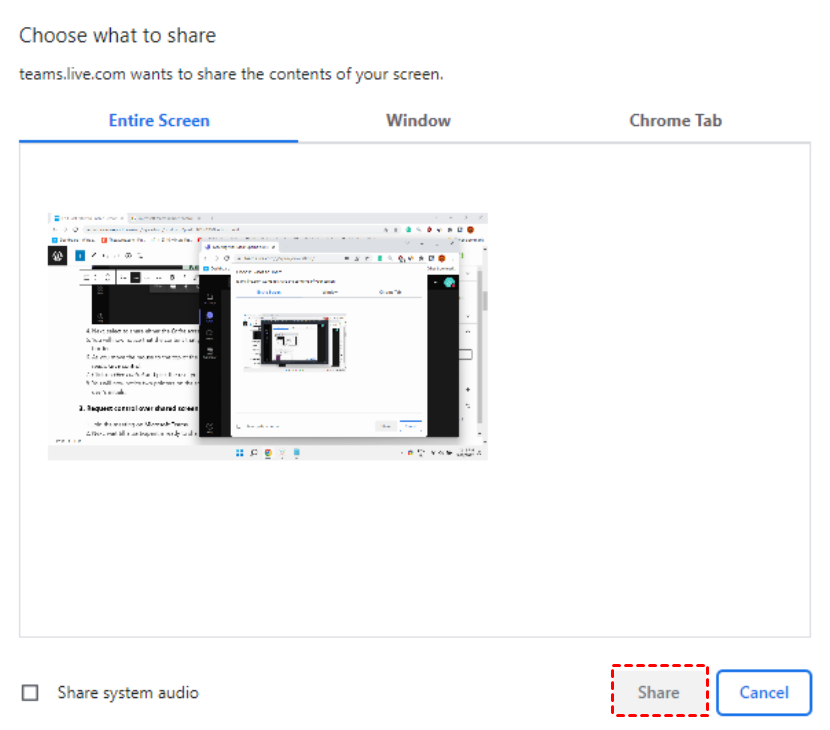
Step 4. Choose whether to share an Entire Screen, Window, or Chrome Tab, then click "Share."
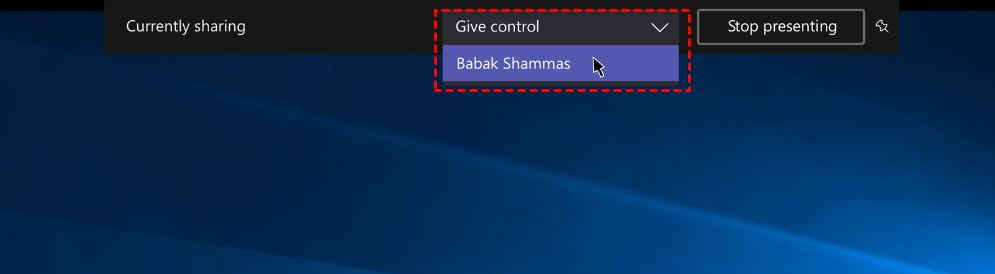
Step 5. Click "Give control" in the upper toolbar and select the user to whom you want to give control.
Requesting control in Teams
Step 1. Launch Microsoft Teams and click "Join now" to enter a meeting.
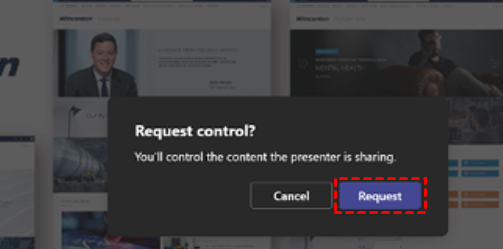
Step 2. When a participant shares their screen, click "Request control" in the toolbar to request control of their screen.
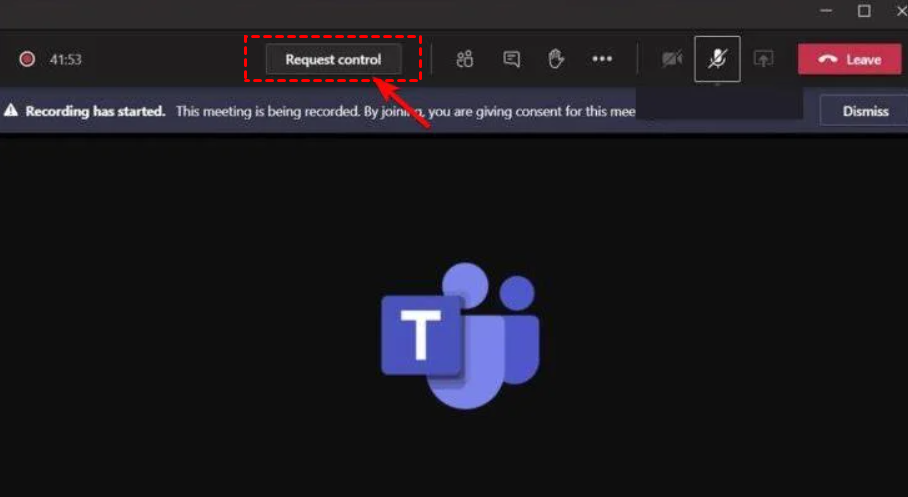
Step 3. Click "Request" and wait for the presenter to grant control.
Bonus tip: Best remote support tool for Windows
AnyViewer is the ideal choice for businesses providing IT remote support services. It offers innovative free remote support software for Windows, ensuring fast and secure solutions. AnyViewer supports IT professionals of all levels, helping them work more efficiently and achieve their goals effortlessly.

Why choose AnyViewer for remote support?
Here's why individuals and businesses should choose AnyViewer for remote IT support services:
- Strong Security: AnyViewer uses advanced encryption and two-factor authentication to keep data safe.
- Smooth Performance: It ensures a seamless experience with responsive operations at 60 FPS.
- Easy to Use: AnyViewer's intuitive interface makes it simple to handle complex IT issues with minimal training.
- Cross-platform Ability: Supports Windows and mobile platforms, enabling support from any device.
- Cost-effective: Offers competitive pricing plans for small businesses and enterprises.
What features does AnyViewer have for remote support?
AnyViewer offers free services ideal for individuals and small businesses, providing essential features for remote IT support:
- Unattended Remote View & Control: Manage and troubleshoot systems remotely, even without user presence.
- Text Communication: Real-time text chat ensures clear interaction during support sessions.
- Multi-session Support: Handle multiple support sessions simultaneously, boosting efficiency.
- Efficient Shortcuts: Quick access to Task Manager, Command Prompt, and more streamlines support tasks.
- File Transfer: Securely exchange files between local and remote systems during troubleshooting.
- Mobile Device Compatibility: Support Windows devices from iPhones and Androids, anytime and anywhere.
- Group Management: Organize devices efficiently with deployment codes for larger teams.
- Mass Deployment via MSI: Easily deploy AnyViewer across multiple devices using MSI packages.
- Privacy Mode: Ensures confidential sessions by blacking out screens and disabling keyboards remotely.
How to use AnyViewer for remote support
To start using AnyViewer for remote IT support, follow these steps:
Step 1. Begin by downloading AnyViewer and installing it on both computers involved in the session.
Step 2. On the computer from which you'll assist, sign up for an AnyViewer account and log in.

Step 3. Use the same account credentials to log in on the client's computer that needs support.

Step 4. On the assisting computer, identify the client's device and select "One-click control" to initiate the session.

Note: If you're the client and prefer not to grant full control immediately, you can use the device ID to authorize one-time control permission securely.
The bottom line
Microsoft offers a suite of powerful built-in remote support tools such as Remote Desktop, Quick Assist, Windows Remote Assistance, Remote Help, and Microsoft Teams. These tools provide secure connections and real-time collaboration, essential for troubleshooting across Windows platforms.
Additionally, AnyViewer stands out as a versatile option, offering robust features like unattended access, file transfer, and mobile device support. Whether for personal or business use, Microsoft's integrated tools and AnyViewer enable efficient remote assistance, ensuring seamless connectivity and enhanced productivity in resolving technical issues.
