
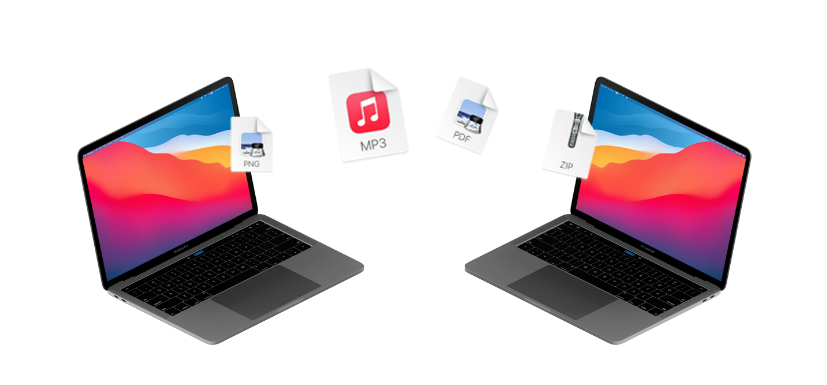
How to Transfer Data from MacBook Air to MacBook Air
This guide explores various ways to transfer data from MacBook Air to MacBook Air, from remote transfers using AnyViewer to wireless options like AirDrop. Each method is simple, secure, and effective, ensuring a seamless transition to your new device.
By Ellie / Updated on March 28, 2025
How do I transfer everything from my MacBook Air to my new MacBook Air?
How do you transfer data from MacBook Air to new MacBook Air? Transferring data from one MacBook Air to another is a common task, whether you're upgrading to a new device or simply sharing files between two computers. Apple offers several built-in tools to make this process seamless, including Migration Assistant, AirDrop, and iCloud Drive. Additionally, external storage devices, Time Machine backups, and file-sharing methods can be used to transfer data efficiently. Besides, there are popular third-party software that can help you to do this with ease.
In this guide, we'll explore the different ways to transfer data between MacBook Air devices, discuss their advantages and limitations, and provide step-by-step instructions for each method. Whether you're moving large files, entire user accounts, or specific folders, this guide will ensure a smooth and secure data transfer process.
How to transfer data from MacBook Air to MacBook Air
Here's how to transfer data from MacBook Air to MacBook Air using the following 10 methods.
Way 1. Remote Mac file transfer via AnyViewer
For transferring data between two MacBook Airs that are not on the same local network, AnyViewer is an ideal choice. This robust remote access tool enables seamless control of your Mac from another device and facilitates secure file transfers over the internet.
Why Opt for AnyViewer?
- Cross-Platform Support: AnyViewer is compatible with macOS, Windows, iOS, and Android. This versatility allows you to connect and manage different types of devices, whether you're working from your MacBook Air or accessing it from another device.
- Secure File Transfer: AnyViewer makes transferring files effortless. The app ensures that all data transfers are encrypted, keeping your files safe from unauthorized access.
- Remote Desktop Access: Need to access apps or files on an older Mac? AnyViewer lets you remotely control your Mac, providing full desktop access as though you were physically sitting in front of it.
- Simple Setup: Installing AnyViewer is straightforward, requiring no complex configurations. Once it's set up, you can remotely connect to your Mac from anywhere, ideal for both business and personal use.
- Free Version Available: AnyViewer offers a free version with core features, making it a great solution for basic remote access and file transfers without any additional costs.
How to transfer data from MacBook Air to MacBook Air using AnyViewer:
Step 1. Begin by downloading and installing AnyViewer on both the source and destination MacBook Airs.
Step 2. Sign up for a free AnyViewer account, or if you prefer, use the software without an account for limited features.
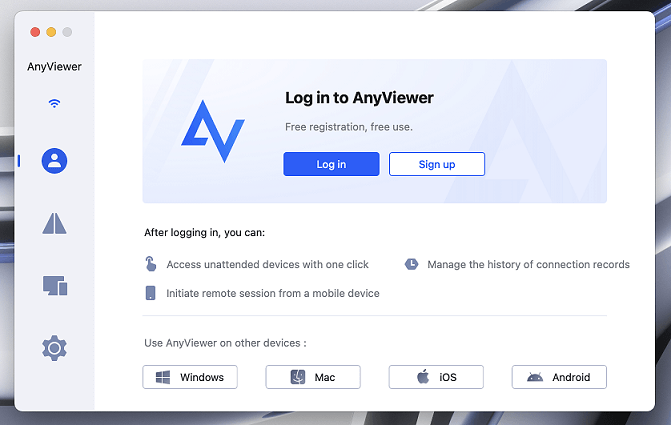
Step 3. On the old Mac, log in to AnyViewer, then select the MacBook Air you want to transfer files to.
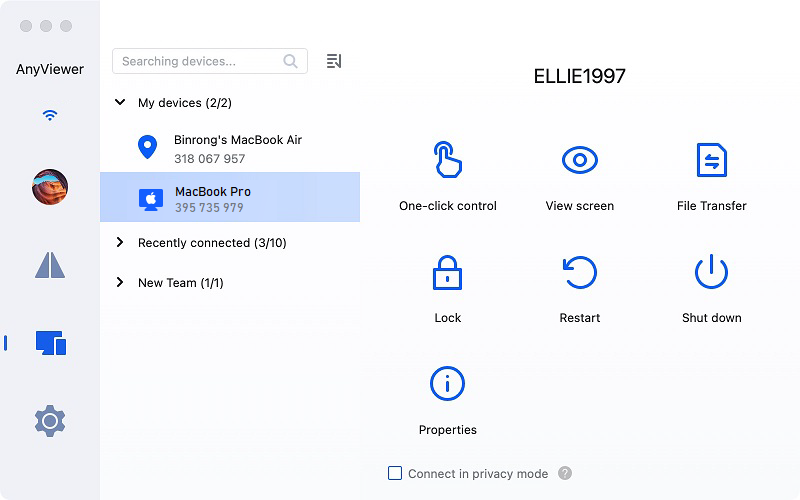
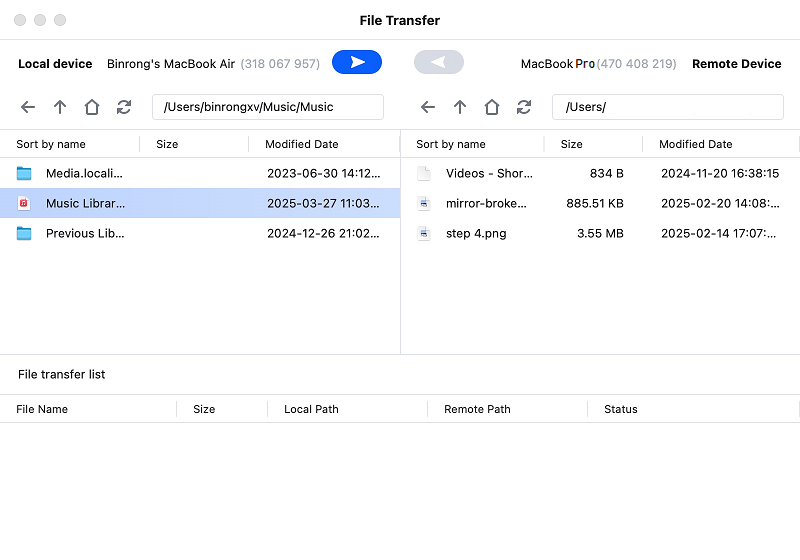
Step 4. Once connected, you can easily drag and drop files from the remote Mac to your local machine, or vice versa, to complete the transfer.
For faster transfer speeds and enhanced performance, upgrading to an AnyViewer Professional or Enterprise plan is a great option. These premium plans offer several key benefits, including:
- Maximized Transfer Speed: Achieve speeds of up to 10 MB/s.
- Simultaneous Transfers: Transfer up to five files at once for increased efficiency.
- Unlimited Files per Transfer: Move as many files as you need in a single session.
- Support for Large Files: Transfer individual files as large as 1 TB.
Way 2. Using Migration Assistant
Migration Assistant is one of the most efficient ways to transfer all data from one MacBook Air to another. It allows you to move user accounts, apps, settings, and files seamlessly.
How to transfer all data from MacBook Air to another MacBook AirusingMigration Assistant:
Step 1. Prepare Both Macs
- Ensure both MacBook Airs are updated to the latest macOS version.
- Place them near each other and connect them to power sources.
- Enable Wi-Fi on both devices or use a direct cable connection (Thunderbolt or Ethernet).
Step 2. Start Migration Assistant on Both Macs
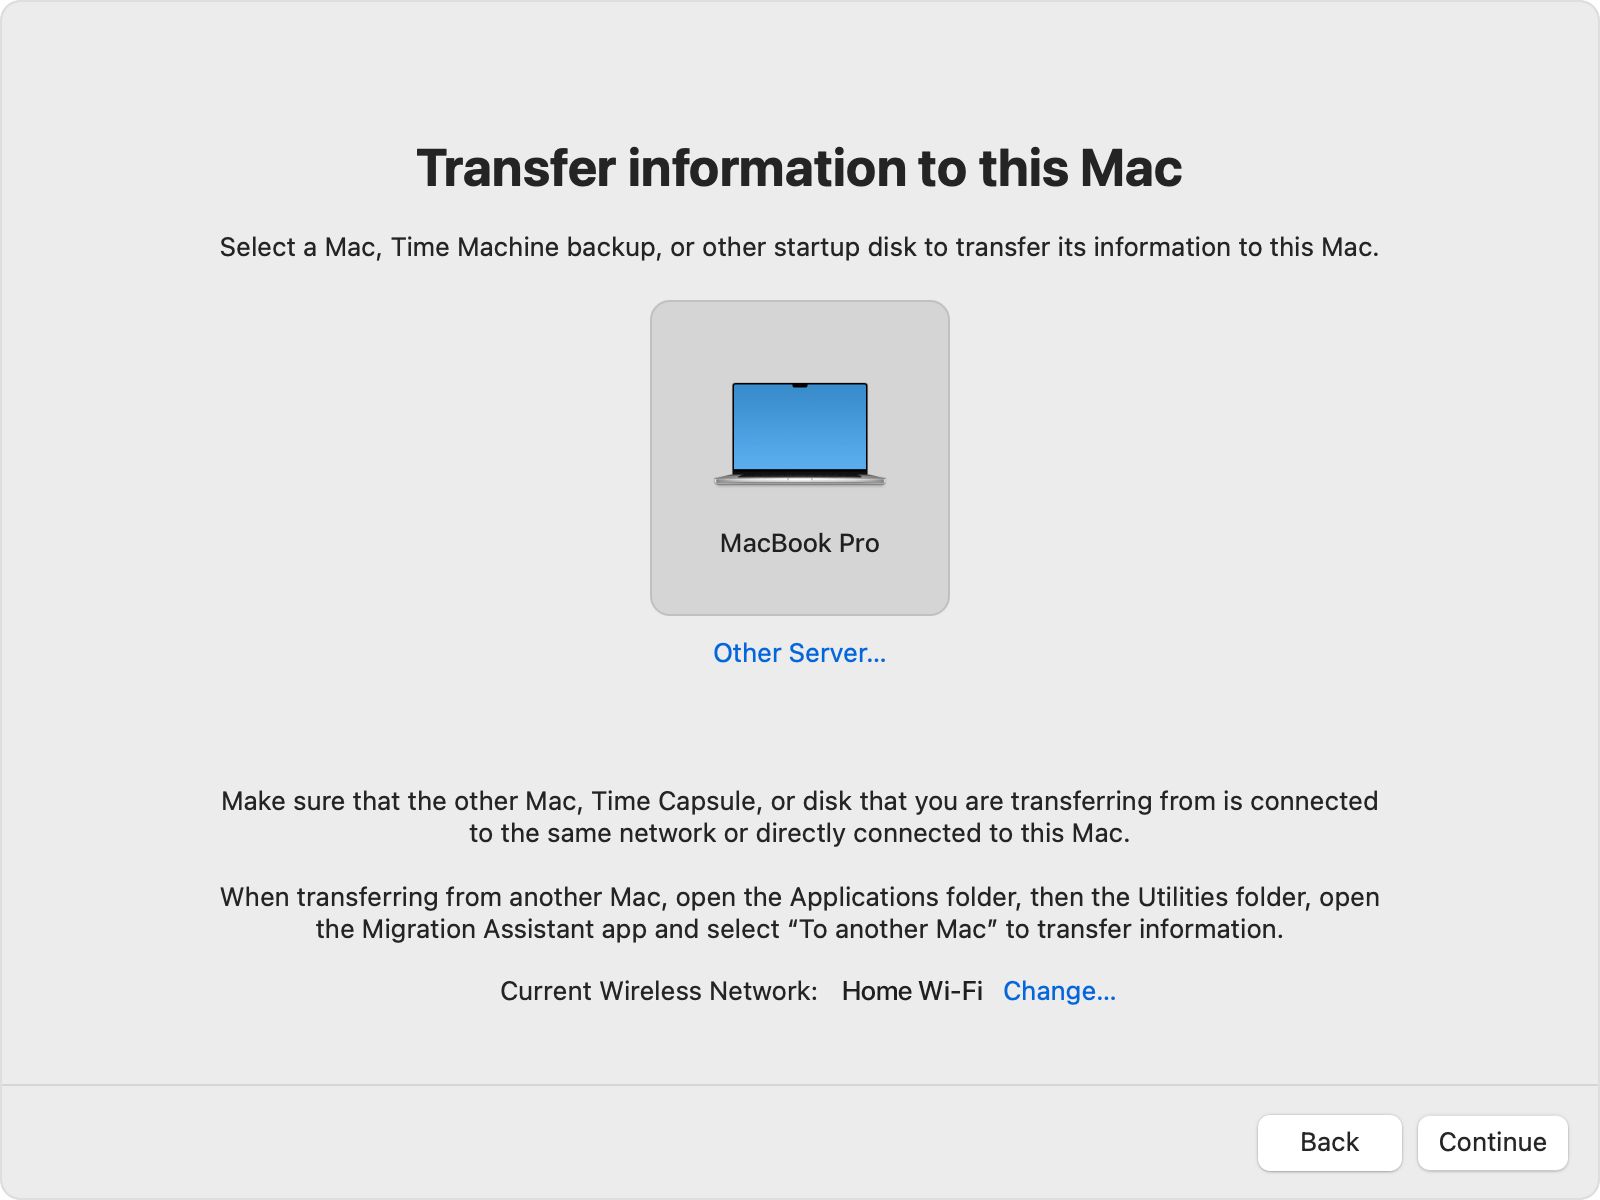
- On the new Mac, go to Finder > Applications > Utilities > Migration Assistant.
- Select From a Mac, Time Machine backup, or startup disk, then click Continue.
- On the old Mac, open Migration Assistant and select To another Mac, then click Continue.

Step 3. Select Transfer Data
- On the new Mac, select the old Mac from the list and click Continue.
- Verify the security code displayed on both Macs and confirm.
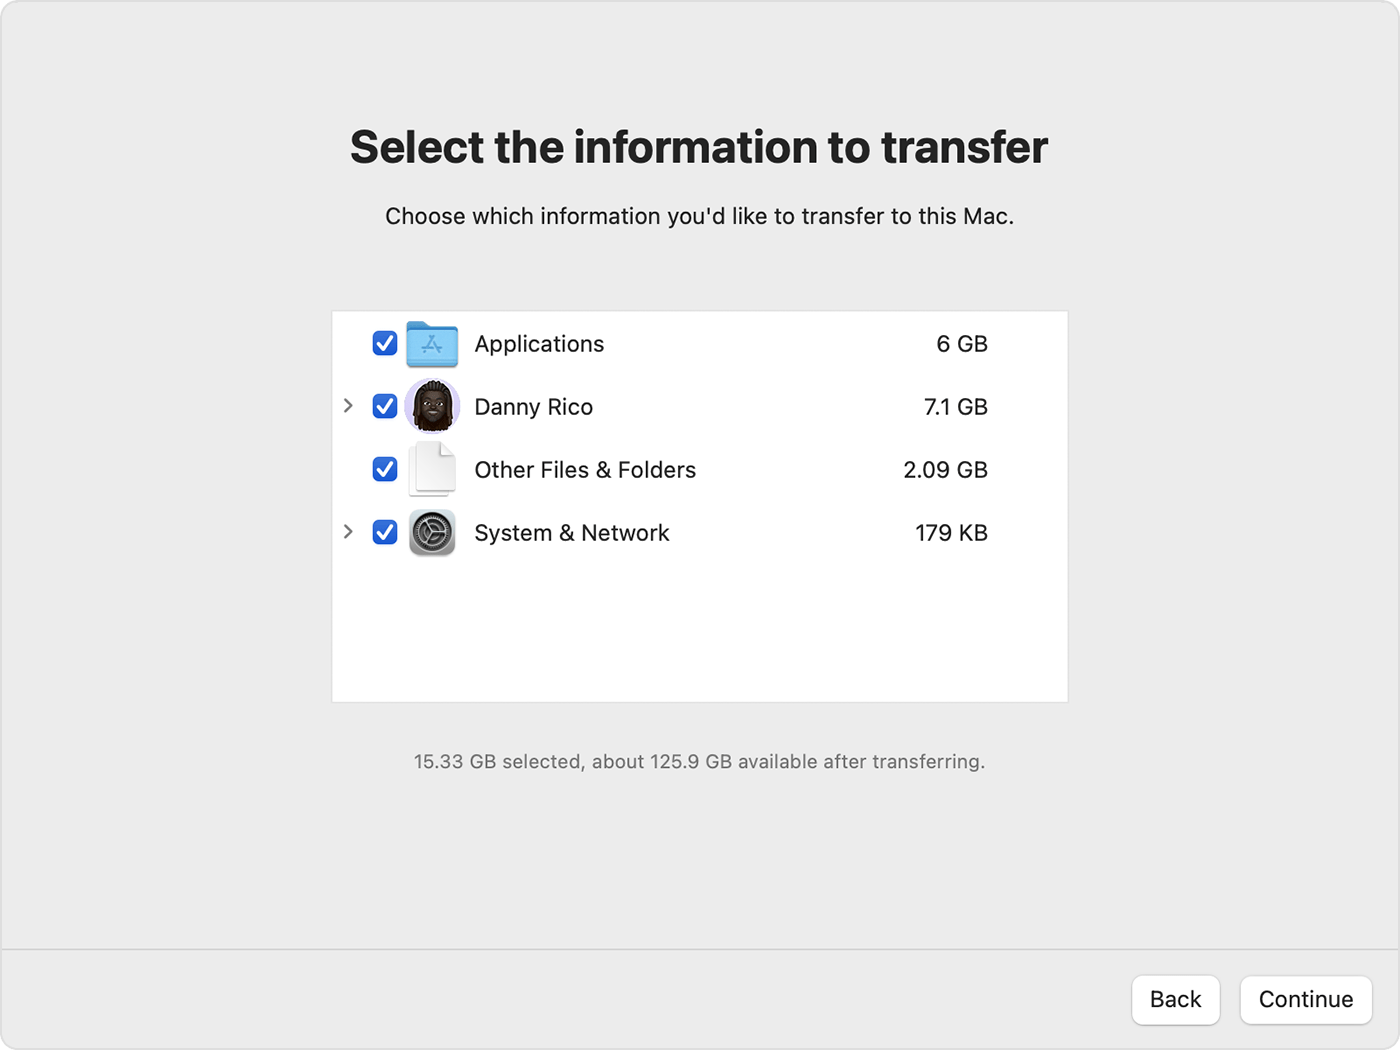
Step 4. Choose Data to Transfer
- Select user accounts, applications, system settings, and files to migrate.
- Click Continue to start the transfer.
Step 5. Complete the Transfer
- Depending on the data size, the process may take several hours.
- Once finished, restart the new Mac and verify that all files and settings have been transferred.
Pros:
- Transfers everything, including apps, settings, and accounts.
- Requires minimal user intervention.
- Ensures a seamless transition to the new Mac.
Cons:
- Can be time-consuming for large data transfers.
- Requires both Macs to be functional and accessible.
Way 3. Transferring files with AirDrop
AirDrop is a wireless feature that allows you to quickly send files between two MacBook Airs using Bluetooth and Wi-Fi.
Steps to transfer files between MacBook Airs using AirDrop:
Step 1. Enable AirDrop on Both Macs
- Open Finder and click on AirDrop from the left sidebar.
- Set Allow me to be discovered by to Contacts Only or Everyone.

Step 2. Send Files via AirDrop
- On the old Mac, locate the file you want to transfer.
- Right-click the file and select Share > AirDrop.
- Choose the new Mac from the list of available devices.
Step 3. Accept the Transfer
- On the new Mac, a notification will appear asking to accept the file.
- Click Accept, and the file will be saved in the Downloads folder.
Pros:
- Quick and easy file transfer.
- No internet or cables required.
- Works with most file types, including documents, photos, and videos.
Cons:
- Limited to small-to-medium file sizes.
- Requires both Macs to be close to each other.
Way 4. Transferring data via external storage devices
Using an external storage device like a USB flash drive, external hard drive, or SSD is a reliable method for transferring data between two MacBook Air devices.
Steps to transfer data using external storage devices:
Step 1. Plug the USB drive, external HDD, or SSD into the old Mac.
Step 2. Open Finder, locate the files or folders you want to transfer, and drag them to the external drive.
Step 3. Once copying is complete, safely eject the drive and connect it to the new Mac.
Step 4. Open Finder, access the external drive, and drag the files to your desired location.
Pros:
- Works without an internet connection.
- Useful for transferring large files.
- Provides an additional backup option.
Cons:
- Requires an external storage device.
- Limited by the storage capacity of the device.
Way 5. Using Time Machine Backups
Time Machine allows you to restore files, applications, and settings from an old Mac to a new one.
Steps to transfer data using Time Machine:
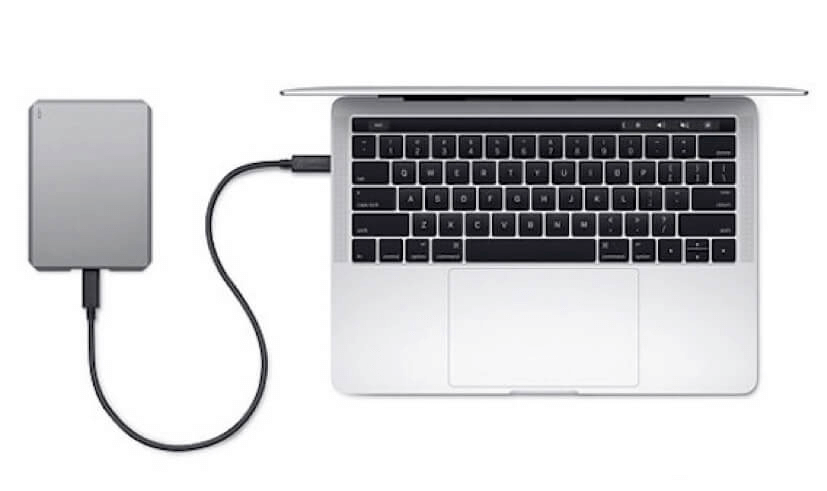
Step 1. Connect an external hard drive to the old Mac.
Step 2. Open System Settings > Time Machine and select Backup Disk.
Step 3. Click Backup Now and wait for the process to complete.
Step 4. Connect the external drive to the new Mac.
Step 5. Open Migration Assistant and select "From a Time Machine Backup."
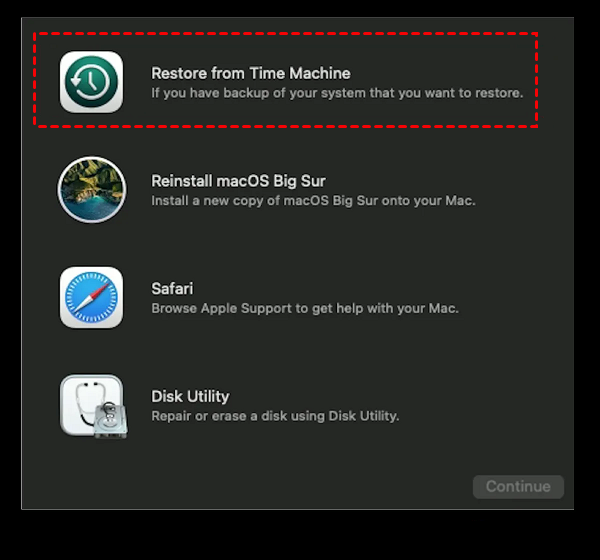
Step 6. Choose the latest backup and click Continue.
Pros:
- Transfers all settings, applications, and files.
- Ensures a complete backup of the old Mac.
Cons:
- Requires an external storage device.
- Can be time-consuming.
Way 6. File Sharing between Macs
File Sharing allows you to transfer data between two MacBook Airs over the same network.
Steps to transfer files using File Sharing:
Step 1. Go to System Settings > General > Sharing.
Step 2. Toggle on File Sharing.
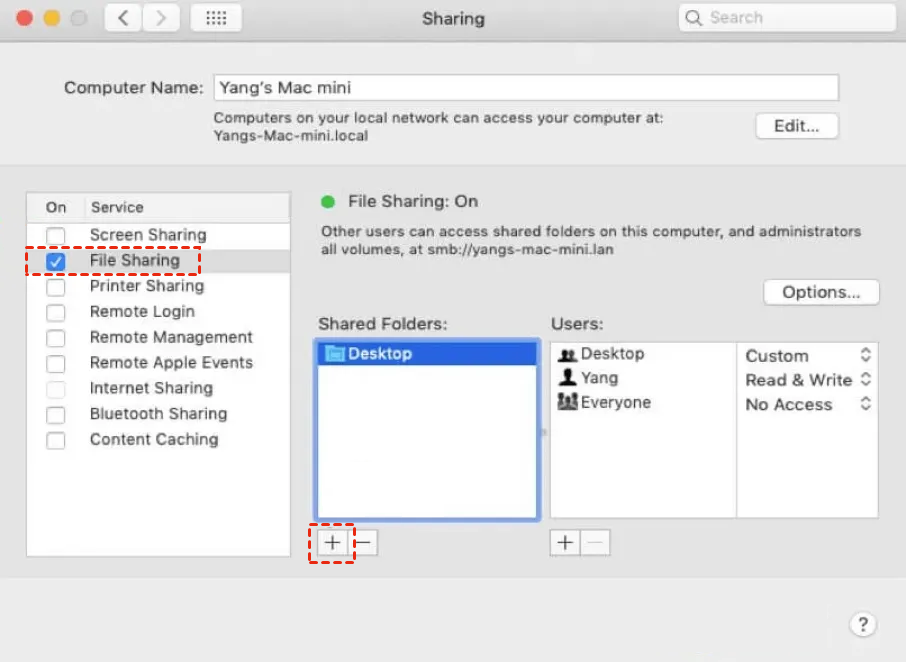
Step 3. On the new Mac, open Finder and click Network.
Step 4. Select the old Mac and enter the login credentials.
Step 5. Drag and drop files between the Macs.
Pros:
- No external device needed.
- Works over Wi-Fi or Ethernet.
Cons:
- Requires both Macs to be on the same network.
- Slower than wired transfers.
Way 7. Using Bluetooth for data transfer
Bluetooth can transfer small files between MacBook Air devices without requiring internet access.
Steps to transfer files using Bluetooth:
Step 1. Open System Settings > Bluetooth and turn it on.
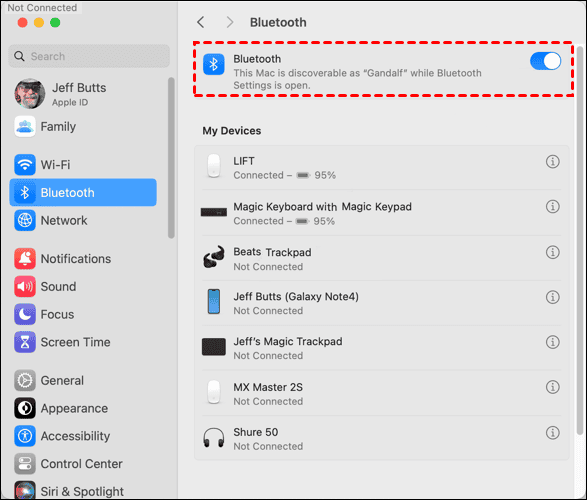
Step 2. Right-click the file, select Share > Bluetooth, and choose the new Mac.
Step 3. On the new Mac, accept the incoming file transfer request.
Pros:
- Wireless file transfer.
- No need for cables or external storage.
Cons:
- Slow transfer speeds.
- Not ideal for large files.
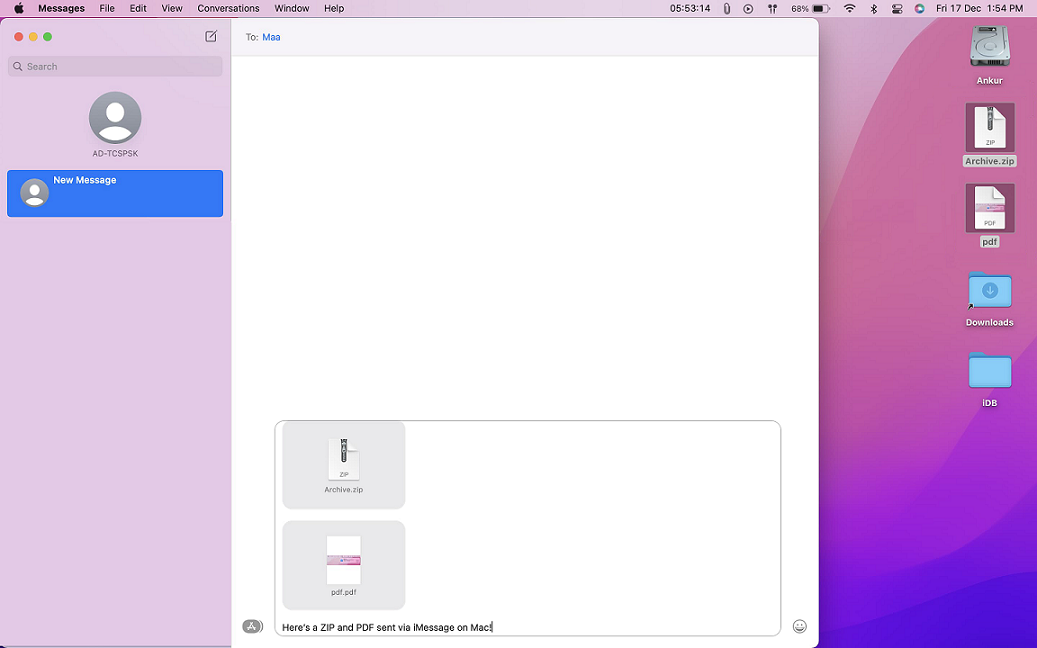
Way 8. Transferring files via email or messaging apps
You can send smaller files via email, iMessage, or cloud-based messaging apps like WhatsApp or Slack.
Steps to transfer files via email or messaging apps:
Step 1. Open mail or a messaging app and attach the file.
Step 2. Send the email or message to yourself and download the attachment on the new Mac.
Pros:
- Quick and easy for small files.
- Works remotely.
Cons:
- Limited by attachment size.
- Requires an internet connection.
Way 9. Using Target Disk Mode
Target Disk Mode allows one Mac to function as an external drive for another Mac, enabling direct data transfers.
Steps to use Target Disk Mode:
Step 1. Connect both Macs using a Thunderbolt or USB-C cable.
Step 2. Boot the old Mac in Target Disk Mode. Restart and hold down "T" until the disk icon appears.
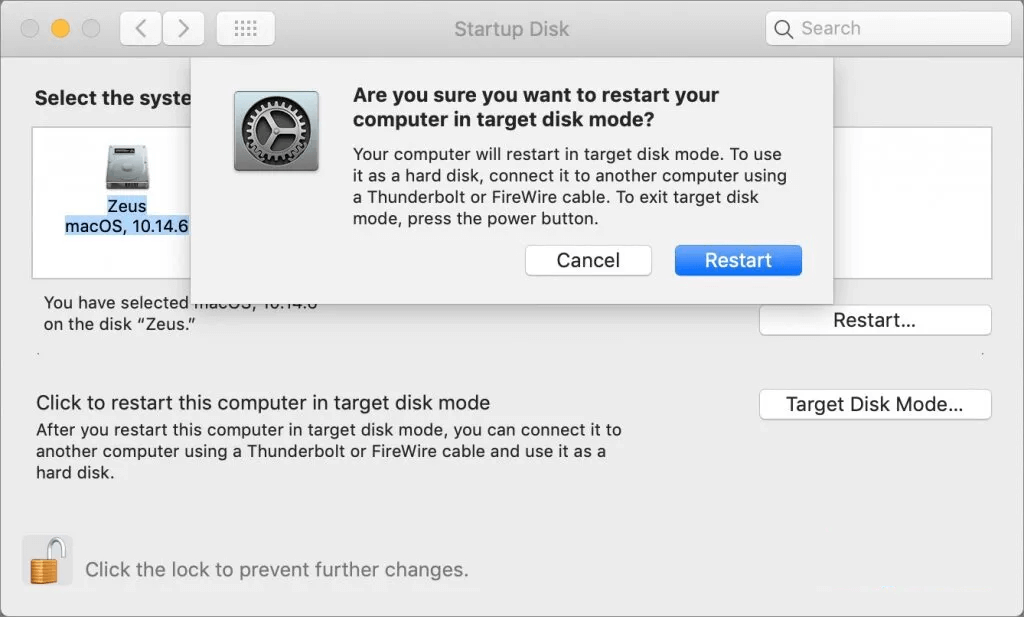
Step 3. On the new Mac, access the old Mac's drive in Finder and copy the files.
Pros:
- Extremely fast transfer speeds.
- No internet required.
Cons:
- Requires compatible cables and ports.
- One Mac must be inoperable during the transfer.
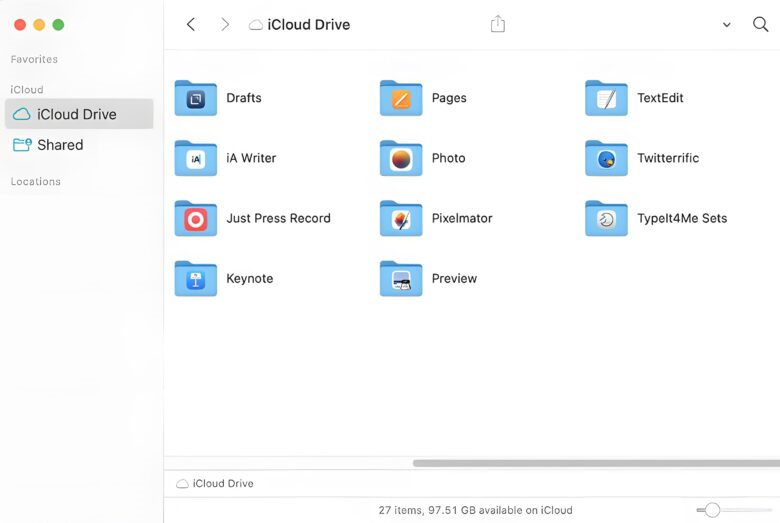
Way 10. Using iCloud Drive for File Transfer
iCloud Drive provides a cloud-based solution for transferring files between two MacBook Airs.
Steps to Transfer Files Using iCloud Drive:
Step 1. Go to System Settings > Apple ID > iCloud to enable iCloud Drive on both Macs.
Step 2. Toggle on iCloud Drive.
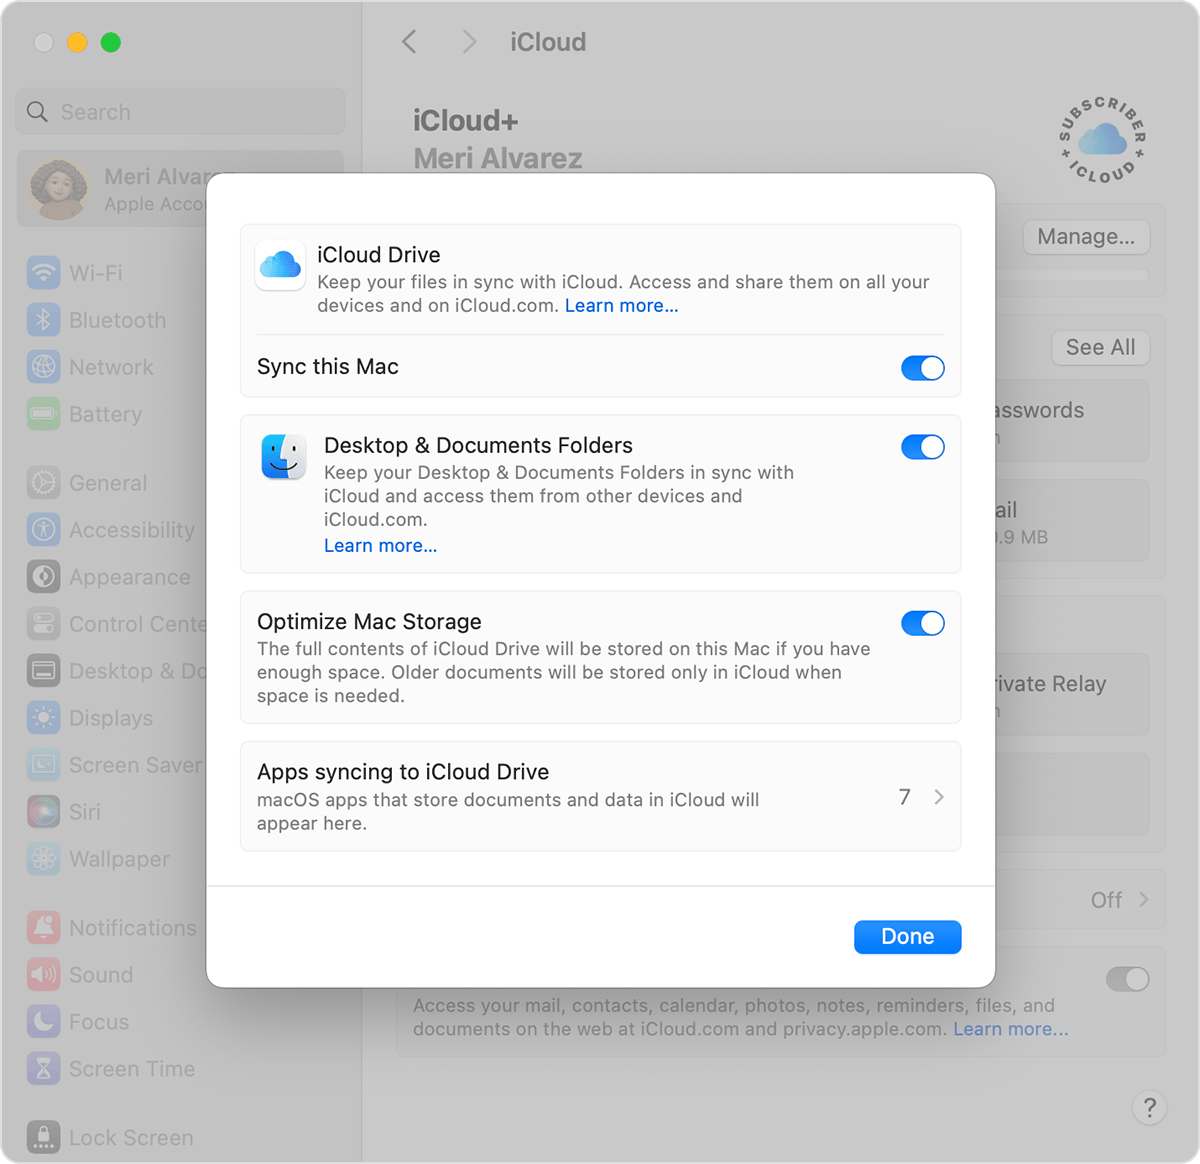
Step 3. Open Finder and navigate to iCloud Drive.
Step 4. Drag and drop files into the iCloud Drive folder.
Step 5. Open Finder on the new Mac and navigate to iCloud Drive.
Step 6. Download the transferred files.
Pros:
- Accessible from anywhere with an internet connection.
- Supports large file transfers.
- Syncs across all Apple devices.
Cons:
- Limited by iCloud storage space.
- Requires an internet connection for upload/download.
Conclusion
In conclusion, knowing how to transfer data from MacBook Air to MacBook Air is essential for a smooth transition to your new device. Whether you opt for remote transfer using AnyViewer, seamless migration with Migration Assistant, or quick file sharing through AirDrop, there are multiple methods to suit your needs. Each approach ensures that your files, apps, and settings are transferred securely and efficiently, making the process hassle-free.
