
How to Send Large Photo Files: A Comprehensive Guide
In this guide, we dive into the significance of sharing large photo files and explore various methods, from email attachments to cloud storage solutions and compression tools. We provide a step-by-step approach to sending these files, best practices to follow, and recommend AnyViewer as the ideal choice for seamless transfers. Get ready to unlock the secrets of sending large photo files like a pro!
By Carolyn / Updated on December 13, 2024
Introduction
Have you ever tried to send a beautiful high-resolution photo, only to be met with the dreaded error message? You’re not alone! In this age where images rule social media and digital communication, knowing how to send large photo files is essential. Whether you’re a photographer sharing your portfolio, a parent sending family photos, a worker sharing a large PDF, or a business professional sending presentations, the need to share large files is more common than ever.
But why is it so challenging? Many of us have faced hurdles like email size restrictions, slow upload speeds, or just plain confusion about which method to use. Fear not! By the end of this guide, you’ll be equipped with the tools and knowledge to solve how to send a large photo file without breaking a sweat.
Why Sending Large Photo Files is Important
Sending large photo files is more than just a technical need; it’s about connection. In an era where visuals dominate communication, being able to share high-quality images is crucial. Whether you’re a photographer showcasing your portfolio, a parent sharing family moments, or a business professional sending presentations, large photo files play a significant role in communication. However, many face hurdles, such as file size restrictions on emails or slow upload speeds on social media. What is the most effective strategy for overcoming these obstacles? Let’s dive into some common methods for sending large photo files.
Challenges of Sending Large Photo Files
File Size Limitations
One of the most significant challenges when sending large photo files is the size restrictions that come with different platforms. Most email services, for instance, impose a maximum file size limit—often around 25MB. If your photo exceeds this limit, you’ll be faced with the dreaded “file too large” message. It’s frustrating, right? Imagine trying to share a beautiful family photo, only to be told that it’s too big to send. Not fun!
Quality Loss Concerns
Another challenge is ensuring that the quality of your images is preserved. Some methods of sending photos, like certain compression techniques, might reduce the quality of your pictures, leaving you with less-than-stellar images that don’t do justice to your original shot. Who wants that? Losing the sharpness and detail of a breathtaking sunset or a priceless family moment is something you want to avoid at all costs.
Common Methods for Sending Large Photo Files
When it comes to sending large photo files, several methods come to mind. Each has its perks and pitfalls. Here’s a quick look at some of the most common methods you might consider:
Email Attachments
How to send large photo files through email? While emailing is a go-to method for sharing files, it often comes with limitations. Most email providers have strict size limits—usually around 25MB. This can be quite frustrating when you're trying to send a high-resolution image! If your files are larger, your email may bounce back, leaving you in a bind.
For example, sending multiple high-resolution images can easily exceed these limits. A simple workaround involves zipping your files, but even then, the email provider might still reject the email if the zipped file exceeds the limit. So while emailing is convenient, it may not always be reliable for large photo files.
Cloud Storage Solutions
File sharing has been transformed by cloud storage services like Dropbox, OneDrive, and Google Drive. With these services, you can upload your large photo files and share a link with your recipient. This method circumvents email size restrictions, but it requires both parties to have internet access and, in some cases, an account with the service.
Here’s how it typically works:
Step 1. Upload your photos: Drag and drop your images into the cloud service interface.
Step 2. Generate a shareable link: Most platforms allow you to create a link that others can use to access the files.
Step 3. Send the link: Copy and paste the link into an email, message, or social media post.
However, keep in mind that your recipient might need to sign up for the service if it’s their first time using it, which could complicate things.
File Compression Tools
File compression can be a lifesaver when it comes to sending large files. By using tools like WinRAR, 7-Zip, or even built-in compression features in operating systems, you can significantly reduce the size of your photos. While this might affect the quality slightly, it’s often worth it to make sharing feasible. Just remember to inform your recipient about the file format!
For instance, compressing a 10MB photo to 5MB can allow you to send it via email without hassle. However, it's essential to strike a balance between compression and image quality. Too much compression can lead to pixelation and loss of detail.
How to Send Large Photo Files Using Different Methods
Now that we’ve covered common methods, let’s break down how to send large photo files using these techniques.
Using Remote Desktop Software
AnyViewer stands out as the premier remote desktop software, especially for users needing to send large photo files with ease and efficiency. Its intuitive interface, designed for both tech-savvy individuals and beginners, allows users to connect to their devices from anywhere in just a few clicks, ensuring a seamless remote experience. What sets AnyViewer apart is its exceptional file transfer feature, which enables users to transfer large files—such as high-resolution photos—without compromising quality or speed.
This software supports multiple file formats and sizes, making it perfect for photographers, graphic designers, and anyone who regularly works with large image files. Additionally, AnyViewer employs advanced encryption and multi-layered security protocols, providing peace of mind when sharing sensitive content. Users can also enjoy features like unattended remote access, screen sharing, and multi-device connectivity, enhancing productivity and collaboration.
In addition to file transfer, AnyViewer enables you to access and manage your devices from anywhere in the world. It boasts a full range of features such as one-click control, remote sound, text chat, multi-monitor support, and screen wall functionality to name a few. Whether you are a professional who needs to transfer large photo projects to your clients, a regular person who just wants to share memorable moments with friends and family, or just a remote worker, AnyViewer offers you a reliable and secure solution.
Step 1. After downloading and installing AnyViewer, open the application on both your local and remote devices. To create your account, go to the "Log in" area and click "Sign up" after entering the required details.

Step 2. Once you log in, your devices will automatically sync with your account.

Step 3. Ensure you are signed into the same account on both devices. On your local computer, select the remote device you wish to transfer video files to and click on "File transfer."

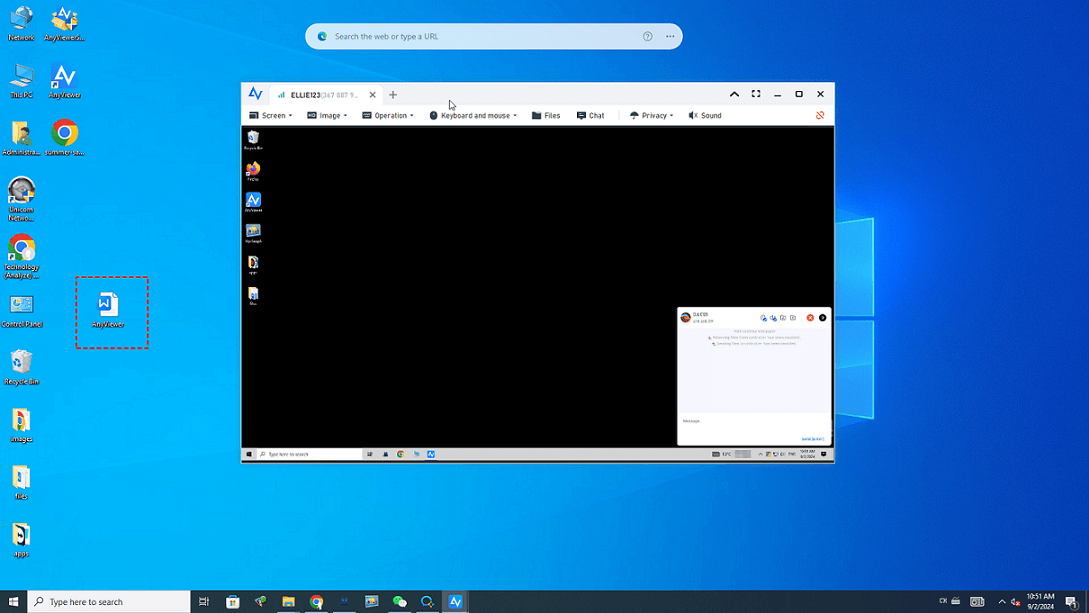
To establish unattended remote access, choose the "One-click control" option to connect to another computer. This feature allows you to manage the remote device as though you were there in person. Once connected, you can transfer files by clicking the "File" button in the menu at the top.

Additionally, you can conveniently drag and drop files from your local computer directly onto the remote device for a seamless transfer experience.
Step 4. The files from your local device will appear on the left, while the files from the remote device will be displayed on the right. To initiate the transfer, simply select the files you want to send and either click the transfer arrows or double-click the selected files.
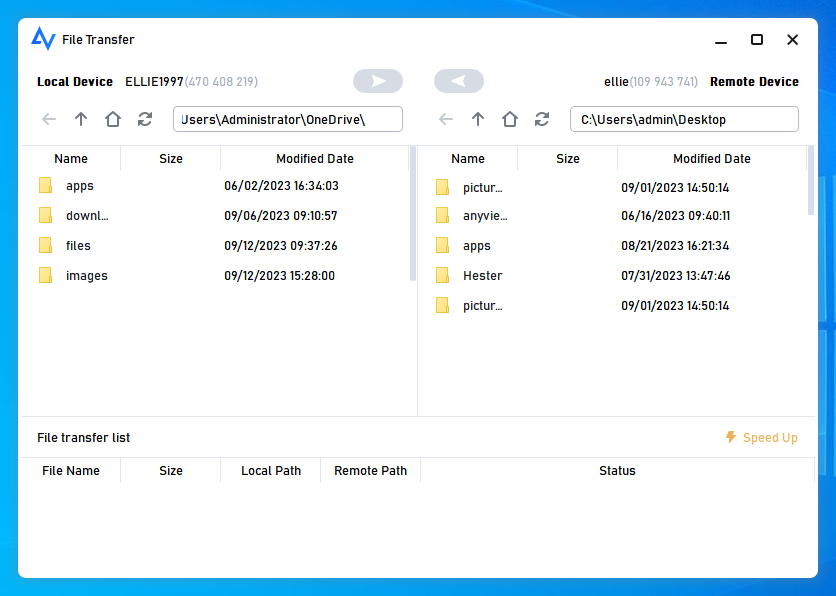
- ★Tips:
- To attain quicker transfer speeds, think about upgrading to a Professional or Enterprise plan.
Using Cloud Storage Service
Cloud services are user-friendly and effective for sharing large files. Here’s a step-by-step guide:
Step 1. Choose a Cloud Service: Select a service like Google Drive or Dropbox that you’re comfortable with.
Step 2. Create a Folder: It’s a good practice to create a dedicated folder for your photos to keep everything organized.
Step 3. Upload Your Photos: Drag and drop your large photo files into the created folder. Most cloud services have intuitive interfaces, making this step easy.
Step 4. Share the Link: Once uploaded, right-click the file or folder and select “Share.” You’ll get a link that you can send to anyone.
Step 5. Set Permissions: Decide whether you want the recipient to view or edit the files. For most scenarios, “view-only” is preferable to prevent accidental changes.
Example: If you’re sharing wedding photos with family members, you can create a Google Drive folder, upload all the photos, and then send a shareable link in a group chat. This allows everyone to view or download the images at their convenience.
Utilizing File Transfer Services
If cloud storage isn’t your thing, file transfer services can do the trick. Here’s how to use a service like WeTransfer:
Step 1. Go to the Website: Open WeTransfer in your browser. You don’t even need to create an account for small file transfers.
Step 2. Upload Your Files: Click on “Add your files” and select the photos you want to send. Multiple files can be uploaded simultaneously.
Step 3. Enter Recipient Details: Fill in the email address of the person you’re sending the files to. You can also add your email for confirmation.
Step 4. Send: Hit the “Transfer” button, and your files will be sent! An email with a download link for the files will be sent to the addressee.
Tip: WeTransfer allows you to send files up to 2GB for free. If you need to send larger files regularly, consider signing up for their Pro version.
Using File Compression Tools
If you prefer to stick with email but need to send larger files, compression can be a game-changer. Here’s how to do it:
Step 1. Select Your Files: Choose the large photo files you want to send.
Step 2. Compress Them: Right-click on the selected files and choose “Send to > Compressed (zipped) folder” on Windows or “Compress” on Mac. This will create a zipped folder containing your images.
Step 3. Check the Size: After compression, check if the new size is under the email limit. If not, consider compressing again or using one of the other methods mentioned.
Step 4. Send the Zipped File: Attach the zipped file to your email and send it off!
Example: If you have a folder of vacation photos that totals 35MB, compressing them could reduce the size to around 20MB, allowing you to send them via email without issues.
Best Practices for Sending Large Photo Files
While it’s great to know various methods, some best practices can enhance your file-sending experience.
Check Your Internet Speed
A slow internet connection can lead to frustrating delays. Before sending large photo files, ensure you have a stable and fast internet connection to avoid hiccups. You can use services like Speedtest by Ookla to check your speed.
If you’re on Wi-Fi, consider moving closer to your router or switching to a wired connection if possible. Remember, a faster upload speed means your files will be sent without the usual headaches!
Use Clear Naming Conventions
When sending multiple files, make it easier for your recipient to find what they need by using clear and descriptive file names. Instead of “IMG_12345,” try something like “Vacation_Photos_Summer2024.” This not only keeps things organized but also prevents confusion, especially when sharing with multiple people.
Conclusion
In conclusion, mastering how to send large photo files is essential for effective communication in today’s image-driven world. By utilizing methods such as email attachments, cloud storage, and remote desktop software like AnyViewer, you can ensure your high-resolution images reach their intended recipients without sacrificing quality. Remember to follow best practices, such as checking your internet speed and using clear file names, to enhance your sharing experience. With the right tools and techniques, you can effortlessly share your cherished memories or professional portfolios with ease. Start implementing these strategies today and send large photo files like a pro!
