
The Ultimate Guide on How to Screen Mirror on Windows
This article is a detailed guide on how to screen mirror on Windows, covering various methods, including built-in tools and third-party apps like AnyViewer. The article is designed to be informative and user-friendly, making it easy for readers to follow along and successfully mirror their screens. It provides different methods and step-by-step instructions to ensure a smooth screen mirroring experience.
By Carolyn / Updated on December 13, 2024
How to screen mirror on Windows 10 & 11?
Nowadays, the ability to share your screen across devices is not just a convenience, but often a necessity. Screen mirroring is a very useful feature that allows you to project your computer screen onto another monitor, such as a TV or projector. Whether you're giving a presentation in a meeting, watching a video on a larger screen, or sharing photos with friends and family, screen mirroring makes it all possible. But how do you use it, especially on Windows devices?
This guide will show you various methods on how to screen mirror on Windows, from using the built-in tools to utilizing third-party applications such as AnyViewer, which we highly recommend.
How to screen mirror on Windows [5 methods]
Screen mirroring in its simplest form is the display of content from a device such as a smartphone or tablet onto another device such as a TV or computer monitor. It projects whatever is on the main device onto a larger screen and is ideal for presentations, entertainment, and collaborative work. This article will provide 5 ways to help you with how to mirror screen on Windows.
Method 1. Built-in feature
If you’re using a Windows laptop and need to display apps and content from another device on your PC screen, screen mirroring or projecting is crucial. Since the August 2016 update, Windows 10 allows you to mirror a PC screen to another Windows 10 PC. This feature goes beyond simple mirroring, enabling the second PC to function as an additional monitor. For instance, you could watch a movie on one screen while managing emails on the other. This functionality uses Miracast, a common casting protocol available on modern Windows PCs, laptops, and Android devices.
To mirror or project your Windows screen to your other devices, follow these steps. Before you start, make sure both Windows are connected to the same Wi-Fi network and that there are no pending Windows updates.
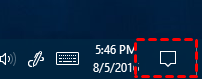
Step 1. Open the Action Center by clicking the speech bubble icon in the bottom-right corner of your screen.
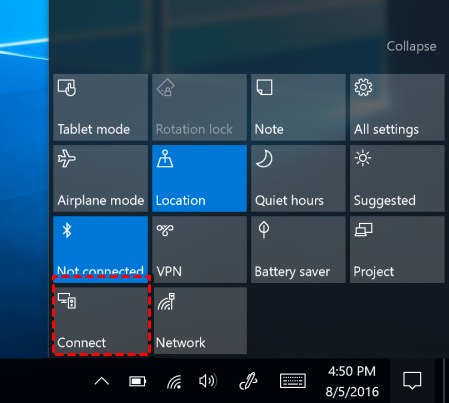
Step 2. From the menu that displays, choose "Connect".
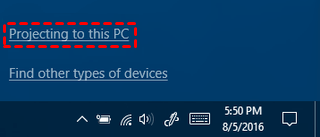
Step 3. Choose "Projecting to this PC," which will open a settings window.
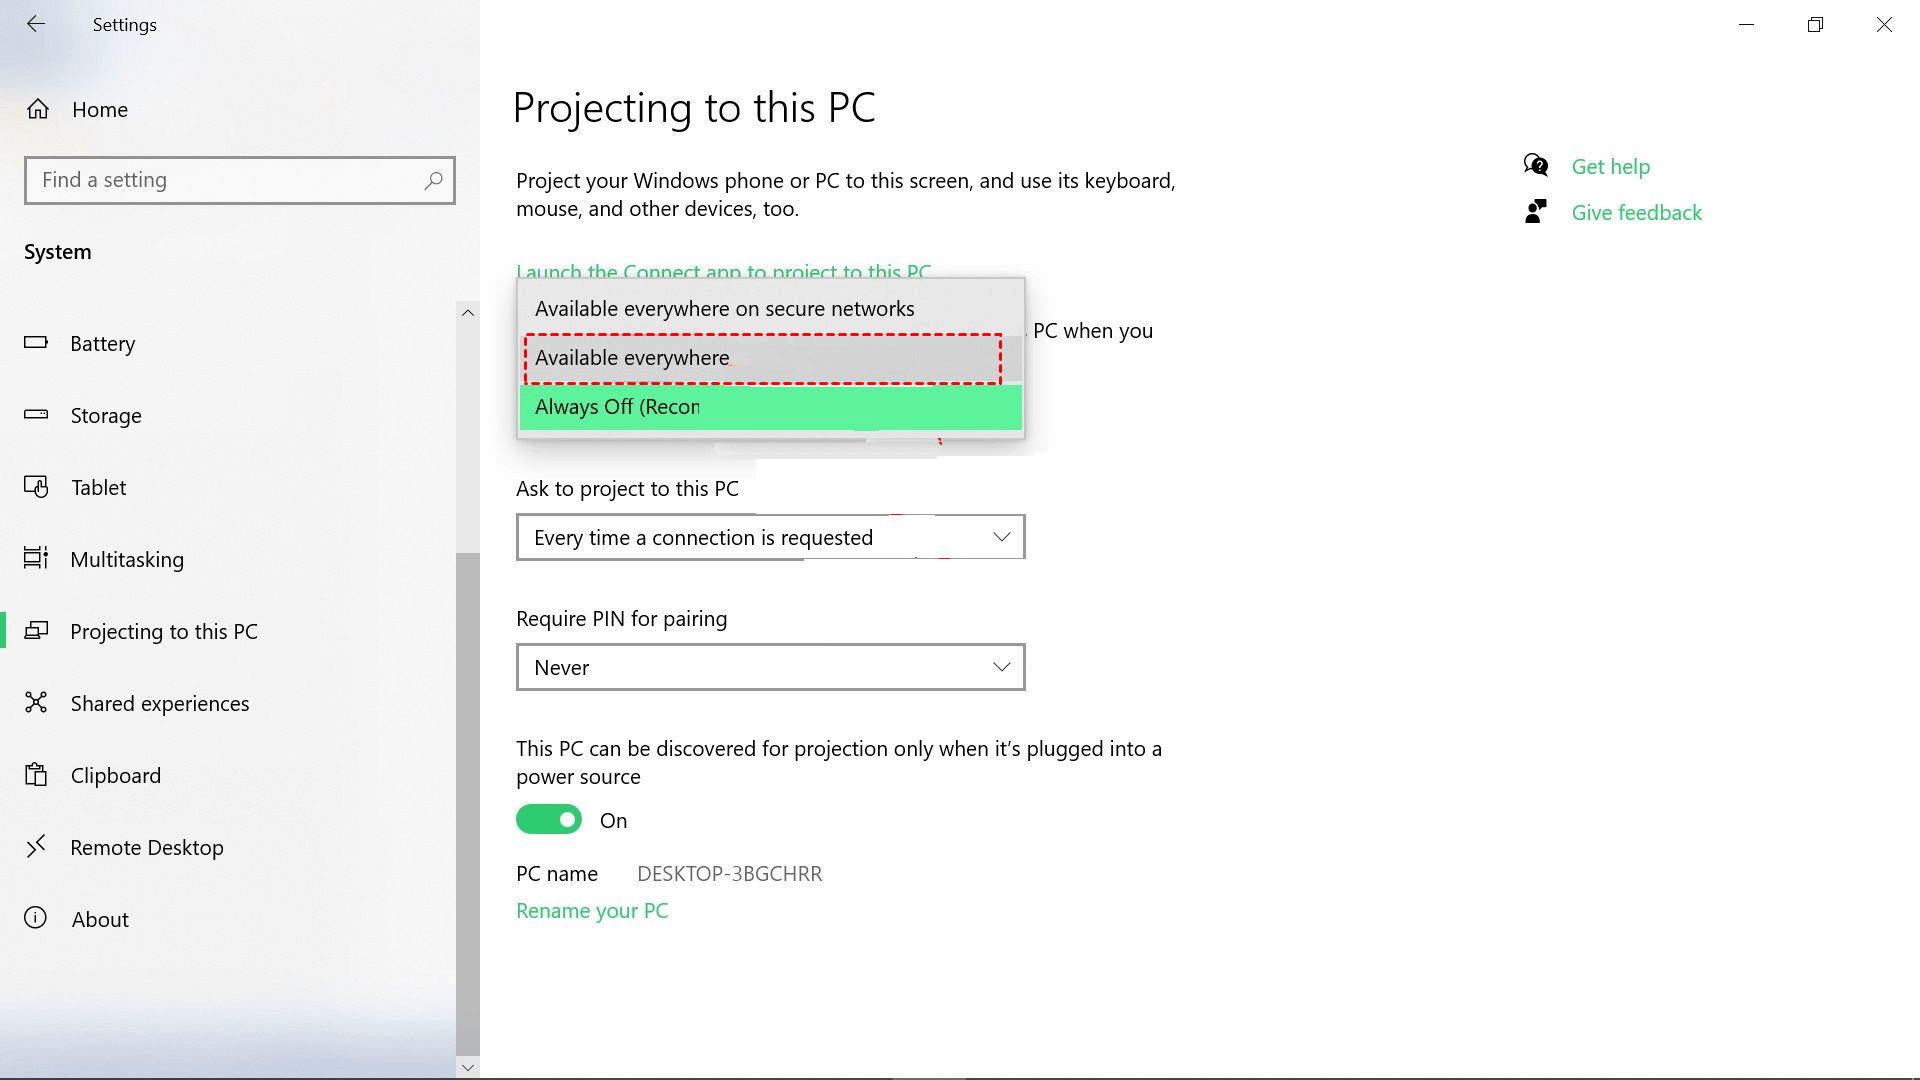
Step 4. In the settings window, use the top dropdown menu to select either "Available everywhere" or "Available everywhere on secure networks."
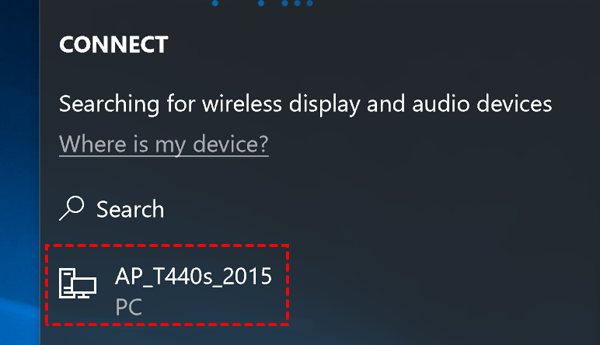
Step 5. Click "Connect" to see a list of available devices.
Step 6. Pick the Windows device you want to share your screen with and wait for the connection to establish. Try it again if it doesn't work the first time.
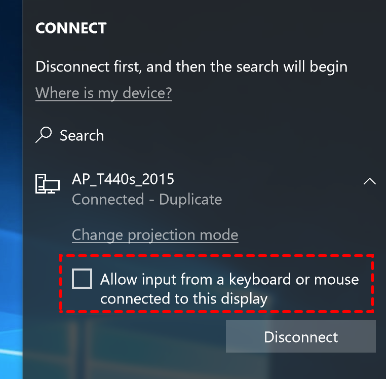
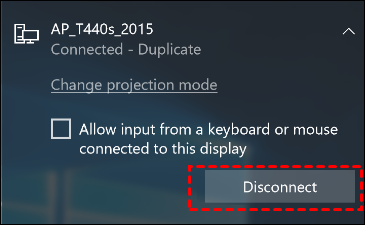
Step 7. If you want to allow the other device to control your Windows, check the "Allow input" box.
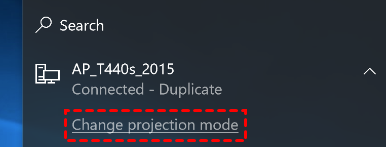
Step 8. Click "Change projection mode" to choose the projection mode that fits your needs.
Step 9. To end the screen sharing session, click "Disconnect."
Method 2. AnyViewer
If you’re looking for a robust and reliable tool, AnyViewer is an excellent choice for screen mirroring. Known primarily as a remote access tool, AnyViewer also offers a seamless screen mirroring experience across different devices. Not only does it offer cross-platform compatibility, but it also provides a secure and stable connection, ensuring your screen mirroring experience is smooth and hassle-free.
Plus, with its remote control features, you can easily manage multiple devices from one interface, making it more than just a screen mirroring tool. It offers additional features such as unattended remote access, file transfer, text chat, remote sound, and multiple sessions, bringing you unrivaled versatility and convenience. Screen casting is easy with AnyViewer, whether you're watching your favorite video or giving a presentation.
Let’s explore how to screen mirror on Windows using AnyViewer:
Step 1. Start by downloading, installing, and opening AnyViewer on both of your Windows computers. Go to the "Log in" section and select "Sign up" to create a new account. Use this account to log in on both devices.

Step 2. After logging in, your devices will be connected to the same account automatically.

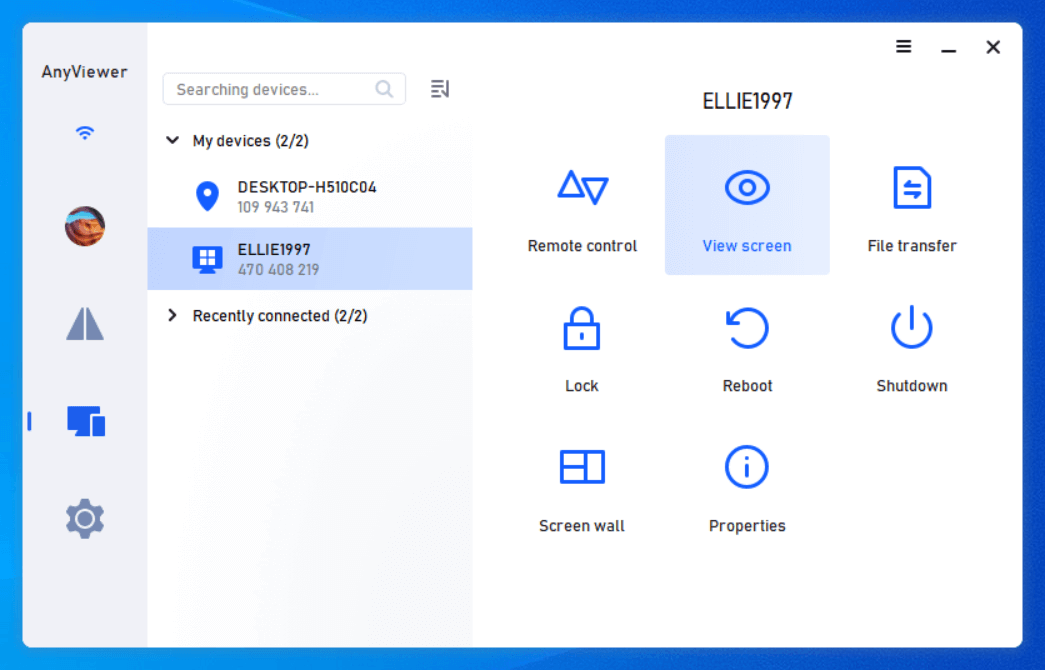
Step 3. On your local Windows computer, navigate to the "Device" tab, select the target Windows computer you want to view and click "View screen" to begin screen mirroring.
- ★Tips: Upgrade to the Professional or Enterprise plan to unlock additional benefits:
- Expand unattended access by adding more devices to your account.
- Connect one computer to multiple devices at the same time.
- Transfer files without limits, supporting individual files up to 1TB.
- Use Privacy Mode to disable keyboard, mouse, and screen access remotely.
- Simplify device management for your organization by creating groups.
- Enjoy features such as Ultra HD Mode, 4:4:4 True Color Mode, up to 60FPS, and more to improve image quality to enhance your remote viewing experience.
- ...
Method 3. Chrome Remote Desktop
Chrome Remote Desktop is an effective tool for screen sharing, especially if Chrome is already installed on your Windows devices. It is compatible with Microsoft Windows, OS X, Linux, and ChromeOS. Follow these steps to set it up:
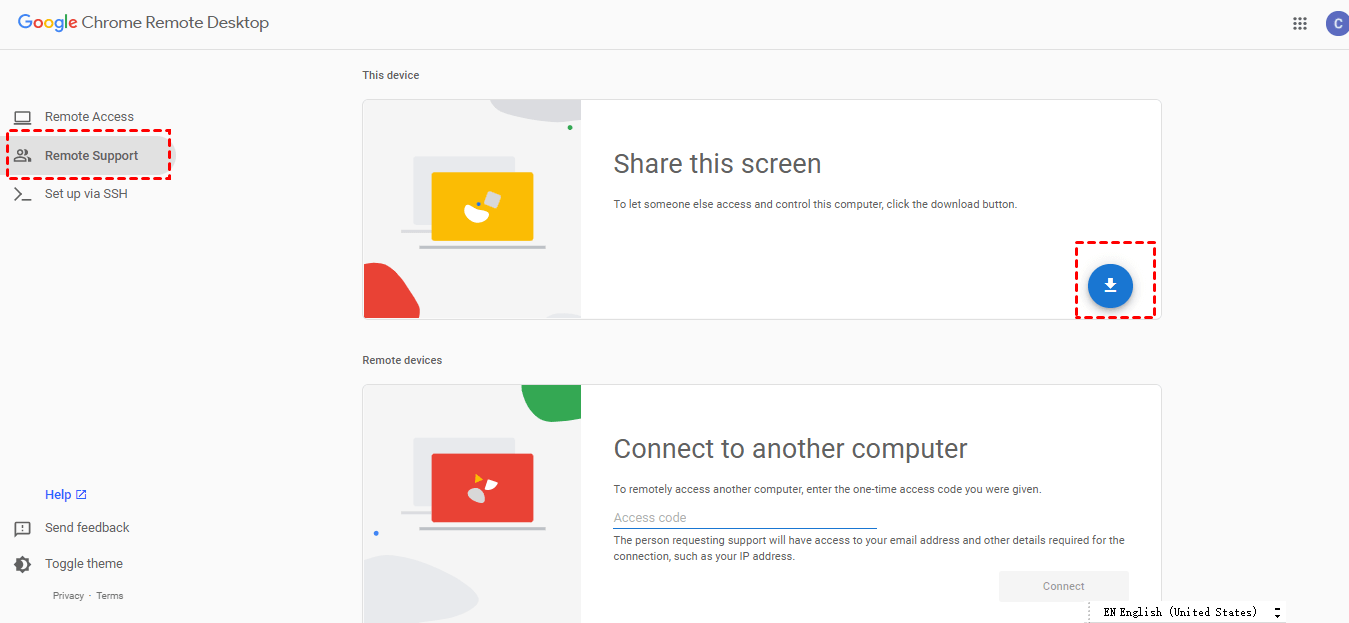
Step 1. Sign in to the same Google Account on both Windows devices, then go to the Chrome Remote Desktop download page. In the left pane, select "Remote Support" and click the blue download button.
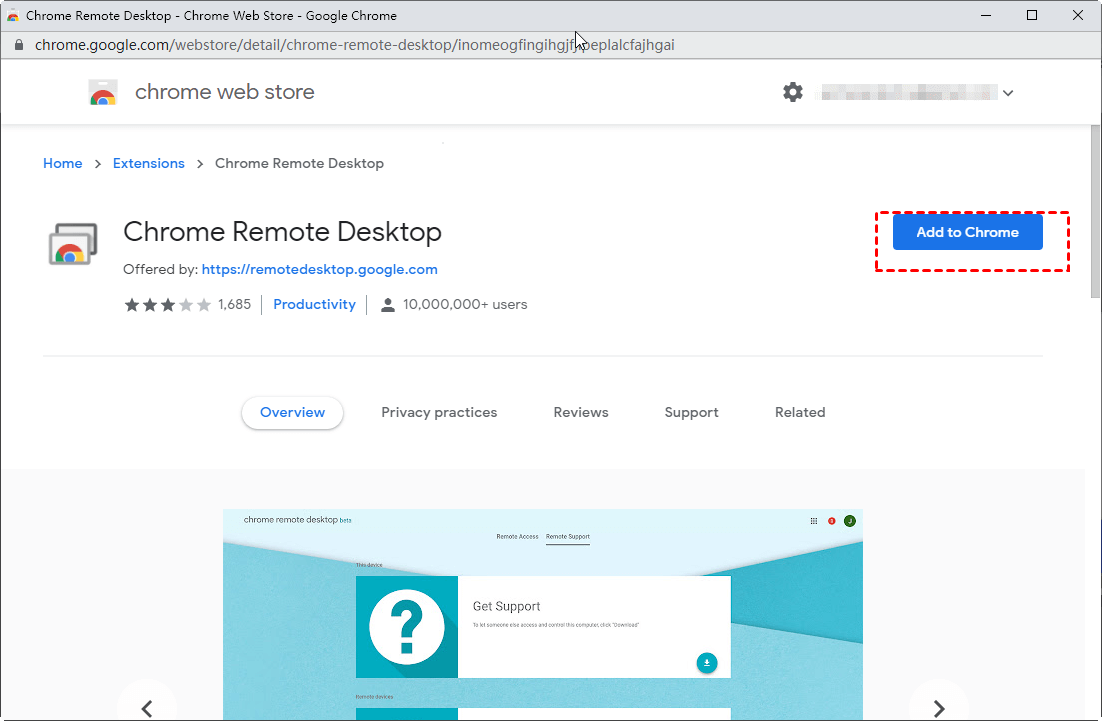
Step 2. Add the Chrome Remote Desktop extension to your Chrome browser by clicking "Add to Chrome."
Step 3. Confirm the installation by selecting "Add extension" in the pop-up window.

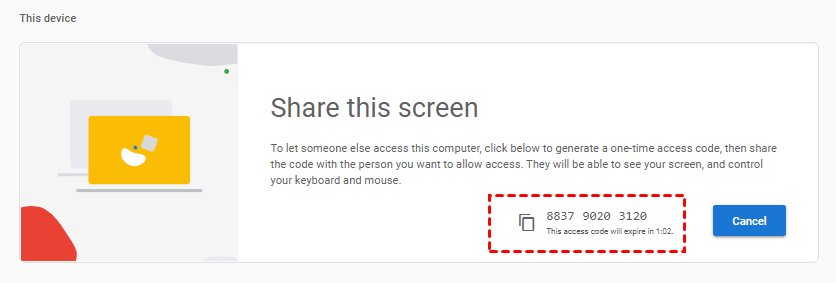
Step 4. After the extension is installed, click "+ Generate Code" under the "Share this screen" section.
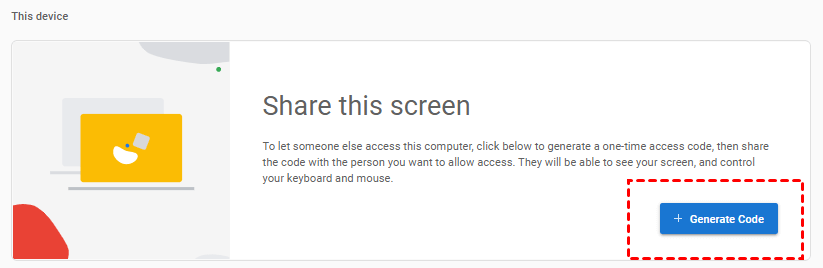
Step 5. Send the generated code to the Windows device with which you want to share your screen (note that the code will expire in 5 minutes).
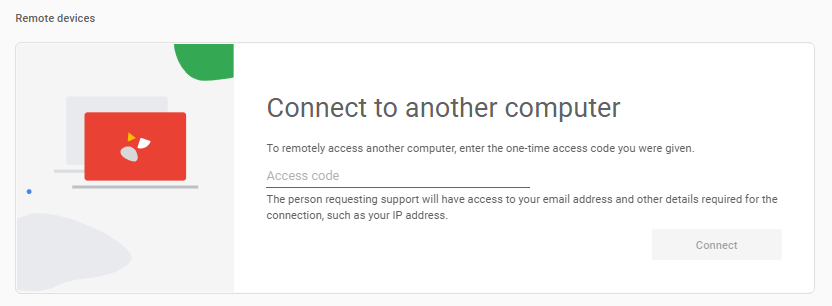
Step 6. On the remote Windows device, enter the access code and click "Connect."
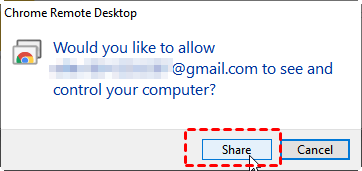
Step 7. Accept the screen sharing request on your Windows device by clicking "Share" to start sharing your screen.
Method 4. LetsView
Alternatively, you can use a tool called LetsView for screen mirroring from your Windows device to another device. Before you begin, make sure to download and install LetsView on both your primary Windows device and the target device. Follow these steps to set up screen mirroring:
Step 1. Download and install LetsView on both your Windows device and the other device, ensuring they are connected to the same local network.
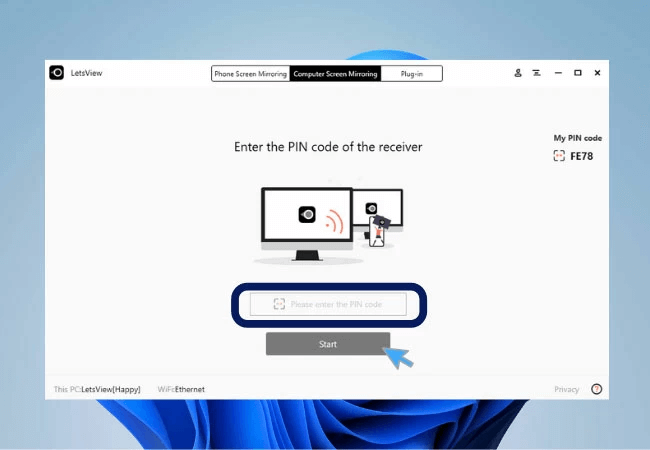
Step 2. Open the application on both devices. On your Windows device, select "Computer Screen Mirroring" and note the PIN displayed.

Step 3. Enter this PIN on the other device and click "Allow" on your Windows device.
Step 4. On the main interface of your Windows device, tap "Start" to begin screen mirroring.
Method 5. TeamViewer
TeamViewer's screen-sharing feature allows you to broadcast your desktop or a specific application window to a remote device, facilitating real-time collaboration, troubleshooting, and presentations, regardless of geographical barriers.
To mirror your screen using TeamViewer, follow these straightforward steps, which are the same for both Windows and Mac systems, once you’ve set the necessary permissions:
Step 1. Download and install TeamViewer on both your Windows devices, choosing the appropriate option (business or personal) during setup.

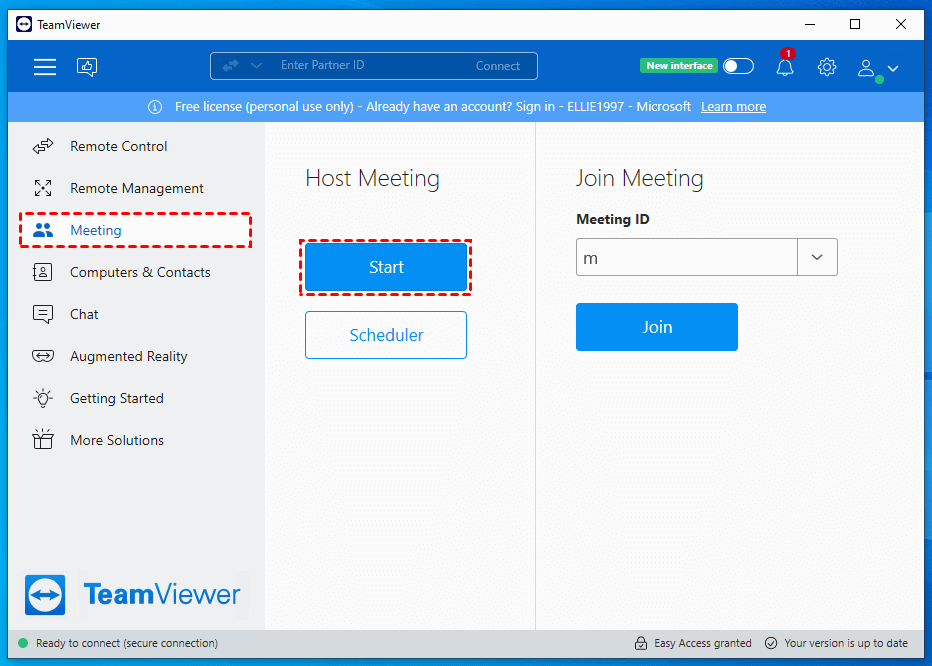
Step 2. Log into your TeamViewer account on your Windows device, then click "Meeting" on the left side of the main interface. Select "Start" to begin a new meeting.
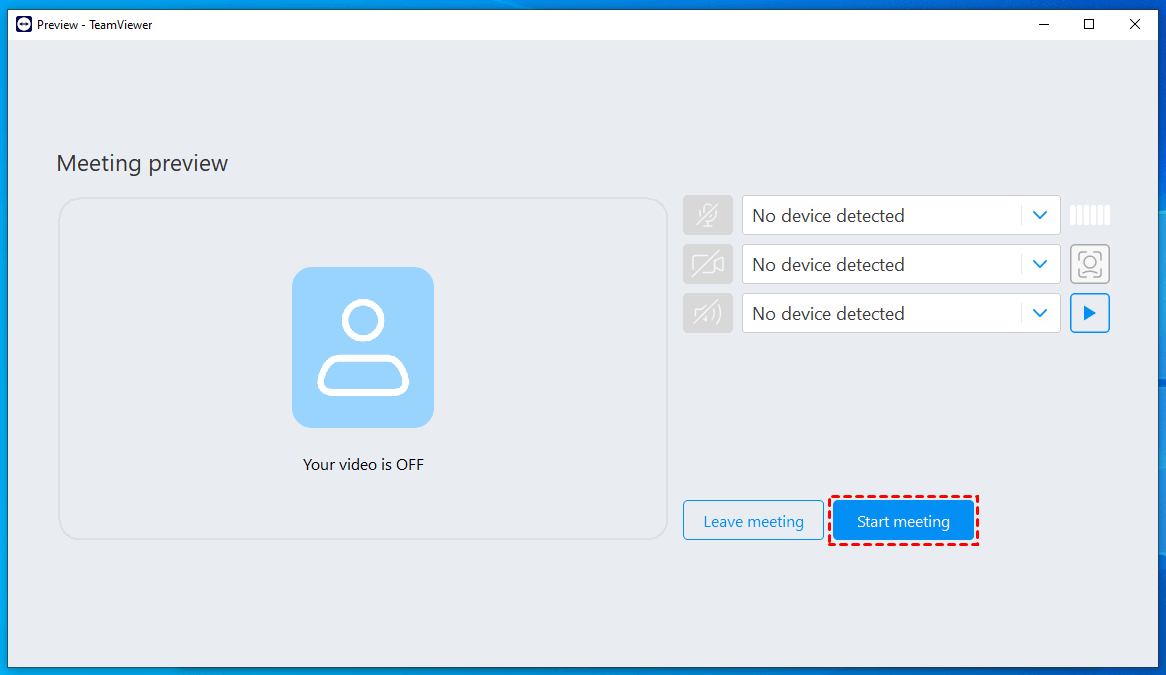
Step 3. After the meeting starts, adjust settings such as microphone and camera on the right side, and then click "Start Meeting."
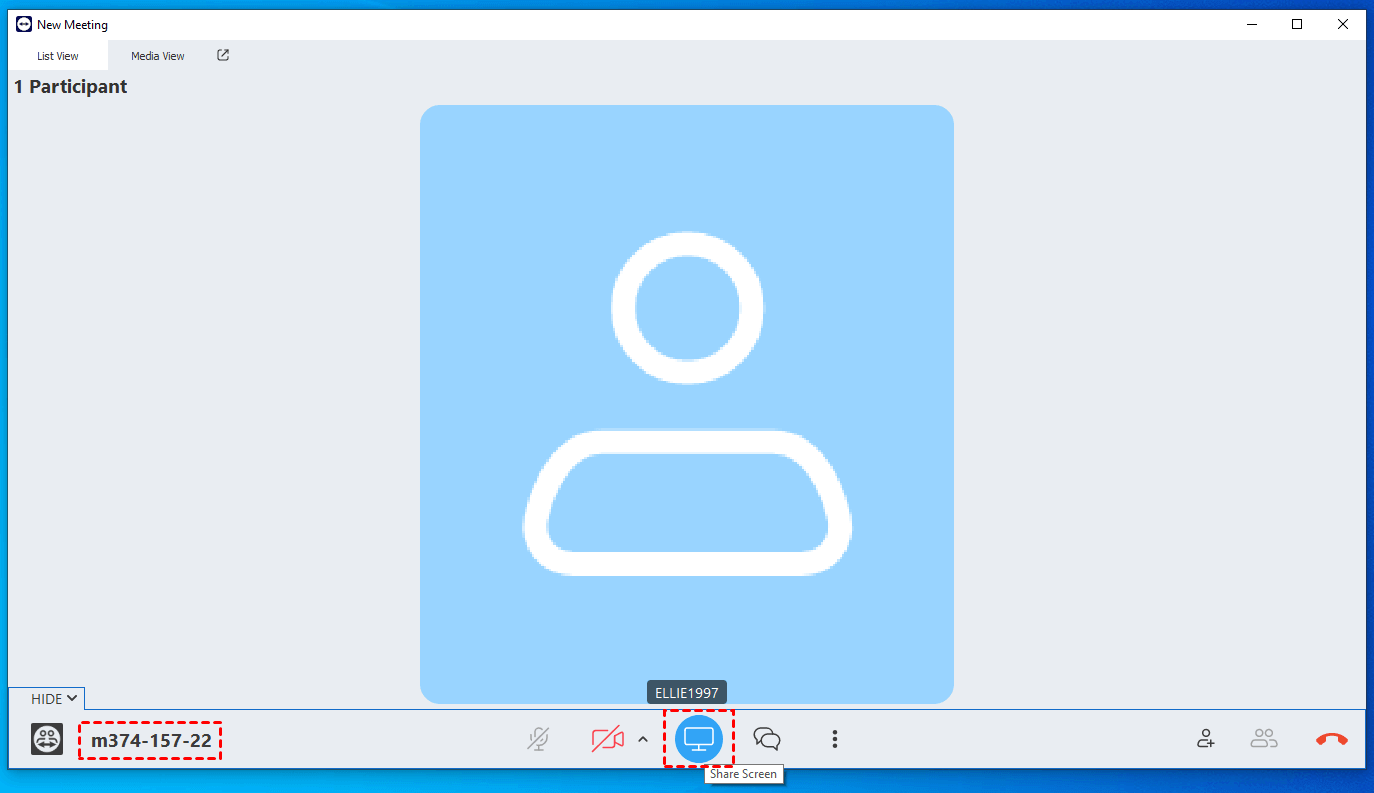
Step 4. Once the meeting is active, find the meeting ID at the bottom left corner. Share this ID with the other Windows device. Click the "Share Screen" icon in the center.
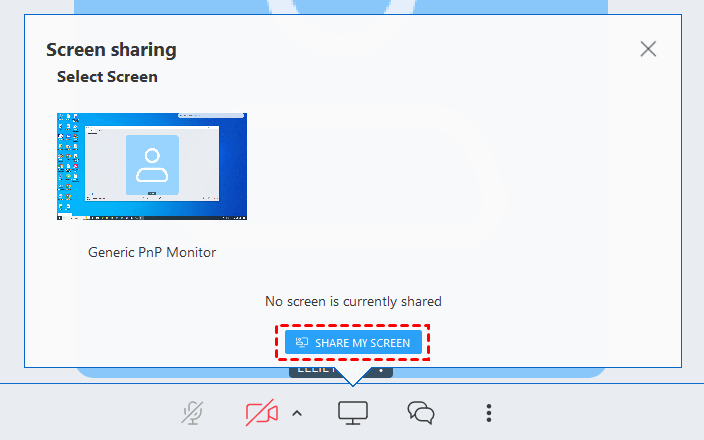
Step 5. To share a screen, select it and click "Share my screen."
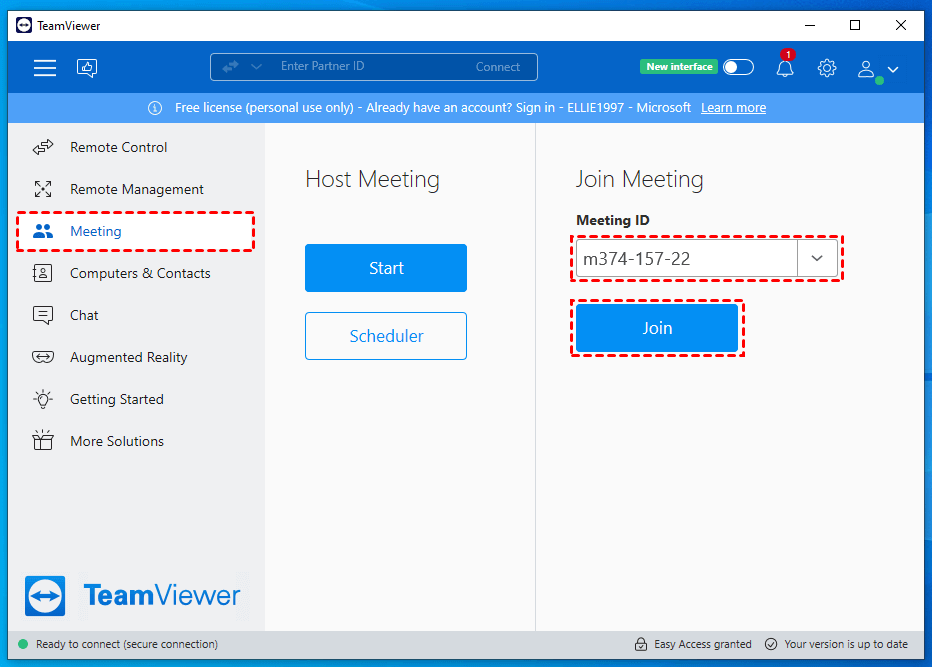
Step 6. On the other Windows device, enter the meeting ID and click "Join."
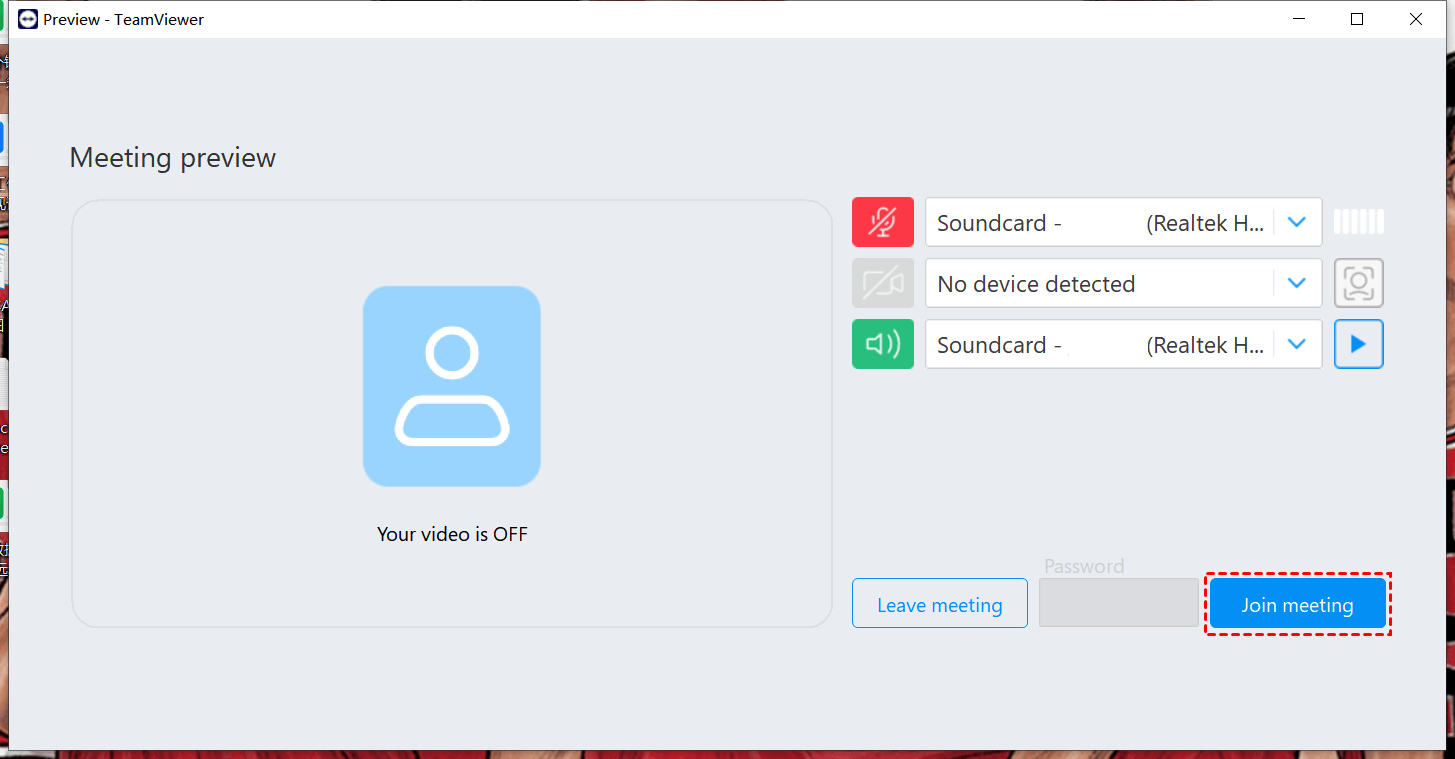
Step 7. After joining, configure any additional settings like microphone and speakers if needed, then click "Join Meeting."
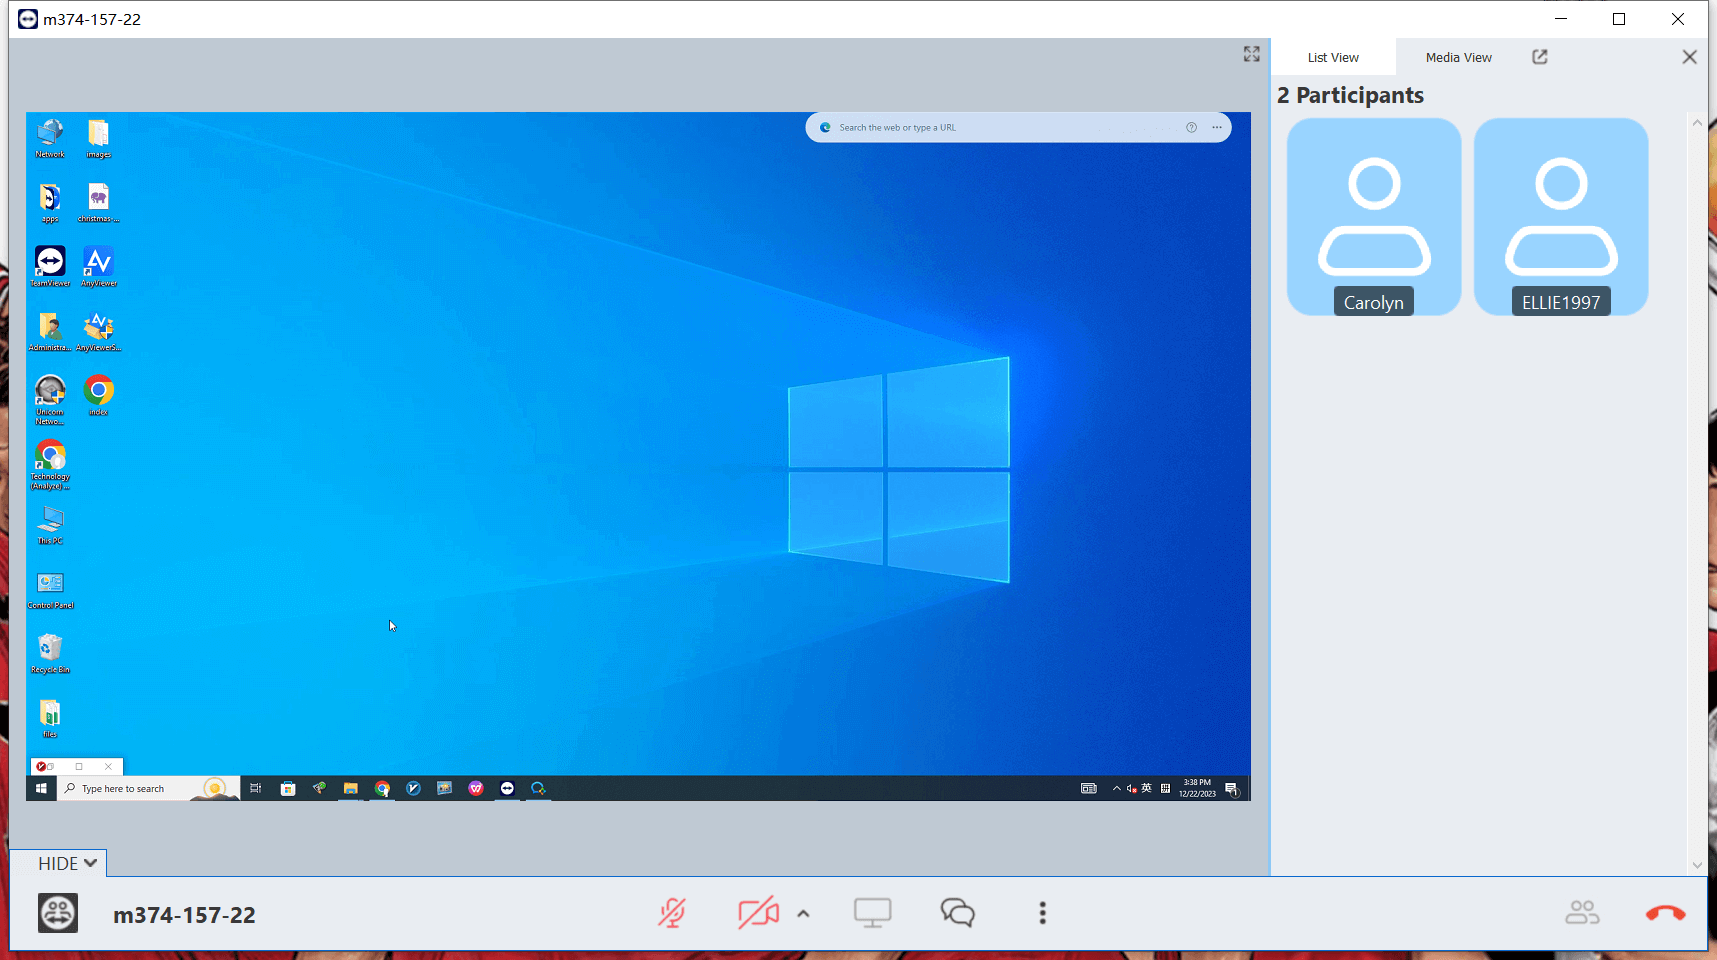
Step 8. The other Windows device will now be able to view your mirrored screen.
Conclusion
Mastering how to screen mirror on Windows opens up a world of possibilities for sharing content effortlessly. Whether using built-in features like Miracast or third-party tools like AnyViewer, you can easily project your screen to enhance presentations, enjoy media on a larger display, or collaborate with others. With this guide, you’re equipped with the knowledge to choose the best method for your needs and troubleshoot common issues. Embrace these techniques and make your screen mirroring experience on Windows both efficient and enjoyable.
