
Tutorial: How to Connect Through a Proxy Using Remote Desktop
This article provides a comprehensive overview of how to use Remote Desktop to connect through a proxy. It covers the basic steps and the simplest alternatives to ensure a secure and efficient remote connection. Whether you are a beginner or an experienced user, this guide will provide you with valuable insights to enhance your remote desktop experience.
By Carolyn / Updated on December 13, 2024
How to use proxy on remote desktop?
Can Remote Desktop be configured to connect through a web proxy? If yes, how can this be done? If not, are there any recommendations on establishing a Remote Desktop session via port 443 over a proxy in scenarios where control over the client's PC or network is limited? Does RemoteApps allow for access via web proxy when using RD Gateway?”
- Question from StackExchange
The ability to connect to your work computer remotely today is a game changer. Whether you work from home, travel for business or manage multiple servers, remote desktop connections offer unparalleled convenience. However, to increase security and bypass network restrictions, many users choose to connect through a proxy. So, how to connect through a proxy using remote desktop connection? Buckle up, because we're going to provide you with a detailed step-by-step guide that will make you a connoisseur in no time!
How to connect through a proxy using remote desktop
If you want to know how to connect through a proxy using remote desktop client, read on. Next, we will show you how to connect through a proxy using remote desktop step by step.
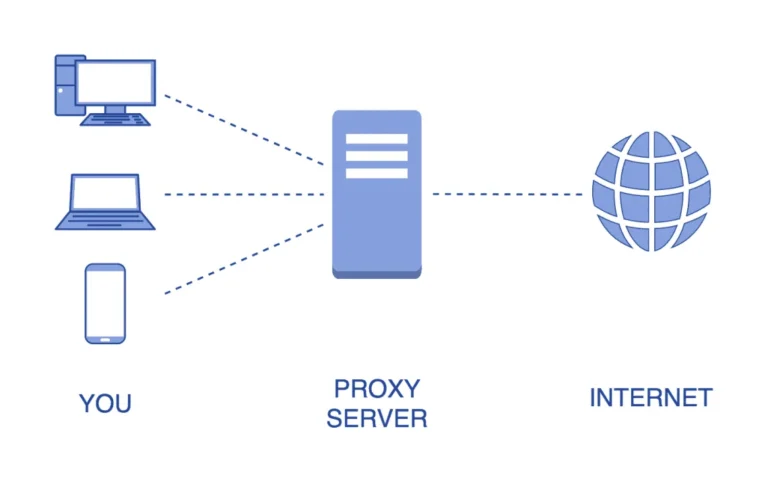
The standard Microsoft Remote Desktop client does not support web proxy server settings. To address this limitation, the Remote Desktop Gateway server feature in newer versions of the Remote Desktop client can be utilized. Here are the detailed steps to set up Remote Desktop via a proxy server. Before that, you need to know the infrastructure required to use a remote desktop proxy server. You will need the following servers:
- Remote Desktop Session Host and Web Access Server:
This server is equipped with the Remote Desktop Services Role, including the Remote Desktop Session Host and Remote Desktop Web Access Role Services. It serves as the main Remote Desktop Server where clients connect to run remote desktops and published applications.
- Remote Desktop Gateway and Web Access Server:
This server is equipped with the Remote Desktop Services Role, including the Remote Desktop Session Host and Remote Desktop Web Access Role Services. It acts as the landing page for users, who connect via Internet Explorer. Through the server's Remote Desktop Web Access portal, users can log in and access the published applications they are permitted to use, including the Remote Desktop Client ActiveX version.
- Remote Desktop Connection Broker Server:
This server has the Remote Desktop Services Role installed, with the Remote Desktop Connection Broker Role Services. It is used to configure the source.
Step to connect through a proxy using remote desktop
Setting up the Remote Desktop Session Host and Web Access Server involves the following steps:
Step 1. Install the desired application on your server.
Step 2. Next, use the RemoteApp Manager to make the installed application available.
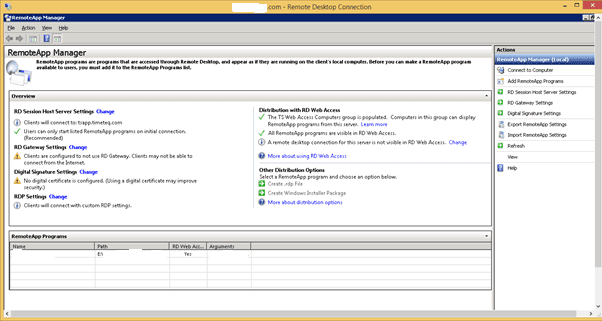
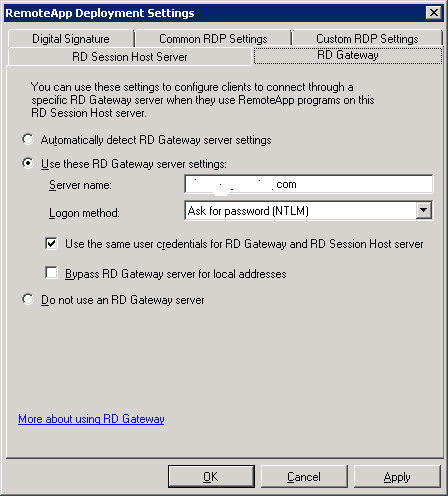
Step 3. Confirm that the RD Gateway Settings are properly set up, as this is essential for facilitating Remote Desktop connections via a proxy server.
Step 4. Repeat these steps for each RD Session Host server.
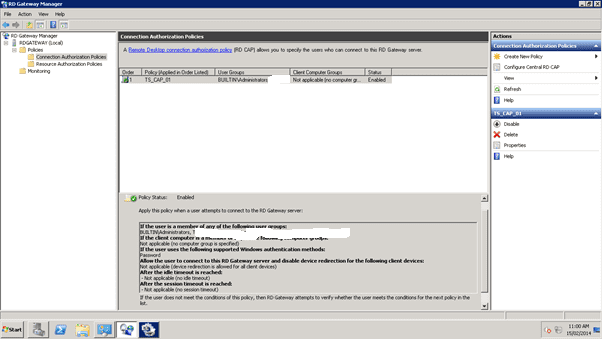
In RD Gateway Manager, manage the following configurations:
Step 1. SSL Certificate: Obtain a valid SSL certificate (or generate a self-signed one) and install it on the Remote Desktop Gateway.
Step 2. Connection Authorization Policies: Define which users or groups can access the Remote Desktop Gateway. It is advisable to use groups for easier management.
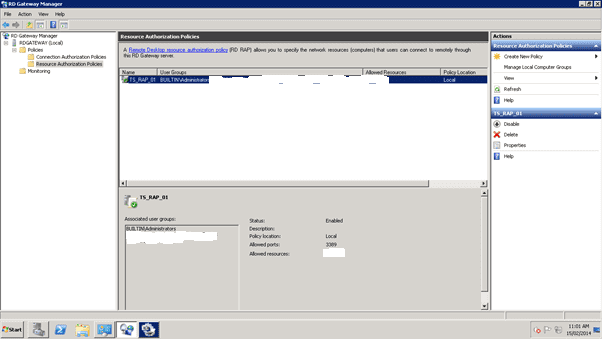
Step 3. Resource Authorization Policies: Determine which network resources can be accessed by specific users or groups.
Step 4. Remote Desktop Web Access Configuration: Set up the source for the Remote App Programs. This could be the name of individual Remote Desktop Session Host Servers, the name of a Remote Desktop Session Host Farm, or, if using a Remote Desktop Session Broker for load balancing, specify the server with the Session Broker role.

AnyViewer: The easiest way to connect through a proxy using remote desktop
Using a proxy server for remote desktop access over the internet enhances both the functionality and security of the connection. It circumvents firewalls, minimizes exposure to the public internet, and streamlines security, and enhances the efficiency of remote connections for businesses.
Configuring typical setups can be challenging for many users. Opting for software equipped with a built-in proxy server designed for remote desktop access over the internet, like AnyViewer, is advisable. These tools are user-friendly and highly effective. Setting up remote support proxy settings is easily achieved with just a few clicks.
AnyViewer enables smooth connections to computers located outside the local area network (LAN). Tailored for remote users, it utilizes a robust proxy to establish secure remote sessions over the internet. This remote access solution ensures that communications between network devices and external users are relayed and protected, facilitating efficient management of devices located outside the LAN environment.
Moreover, AnyViewer offers comprehensive features including one-click control, unattended file transfer, screen sharing, and multi-monitor support. By selecting AnyViewer, users benefit from hassle-free remote connections with heightened security and efficiency.
Here are the steps to set up and use AnyViewer with a proxy for connecting to a computer outside your LAN:
Step 1. Download and install AnyViewer on both your local and remote computers. Create an AnyViewer account and log in with the same account on both devices.

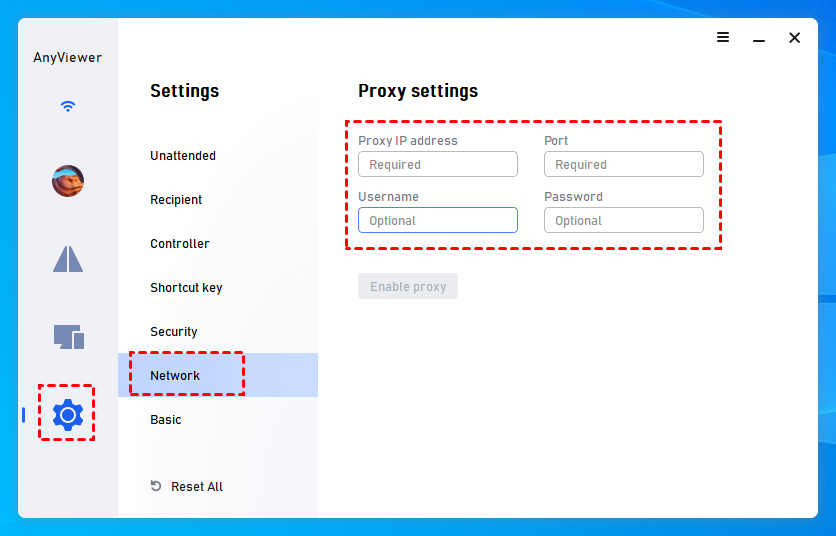
Step 2. On your local device, go to Settings > Network, and enter the required Proxy settings. Then, click on "Enable proxy."
Step 3. Find the remote computer in the device list on the Device tab within AnyViewer. Click "One-click control" to establish remote desktop access over the internet.

Following these steps allows you to securely connect to a remote computer over the internet using AnyViewer's proxy functionality.
- ★Tips: If you want unlimited simultaneous sessions, faster file transfers, better image quality and color, more devices for remote access, and other higher-level features, it is recommended that you upgrade to the Professional or Enterprise plan to get them.
Conclusion
Mastering how to connect through a proxy using remote desktop opens up a world of possibilities for seamless and secure remote connections. By following the steps outlined in this guide, you've gained the knowledge to configure Remote Desktop via a proxy server effectively. Whether you're enhancing security, bypassing network restrictions, or optimizing remote access efficiency, this tutorial equips you with the essential tools. Additionally, exploring alternatives like AnyViewer showcases simpler solutions for users seeking user-friendly remote access options. Embrace these techniques to elevate your remote desktop experience with confidence and efficiency. Now, go forth and connect effortlessly, no matter where you are!
