
Tutorial: How to Turn on High Performance Screen Sharing
Want to turn on High Performance Screen Sharing on macOS Sonoma? This post provides a detailed tutorial. It also mentions the requirements and limitations for High Performance Screen Sharing. Keep reading if you want to learn more.
By Ellie / Updated on December 13, 2024
What is High Performance Screen Sharing on Sonoma?
Mac users have various options for screen sharing, including Messages, FaceTime calls, and a new feature in video conference calls. With the introduction of macOS Sonoma, a dedicated Screen Sharing app is now available. This app offers a "High Performance" mode for screen sharing.
This High Performance Screen Sharing leverages Apple's advanced media engine on Apple silicon, enabling highly responsive remote access over high-bandwidth connections. It can handle up to two virtual displays, deliver high frame rates, and provide low-latency audio.
Professionals can securely access their content creation workflows from anywhere, whether they're editing in Final Cut Pro or DaVinci Resolve, or working on complex 3D animations in Maya. This mode also supports reference color, enabling remote color workflows that previously required specialized software and hardware.
How to turn on High Performance Screen Sharing on macOS Sonoma
To enable High Performance Screen Sharing between a supported Apple Silicon Mac and a client Mac, first ensure that screen sharing is activated on both devices. Once screen sharing is enabled, you can proceed with controlling or observing the other Mac using the High Performance mode.
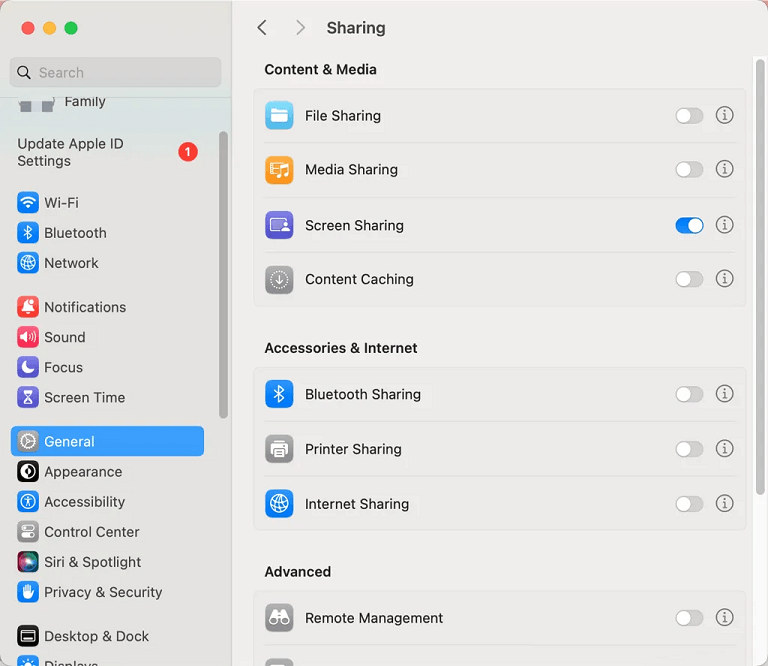
Step 1. Open the Apple Menu and select System Preferences.
Step 2. Navigate to General and then click on Sharing.
Step 3. Enable the Screen Sharing option.
Here are the steps to turn on High Performance Screen Sharing:
Step 1. Launch the Screen Sharing app from the Launchpad or the Utilities folder.
Step 2. Connect to a computer you have previously connected to or a new one.
Step 3. If prompted, enter a username and password, then click Sign In.
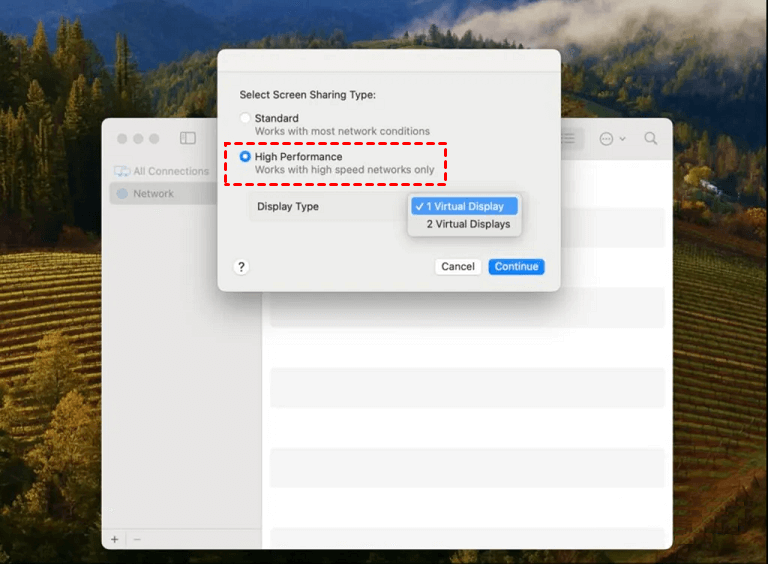
Step 4. In the Screen Sharing Type window, select High Performance.
Step 5. Click the Display Type pop-up menu, choose either one or two virtual displays, then click Continue.
Requirements and limitations for High Performance Screen Sharing
To use macOS Sonoma High Performance Screen Sharing, keep the following in mind:
- A high-bandwidth and consistently low network latency are ideal for optimal performance.
- Wired network connections are recommended over wireless.
- Both Mac computers involved must be Apple silicon and running macOS Sonoma 14 or later.
- Only one High Performance Screen Sharing session can be active on each Mac at any given time.
- The maximum supported screen resolution on a virtual display is 4K (3840 x 2160 pixels or 1920 x 1080 HiDPI).
- When authenticating using the logged-in user's name on the target Mac, the physical displays connected to that Mac are blanked for privacy, preventing simultaneous use of the Mac during the High Performance Screen Sharing session.
Bonus tip: Set up high performance screen sharing on Windows
To enable high performance screen sharing on Windows, you can utilize the third-party remote screen-sharing software called AnyViewer. Here are the details:
AnyViewer is a versatile application designed for screen sharing and remote desktop functionality, allowing users to control computers and devices remotely from anywhere. Alongside screen sharing, AnyViewer supports fast remote control, file transfers, and mobile screen mirroring. It is commonly used for remote assistance, collaborative projects, and accessing office computers from home.
AnyViewer's high performance screen sharing feature enhances color workflows and responsiveness. It includes support for ultra-high-definition display mode, high frame rates (30 or 60 fps), and 4:4:4 chroma sampling. These capabilities cater to professional tasks such as graphic design, video editing, and other visually demanding applications.
Here are the steps to set up and start a remote screen viewing/sharing with AnyViewer:
Step 1. Download and install AnyViewer on both your local and remote devices. Create an AnyViewer account and log in on both machines.

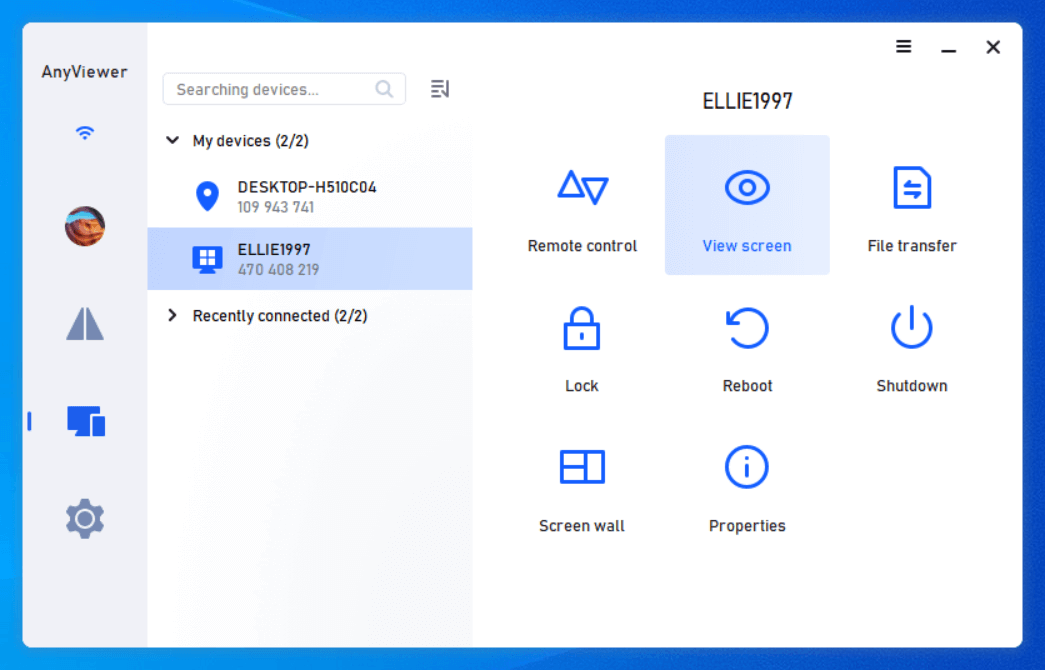
Step 2. On your local device, select the remote screen you want to view. View directly without permission by clicking on "View screen".
To enable high performance screen sharing in AnyViewer:
With a free AnyViewer account, users can access basic features. Upgrading to a Professional or Enterprise plan offers optimized display quality and additional advanced features.
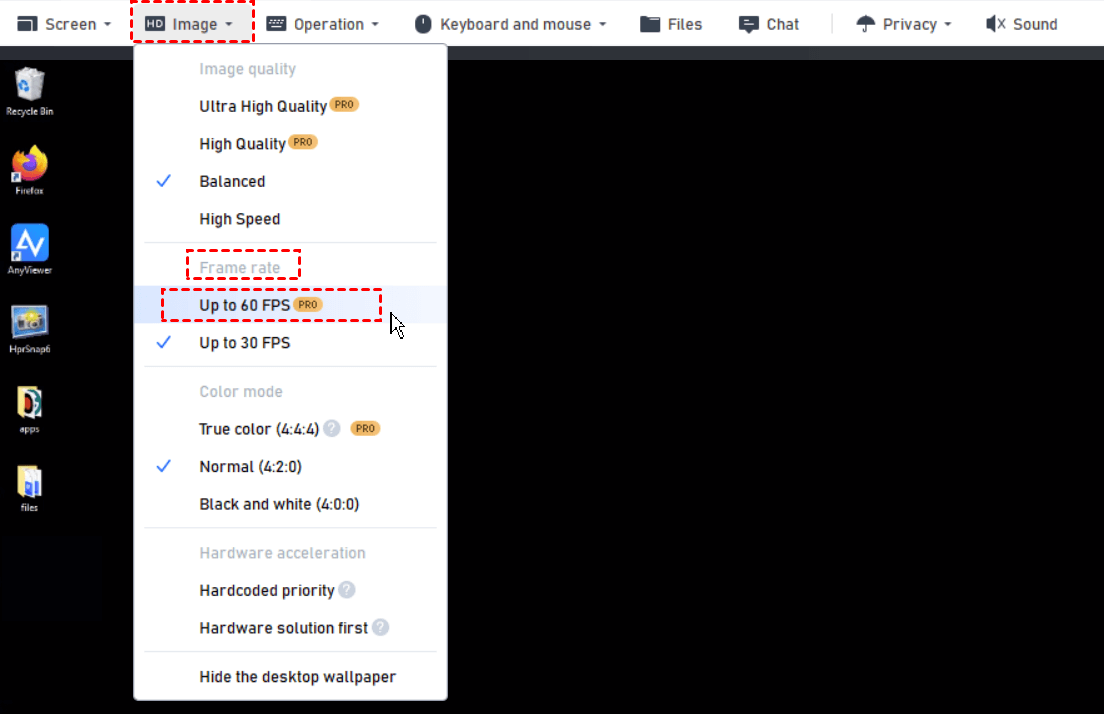
Step 1. Navigate to the toolbar located at the top center of the window during a remote session.
Step 2. Select Image > Image quality > Ultra HD mode to enjoy ultra-high-definition display details.
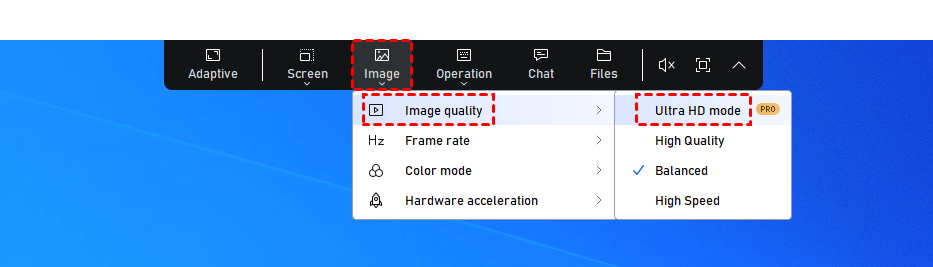
Step 3. Next, go to Image > Frame rate > Up to 60FPS to maintain high-definition quality with a smooth frame rate.
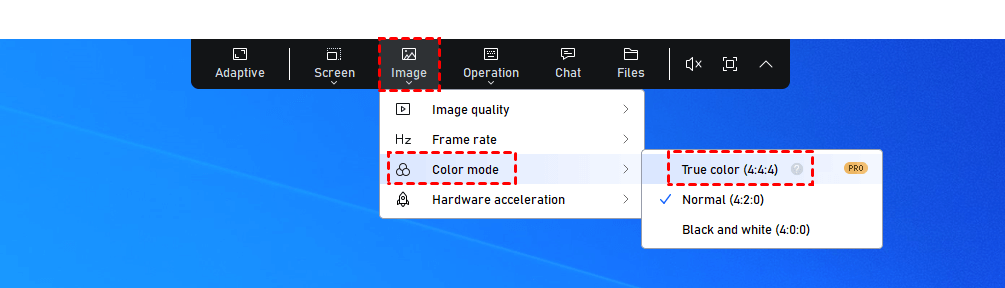
Step 4. Finally, choose Image > Color mode > True color to utilize 4:4:4 chroma sampling, ensuring accurate color display without any loss.
The bottom line
High Performance Screen Sharing on macOS Sonoma offers an advanced solution for professionals needing highly responsive remote access with high frame rates and low latency. By following the steps outlined in this tutorial, you can easily enable this feature and take full advantage of the sophisticated media engine in Apple Silicon.
Additionally, Windows users can achieve similar high performance screen sharing using AnyViewer, making these tools invaluable for remote work and collaboration. Whether you're working on complex video edits or detailed 3D animations on Mac or Windows, this guide ensures you can securely access your workflows from any location.
