
How to Execute Remote Command via SSH on Windows
This post provides stepwise tutorial to execute remote command via SSH on Windows. Additionally, it suggests optimal GUI tools for users who favor remote desktop access and control interfaces over command-line utilities.
By Ellie / Updated on December 13, 2024
How to execute SSH commands in Windows?
SSH, or Secure Shell, serves as a secure means of communication between devices. Typically, SSH is utilized for connecting a local computer to a remote server, often for administrative purposes related to web hosting.

This guide outlines the process of executing remote commands via SSH on the Windows platform, encompassing the fundamentals of installing a command-line tool for SSH on Windows and establishing a connection to a remote server (such as a Linode) via SSH from a local Windows system.
Stepwise tutorial to execute remote command SSH on Windows
The following is the stepwise tutorial to use Windows SSH to execute remote commands. Read each part carefully.
Before You Begin
Before you begin, there are two things you need to pay attention to:
- Make sure you have a server equipped with an SSH server, such as OpenSSH, installed.
Step 1. Access Windows Search by clicking on the search area in the taskbar or pressing Windows + S on the keyboard.
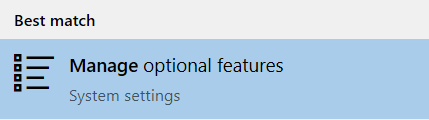
Step 2. Start by entering "Manage optional features" in the search bar, then choose "Manage optional features (System settings)" from the list of search results.
Step 3. The Optional Features page of the Settings application will open. Look under the Installed features list for the OpenSSH Client feature.
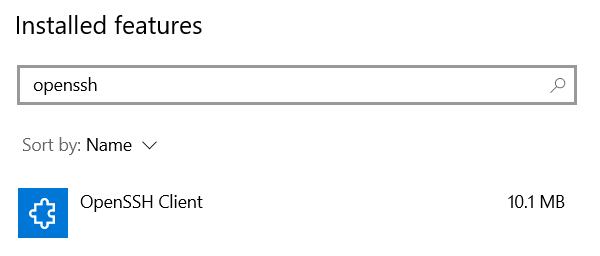
Step 4. If the OpenSSH Client feature is not listed, click the "Add a feature" button at the top of the page. A dropdown menu will appear. Choose "OpenSSH Client" and then click the "Install" button to install SSH on Windows.
- Before enabling SSH, it's important to install any pending updates to ensure your Windows system is running the latest version.
Open the Terminal [3 options]
To begin, launch the terminal application of your choice on your local Windows computer. The terminal grants access to your operating system's shell environment, enabling you to execute commands like SSH through the command line.
- Command Prompt (or PowerShell) - Windows 10 or 11: This is the simplest method for most users of Windows 10 or later.
- Windows Subsystem for Linux (WSL) - Windows 10 or 11: This involves additional installation and setup steps but may be preferred by those comfortable with Linux command-line interfaces.
- PuTTY - Windows 8, 7, Vista, and XP: Users of earlier Windows versions should use PuTTY or another third-party terminal emulator.
Command Prompt (or PowerShell) - Windows 10 or 11
On Windows 10 and 11, there are two primary terminals: Command Prompt (CMD) and PowerShell.
Step 1. To initiate the SSH command, you must first open your preferred command-line utility.
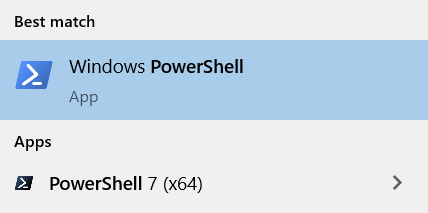
Step 2. Access Windows Search using the Windows + S shortcut, enter "Command Prompt" or "PowerShell" in the search field, and choose the relevant application from the results.
Windows Subsystem for Linux (WSL) - Windows 10 or 11
Rather than utilizing the Command Prompt or PowerShell environments, which differ significantly from macOS and Linux command-line interfaces, you have the option to run Linux directly within Windows via WSL (Windows Subsystem for Linux). This approach might be preferable if you are more accustomed to working within a Linux shell environment.
- Follow Microsoft's Install WSL guide to install WSL. If you already have WSL1 installed, it's advisable to update to WSL2.
- Install your preferred Linux distribution, like Ubuntu, directly from the Microsoft Store.
Once configured, access the WSL environment by launching your installed Linux distribution from the Start Menu or Windows Search. By default, WSL utilizes a straightforward terminal emulator. For a more customizable terminal experience, consider using tools like Windows Terminal or Hyper.
PuTTY - Windows 8, 7, Vista, and XP
Windows 8 and earlier versions do not come with a native SSH client. Therefore, to use SSH, you will need to rely on a third-party application such as PuTTY.
Step 1. Install PuTTY on your local Windows system.
Step 2. Open PuTTY. You can find PuTTY on your desktop, through the Start Menu, or by using Windows Search.
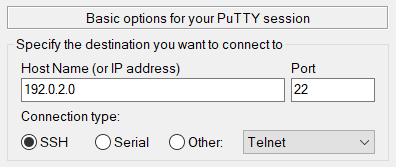
Step 3. Enter the following details about the destination host:
- Host Name: Enter the destination host's domain name or IP address.
- Port: Specify the SSH port on the destination host. The default port for SSH is 22, but you can change it if necessary.
- Connection type: Select SSH as the connection type, unless you are using a different protocol.
Step 4. Optionally, save your session for future use by entering a unique name under "Saved Sessions" and clicking the Save button.
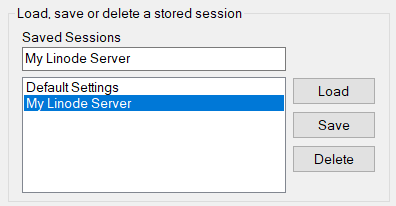
Step 5. Click the Open button at the bottom of the PuTTY window to initiate the connection.
Step 6. When connecting to a server for the first time, PuTTY will prompt you to verify the host key's fingerprint.
Step 7. If you trust this connection, click the Accept button to proceed.
Step 8. PuTTY will now prompt you to enter the remote username and password for authentication. This is how you use SSH to execute remote commands with passwords from Windows.
Establishing a connection to a remote server via SSH from Windows
Once you've opened your preferred Windows SSH client (Command Prompt, PowerShell, or WSL), proceed to run the `ssh` command to establish a connection to your server.
Step 1. In your terminal, input the command below, substituting `[username]` with the remote user's username and `[ip-address]` with the IP address or domain name of the server you wish to connect to.
Step 2. Upon connecting to a server for the first time, the SSH client on Windows 10 will prompt you to verify the host key's fingerprint. This step ensures the authenticity and security of the remote server before establishing the connection.
Step 3. Accept the prompt by entering `y` or `yes`, which results in a one-time warning similar to:
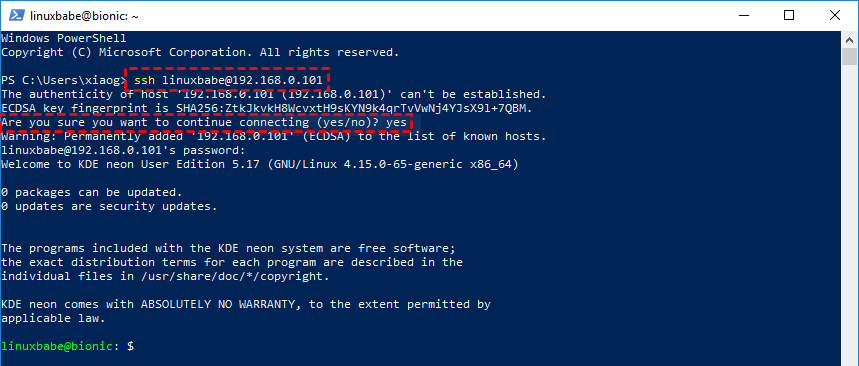
After successfully connecting, your terminal will be operating within the remote shell environment of the server. This allows you to execute commands and interact with the server's resources directly from your local Windows system. Your command prompt will display the username and hostname configured for the server. Now, you can execute various commands available on the server, including fundamental Linux commands like `ls`, `cd`, `rm`, and others covered in the Using the Terminal guide. Familiarizing yourself with these commands will facilitate navigation and management of your server.
AnyViewer: Best GUI remote desktop access & control software
For some users, navigating command lines can be challenging and technically demanding, making them less user-friendly. Unlike SSH, which typically operates through a command-line interface (CLI), the remote desktop software AnyViewer offers a graphical user interface. This GUI allows for intuitive navigation, easier file transfers, and seamless interaction with remote desktop environments.

Advantages of using AnyViewer
Using AnyViewer instead of traditional SSH-based solutions for remote desktop access and control offers several distinct advantages:
- Ease of use: AnyViewer provides a straightforward, user-friendly interface that simplifies the process of connecting to remote desktops. Unlike SSH, which often requires command-line knowledge and port forwarding setup, AnyViewer can be set up and used by users with varying levels of technical expertise.
- Remote control features: AnyViewer enables comprehensive remote control capabilities such as real-time screen sharing, file transfer, and remote restart/shutdown. These features are often more user-friendly and accessible compared to what SSH provides natively.
- Security features: AnyViewer uses strong encryption protocols (asymmetric ECC 256-bit end-to-end encryption) to secure remote connections. It also supports additional security measures like two-factor authentication (2FA), ensuring data privacy and protection during remote sessions.
- Performance and reliability: AnyViewer is optimized for performance over various network conditions, including slower connections. It typically provides a smooth remote desktop experience with minimal latency and high reliability, which can be crucial for tasks requiring real-time interaction.
- Additional collaboration tools: Beyond remote desktop access, AnyViewer includes features for mobile screen mirroring, screen sharing, and text chat. This versatility makes it suitable not only for IT support scenarios but also for team collaboration and remote training sessions.
- Commercial and personal use: AnyViewer offers a free version for any use and licensing options that cater to both personal users and businesses of all sizes. This scalability allows individuals, small teams, and large enterprises to utilize its features according to their specific needs and budget.
Access the remote desktop with AnyViewer in 3 steps
You can remotely access remote desktops with AnyViewer in just three steps:
Step 1. To initiate the session, begin by downloading and installing AnyViewer on both computers engaged in the connection.
Step 2. Next, on the school computer, create an AnyViewer account, log in, and ensure the device remains powered on.

Step 3. Using the identical account details, log in on the local device. Locate the remote device and initiate the session by selecting "One-click control."

The bottom line
In conclusion, executing remote commands via SSH on Windows opens a secure gateway to efficiently manage remote servers from your local environment. Whether using Command Prompt, PowerShell, or WSL, configuring SSH empowers seamless command-line control.
For those preferring a graphical interface, AnyViewer offers a user-friendly alternative for remote desktop access, enhancing collaboration and security with robust encryption and advanced features. Whether opting for CLI precision with SSH or the intuitive ease of AnyViewer, these tools cater to diverse user needs, ensuring reliable and secure remote connectivity across different Windows platforms.
