
The Ultimate Guide to Configuring Remote Support Proxy
This article provides a detailed guide to configuring remote support agents, covering everything from definitions and best choices to step-by-step configuration.
By Carolyn / Updated on December 13, 2024
What does it mean to configure proxy?
Remote support has become a vital aspect of IT and customer service operations now. Ensuring secure, efficient, and reliable remote support requires the proper configuration of a remote support proxy. This guide will provide an overview of configuring a remote support proxy and the essential steps for configuring a remote support proxy to optimize your remote support infrastructure.
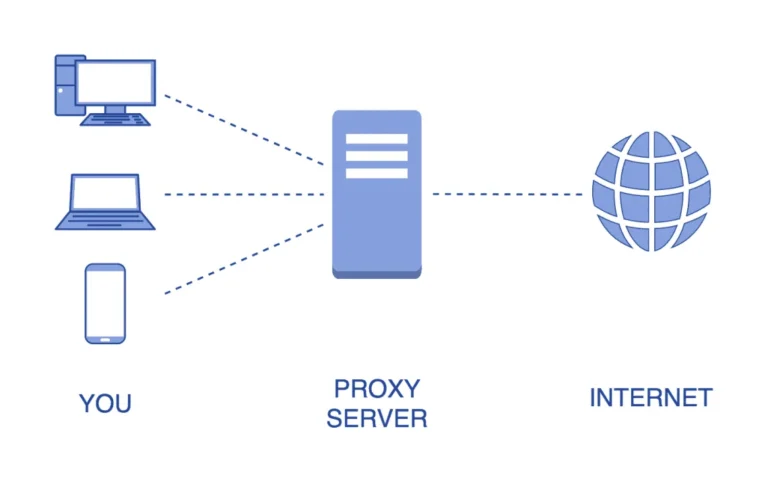
Configuring a proxy involves setting up a server that acts as an intermediary between a user's device and the internet. This intermediary server processes and forwards requests from the user to the intended internet resource and then returns the response to the user. Proxy configuration is crucial for enhancing security, improving performance, and managing internet traffic within a network.
Step of configuring remote support proxy server
If you are looking for configuring remote support proxy server, follow the step-by-step instructions below:
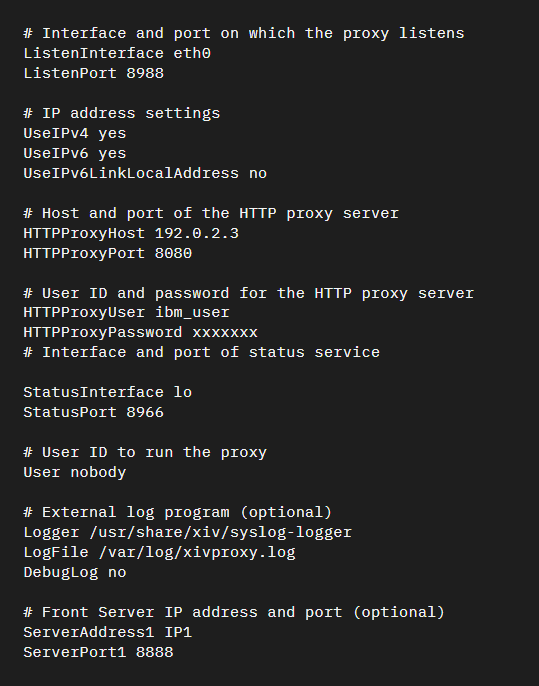
Step 1. Locate and Open Configuration File. After installing the Remote Support Proxy, find and open /etc/supportcenter/proxy.conf file:
Step 2. Set Listening Interface. To define where the proxy service listens for incoming connections from the system, you can specify an IPv4 address, IPv6 address, or interface name(e.g., eth0). If you opt for an IPv4 or IPv6 address, the Remote Support Proxy service will exclusively listen to that specified address. However, if you specify an interface name instead, the service will listen to all permitted addresses. You have the flexibility to manage which addresses are permissible by configuring parameters such as UseIPv4, UseIPv6, and UseIPv6LinkLocalAddress.
By default, the Remote Support Proxy service is set to listen on both IPv4 and IPv6 addresses. Note that if you specify an interface name, it must exactly match the output provided by the ipconfig command.
Step 3. Set Listen Port. Specify the TCP port where the Remote Support Proxy will listen for incoming connections from the system. For instance, to listen on port 9955, include the following lines in the configuration file:

Step 4. Example. Below is an example of a sample configuration file:
Configuring remote support proxy with AnyViewer
Employing a proxy server for remote desktop access over the internet improves both the practicality and security of the connection. It bypasses firewalls and reduces exposure to the public internet, simplifying, securing, and boosting the effectiveness of remote connections for businesses.
For most users, configuring common setups can be challenging. It's advisable to opt for software that includes a built-in proxy server designed for remote desktop access over the Internet, such as AnyViewer. These tools are user-friendly and highly efficient. Configuring remote support proxy settings is easily accomplished with a few simple clicks.
AnyViewer enables effortless connections to computers outside the local area network (LAN). Tailored for remote users, it leverages a robust proxy to establish secure remote sessions over the Internet. This remote access software ensures that communications between network devices and external users are relayed and safeguarded, enabling effective management of devices situated outside the LAN environment.
In addition, AnyViewer, as an all-in-one software, provides users with rich and efficient features, such as one-click control, unattended file transfer, screen sharing, multi-monitor support, and so on. By choosing AnyViewer, you will have a hassle-free remote connection with increased security and efficiency.
Below are the steps to set up and utilize AnyViewer with a proxy for connecting to a computer outside your LAN:
Step 1. Download and install AnyViewer on both your local and remote computers. Create an AnyViewer account and log in to the same account on both devices.

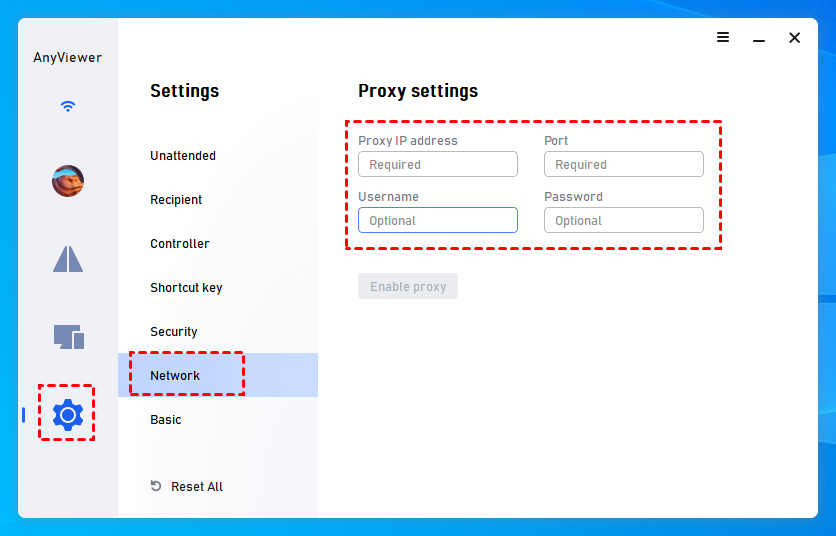
Step 2. On your local device, navigate to Settings > Network, and enter the required Proxy settings. Then, click on "Enable proxy."
Step 3. Locate the remote computer from the device list on the Device tab. Click "One-click control" to establish remote desktop access over the internet.

- ★Tips: It is advisable to upgrade to a Professional or Enterprise plan to gain additional privileges, which may include but are not limited to:
- More assigned devices for unattended remote access.
- Unlimited concurrent sessions.
- Faster file transfer speeds.
- Higher image quality and true color.
- Screen walls for improved device management.
- ...
Conclusion
Configuring a remote support proxy is not just about setting up a server—it's about enhancing your remote support capabilities with security and efficiency in mind. By properly configuring proxy settings, businesses can ensure seamless remote connections while safeguarding sensitive data from cyber threats. Whether you opt for manual configuration using configuration files or user-friendly tools like AnyViewer, the goal remains the same: to streamline remote support operations and improve user experience across the board. Stay informed about the latest trends and technologies to stay ahead in optimizing your remote support infrastructure.
