
How to Allow Remote Access SQL Server [Full Tutorial]
This post offers a full configuration tutorial to allow remote access SQL Server. Follow the steps below, you can connect to your SQL Server remotely, helping enhance your workflow and improve efficiency.
By Ellie / Updated on December 13, 2024
How do I allow access to SQL Server?
I've got SQL Server Express 2008 installed on my web server, which by default does not allow remote connections (probably a good thing.) I’m looking for instructions to enable remote connections to SQL Server. Any advice?”
- Question from Stack Exchange
SQL Server is a relational database management system (RDBMS) developed by Microsoft. It is designed to store and retrieve data requested by other software applications, whether those applications are running on the same computer or on another computer across a network.

Allowing remote access to SQL Server can be a game-changer for your database management and accessibility. Whether you're managing a small business or a large enterprise, having the capability to connect to your SQL Server remotely can enhance your workflow and improve efficiency. This guide will walk you through the steps to configure your SQL Server for remote access, ensuring that your data is both accessible and secure.
How to allow remote access SQL Server
How does SQL Server allow remote access? Here is an easy method for configuring SQL Server Express Edition on a local computer, enabling members of the same network to connect remotely using SQL Server authentication. Follow the steps in the following parts to learn how to allow remote access to SQL Server database.
Configure SQL Server for remote connections
To enable remote connections to your SQL Server, you'll need to configure a few settings in SQL Server Management Studio (SSMS). Follow these steps to ensure that your server is properly set up to allow remote access.
Step 1. Launch SQL Server Management Studio (SSMS).
Step 2. Connect to your SQL Server instance.
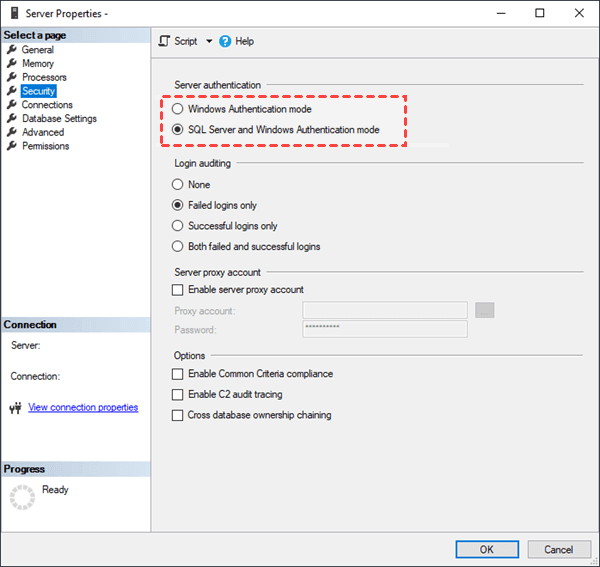
Step 3. Right-click your server name and select “Properties”.
Step 4. On the "Security" page, choose “SQL Server and Windows Authentication” mode under Server Authentication.
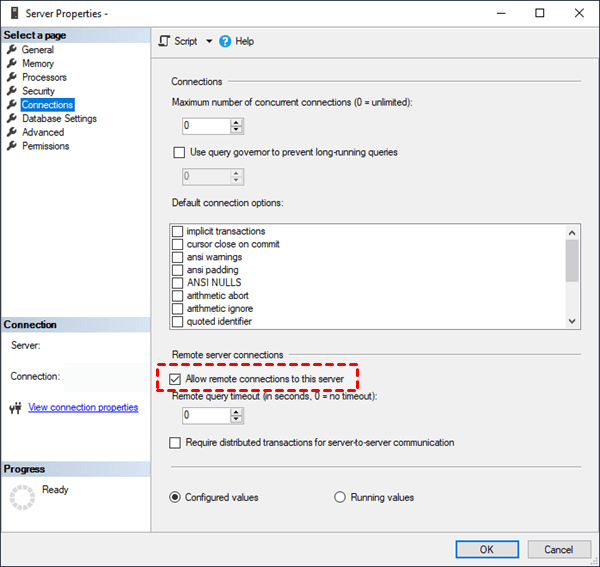
Step 5. Next, go to the Connections page, check the box for "Allow remote connections to this server", and click “OK”.
Create a universal SQL Server authentication login
After confirming that your server permits remote connections, the next step involves establishing a login for both the server and the dedicated Calibration Control database (apecal). Follow these steps to generate a universal SQL Server Authentication login tailored for Calibration Control users. This login will be utilized in the SQL Server Connection dialog for establishing database connectivity.
Note: Consider providing users with individual logins using either SQL Server Authentication or Windows Authentication, depending on the preference in your workplace environment.
Step 1. Navigate to the Security folder on your Server.
Step 2. Right-click the Logins folder and choose "New Login".
Step 3. Input a generic username, such as "apeuser."
Step 4. Opt for "SQL Server Authentication".
Step 5. Set a password, and decide whether to enforce password policy.
Step 6. Designate the apecal database as the default.
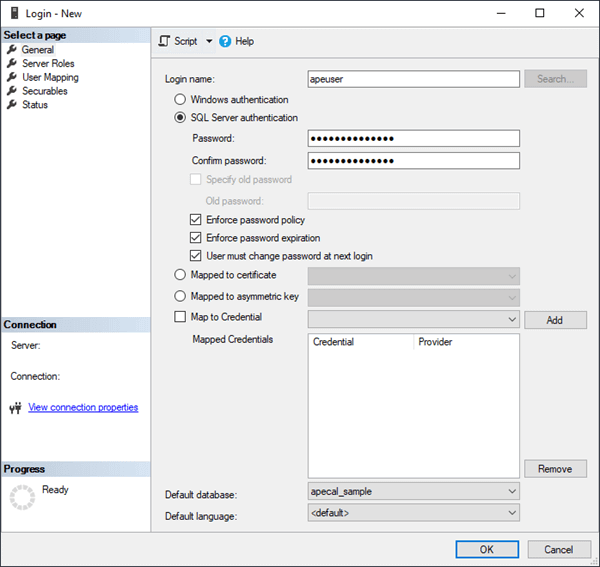
Step 7. In Server Roles, the "public" role is mandatory; optionally, assign additional roles.
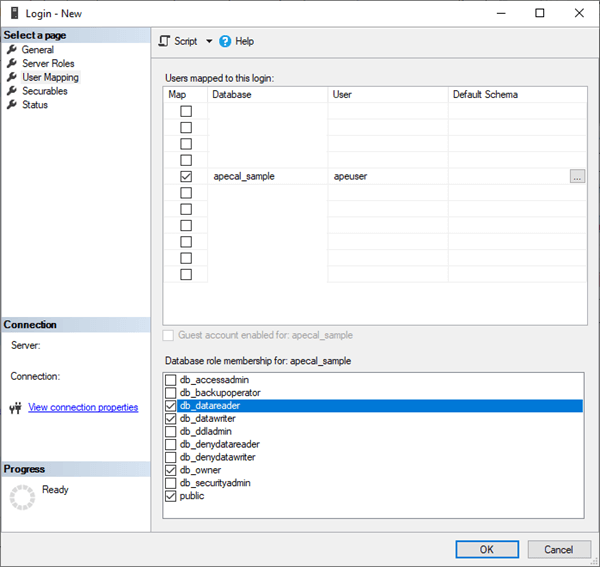
Step 8. Access “User Mapping” and select the apecal database.
Step 9. Within database roles, check "db_datawriter", "db_datareader", and "db_owner", then save changes.
Step 10. Expand the "Databases" folder, then expand the apecal database and its "Security" folder.
Step 11. Expand "Users" and double-click the newly created login.
Step 12. Verify on the membership page that the user has at least "db_datareader" and "db_datawriter" roles.
Step 13. Click "OK" to confirm.
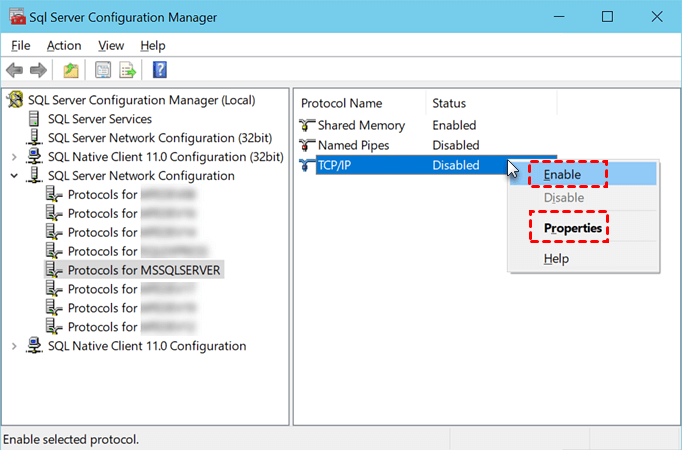
Enable TCP/IP protocols for SQL Server
Ensure that TCP/IP protocols are enabled for your server, which already permits remote connections via SQL Server login.
Step 1. Launch SQL Server Configuration Manager.
Step 2. Expand "SQL Server Network Configuration" and locate "Protocols" for {Your server name}.
Step 3. Right-click “TCP/IP” and choose "Enable". Confirm the service restart prompt by clicking "OK".
Step 4. Right-click “TCP/IP” again and select "Properties".
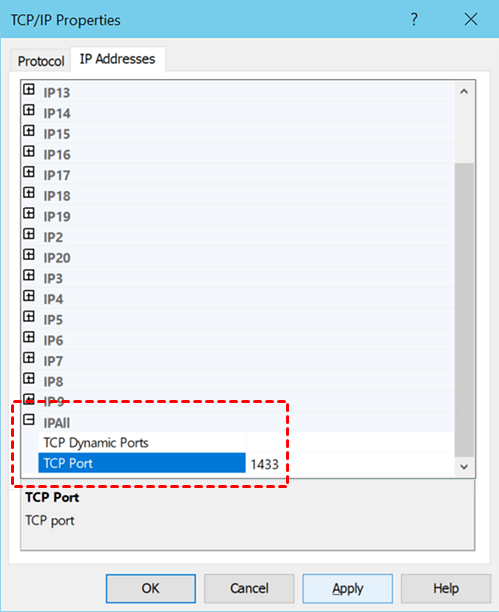
Step 5. Navigate to the "IP Addresses" tab and find “IPAll” (all IP Addresses). Input “1433” directly into the TCP Port field. Apply the change by clicking “OK”, and confirm the service restart prompt.
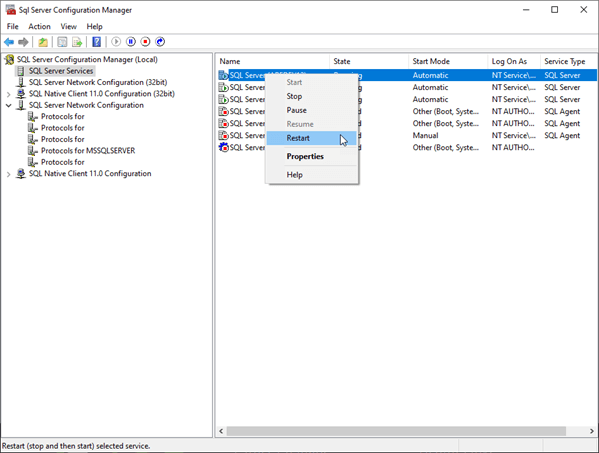
Step 6. Return to the SQL Server Services dialog. Right-click your server name and select “Restart”.
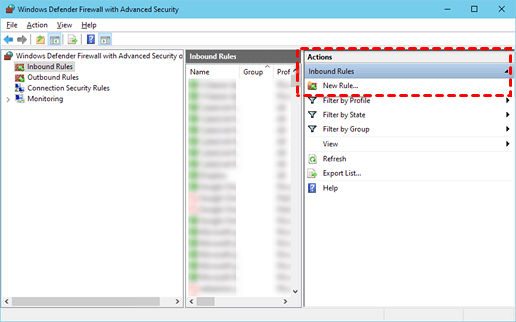
Allow specific ports for SQL Server connections
With TCP/IP now enabled on your server, the subsequent step involves permitting specific ports for connecting to your server.
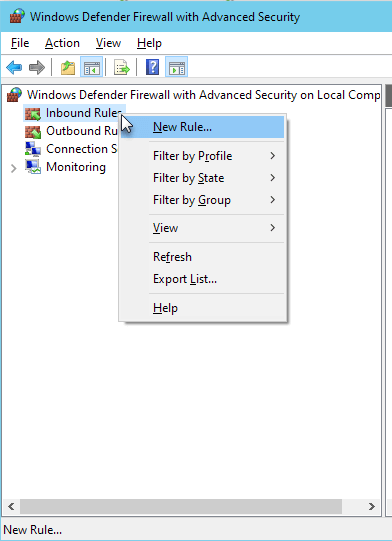
Step 1. Launch Windows Defender Firewall with Advanced Security.
Step 2. Click on Inbound rules.
Step 3. Select “New Rule” from the "Actions" menu on the right.
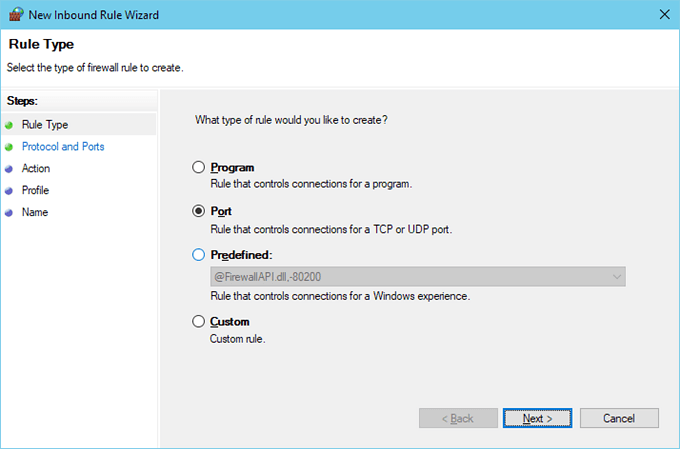
Step 4. Choose “Port” and proceed to the next step.
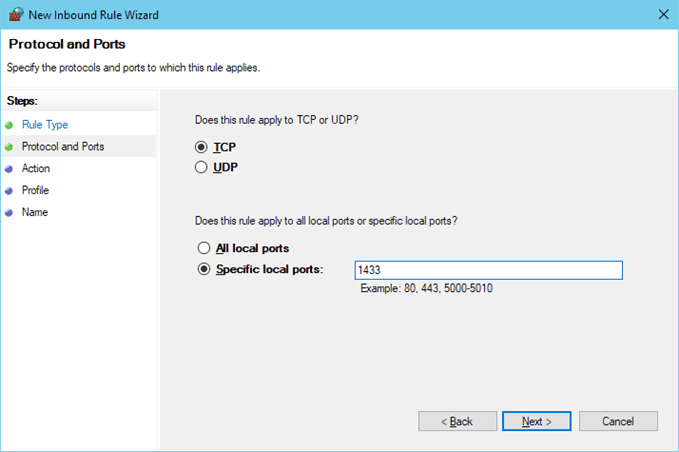
Step 5. Opt for “TCP” and specify the "Specific Port" as "1433".
Step 6. Set the Action to “Allow the Connection” and continue.
Step 7. Provide a Name for the New Rule (e.g., "SQL PORT TCP Connection") and click “Finish”.
Step 8. Create another new Inbound Rule.
Step 9. Select “Custom” to create a custom rule, then proceed.

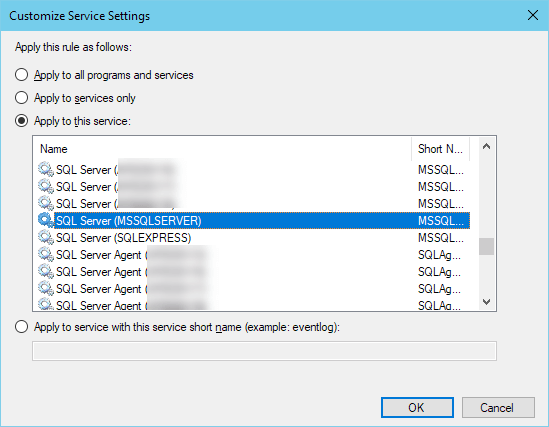
Step 10. Under the "Services" section, click “Customize”.

Step 11. Select "Apply to this service" and choose your SQL Server, then click "OK".
Step 12. Complete the wizard by clicking "Next" and provide a Name for this New Rule (e.g., "SQL SERVER TCP CNN"). Click “Finish” to complete the process.
Test the server connection
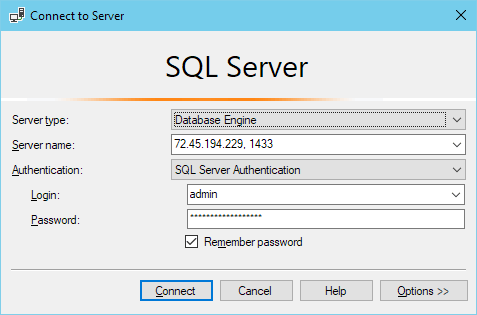
To test the server connection using SQL Server Management Studio from any computer, follow these steps:
Step 1. In the Server name field, input the computer's IP address followed by a comma and a space, then specify the Port number "1433" (Example: 72.45.194.229, 1433).
Step 2. Opt for “SQL Server Authentication” and provide the login credentials.
To establish a server connection where Calibration Control is installed using Calibration Control SQL Connect:
Step 1. If Calibration Control is open (e.g., sample database or Access database), navigate to the Utilities tab of the ribbon.
Step 2. Choose "SQL Connect" and provide your connection credentials.
AnyViewer: Best SQL Server complementary tools
AnyViewer is one of the best remote access and remote support tools that allow users to connect to and control computers remotely. It is ideal for IT support, remote troubleshooting, and remote collaboration.
AnyViewer serves a different primary function than SQL Server. However, with AnyViewer, SQL Server can better serve its functions. They are regarded as the best complementary tools.
How can they become complementary tools?
Here are common scenarios and usages:
Remote database management:
- Scenario: A database administrator needs to manage or troubleshoot an SQL Server instance that is located on a remote server.
- Usage: Using AnyViewer, the administrator can remotely access the server where SQL Server is installed and perform necessary tasks as if they were physically present at the server's location.
Technical support:
- Scenario: A developer encounters an issue with their SQL Server setup and requires help from an IT support team.
- Usage: The IT support team can use AnyViewer to remotely access the developer's machine to diagnose and fix issues with the SQL Server configuration, queries, or performance.
Training & collaboration:
- Scenario: A company is deploying SQL Server for the first time and needs to train its staff.
- Usage: An expert can use AnyViewerto to provide remote training sessions, demonstrating SQL Server functionalities and best practices directly on the trainees' machines.
Database access permissions:
- Scenario: A database administrator needs to assign different permissions for different groups of users who have the rights to access the SQL Server database.
- Usage: With AnyViewer, the administrator can create role groups and assign specific role permission to each group, and then the administrator can add sub-accounts into these role groups for users at various levels. This helps the administrator to better manage user rights to the SQL Server database.
How to remotely access the server where SQL Server is installed with AnyViewer
Step 1. Start by downloading and installing AnyViewer the server where SQL Server is installed in advance and sign up for an account.

Step 2. Then log in to the same account on the local computer.

Step 3. Go to the device tab on your local computer, choose the server that has SQL Server installed, and click “One-click control”.

Step 4. Now you can securely access the server and manage the SQL Server database from any location.
- ★Tips:
- It is recommended to upgrade to the AnyViewer Enterprise plan for better management of the server that has SQL installed. Here is what you can enjoy:
- Unlimited simultaneous sessions: Control as many computers as you need from one device.
- Unlimited screen walls: Monitor multiple devices in real-time. Enterprise users can add up to 24 devices per screen wall, while free and Professional users can add 2.
- High-speed file transfer: Transfer files at speeds of up to 10 MB/s with no limits on the number of files and a maximum size of 1 TB for individual files.
- Mass Deployment (MSI): Deploy AnyViewer to multiple computers in a domain using Group Policy.
- Role permission management: Customize roles and permissions for different users.
- Computer grouping: Easily manage large groups of devices.
The bottom line
In conclusion, allowing remote access to SQL Server significantly enhances your workflow and efficiency by allowing you to manage your databases from any location. This comprehensive guide provided step-by-step instructions for configuring SQL Server, creating authentication logins, enabling TCP/IP protocols, and setting firewall rules to allow remote connections.
Additionally, utilizing tools like AnyViewer can further support remote database management, technical support, and collaboration. By following these steps, you can ensure secure and efficient remote access to your SQL Server, ultimately improving your database management capabilities.
