What should we do when Windows 11 Remote Desktop not working? What are the reasons causing RDP not connecting? Here you can get possible reasons and useful solutions.
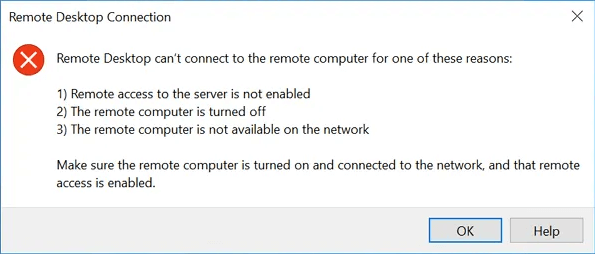
Remote Desktop is a Windows built-in feature that provides us a way to connect a PC remotely and is useful for our work or remote assistance. However, we may come across various problems with Remote Desktop (RDP) when we try to connect to a server, such as the Remote Desktop Services has ended or RDP can’t connect to the remote computer as in the following picture.

According to the reasons shown in the picture, the reasons for error occurs are because the Remote Desktop is not enabled, the remote computer is turned off, and the network issue. Before the concrete steps to fix the issue "Windows 11 RDP not working", make sure the Network is accessible and the remote PC is turned on. Then, let’s solve the problem together.
As a matter of fact, apart from the reasons mentioned above, the issue "Windows 11 Remote Desktop not working" also can be caused by the firewall blocks, services, or the changed credentials. There are 6 solutions for the issue, and you can choose a potentially possible one to help you out of the problem.
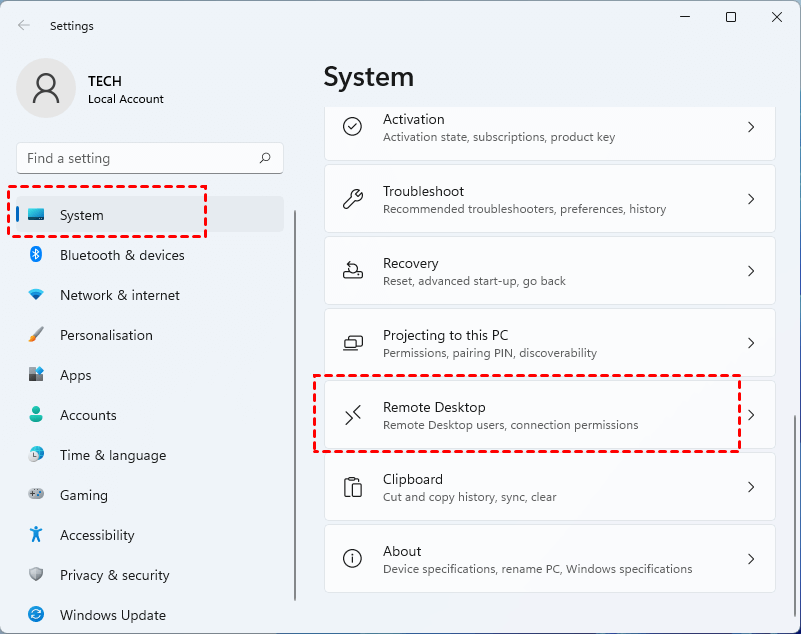
Step 1. Press Win + I to open Settings, and then find “Remote Desktop” on the right pane.

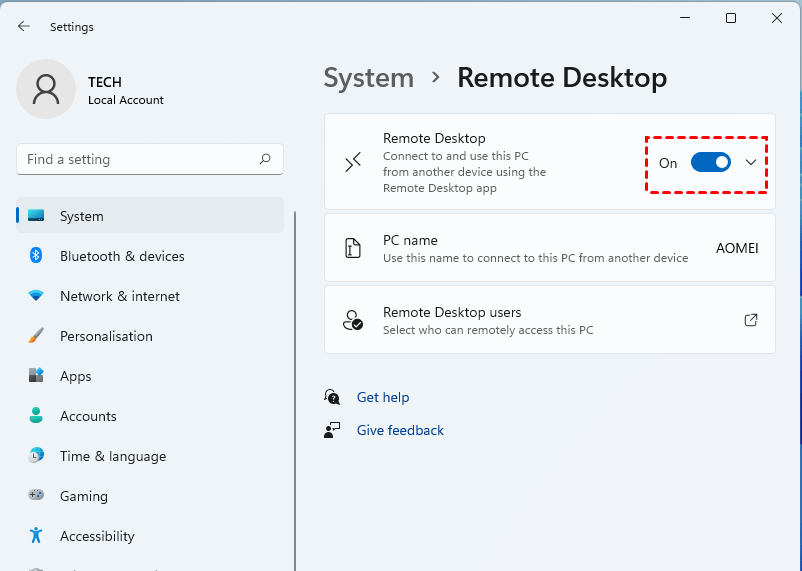
Step 2. Double-click on Remote Desktop and then tick the button to enable the RDP.

Step 1. Search Windows Defender Firewall in the search box.
Step 3. Click on “Allow an app or feature through Windows Firewall" and then select Change Settings.
Step 4. Scroll down and locate “Remote Desktop”, click on “Private”, and then click on OK.
Step 1. Press Win + R and then input services.msc to open the Services.
Step 2. Scroll down and locate “Remote Desktop Services”, and double-click on it.
Step 3. Locate Startup type, choose “Automatic” and then click on “OK”.
Step 1. Search control and panel in the search box.
Step 2. Choose a category and then click on “Network and Internet”.
Step 3. Select Network and Sharing Centre, then click on “Change Advanced sharing settings”.
Step 4. Choose “Turn on network discovery” and then click on Save changes.
Step 1. Click on the File Explorer on the bottom line and then open the file in C: /Windows/ System32/ Drivers/etc and then find hosts. Click on hosts and right-click, choose “Open with”.
Step 2. Choose Notepad and click on “OK”.
Step 3. Type the IP address of the host computer and then click on “File” or “Save”.
Finding the most suitable way to fix the issue "Windows 11 RDP not working seems a little bit time and energy-consuming. If you still struggle to fix Windows 11 RDP not connecting, we suggest you try a totally reliable third-party remote access software, AnyViewer. With the advantages of free charge, rapid speed of connection, easy operation, and security, AnyViewer can give you an immersive experience without worrying about errors when you remotely control a PC from another PC. Here are the operations of AnyViewer.
Step 1. Sign up for an AnyViewer account and sign in to the two computers. The device will be assigned to the account once logged in.
Step 2. On the main interface of AnyViewer in your current computer, go to "Device" and locate the remote PC. Click it and choose "One-click control" to access an unattended computer with one click.
Step 3. Then you can remote into the computer over the internet for free and you can see the screen of the remote computer and run apps on it.
What can we do to fix Windows 11 Remote Desktop not working? Through the text above, we can get to know that enabling RDP, allowing RDP in Defender Firewall, and checking the RDS may fix the issue. But if you get tired of trying them one by one, it’s wise to choose third-party remote access software, AnyViewer.