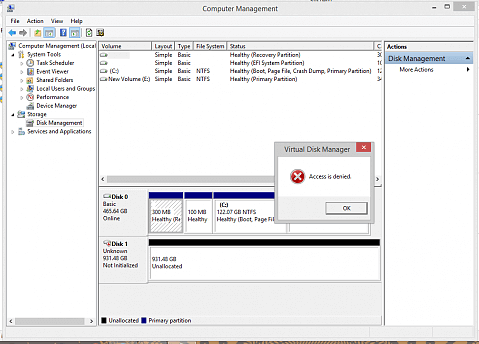
What if you run into “remote Disk Management Access is denied” problem when you are in urgent need to extend or shrink volume remotely? Don’t worry, follow me to know how to fix the issue.
Hello everyone! Please assist me to resolve my problem. I have a remote server with three partitioned drives (C:, D: & F:) and windows server 2012 R2 installed. I am the only one using the server and have admin access both in the local and domain accounts. Yesterday, since there was an internet issue in the company, the IT department made rebooted all servers and after that, I found both D & F drive inaccessible. When I tried to extend the volume, an error “Access is denied" appears. I don’t know what’s going on. Can anybody help me?
- Question from Mike

When you are in an attempt to shrink, extend a volume or format with Disk Management on the remote PC but finally get the error “Access is denied, it is mostly caused by the 2 causes. The first one is the user account does not have permission to access this partition, Or there are unmovable files located at the end of this partition. Here in this part let’s figure out the solutions to fix the issue.
Aiming at the first cause, we can fix the issue by restoring the partition permission.
Step 1. On the host PC, log in with the administrator account and turn off UAC.
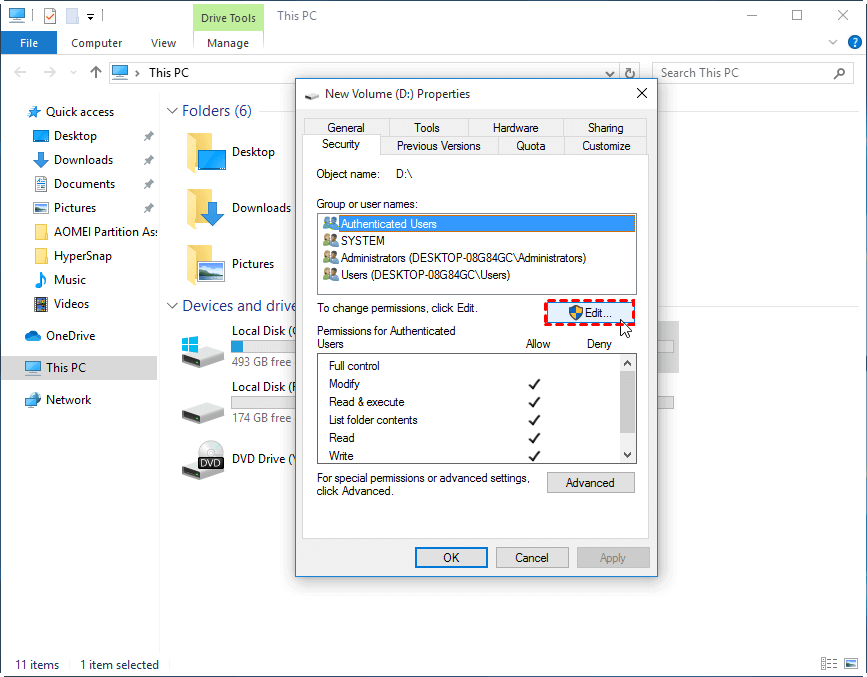
Step 2. Right-click Drive and go "Properties" > "Security" > "Edit" to see if "Administrators" is included in the "Group and user names.

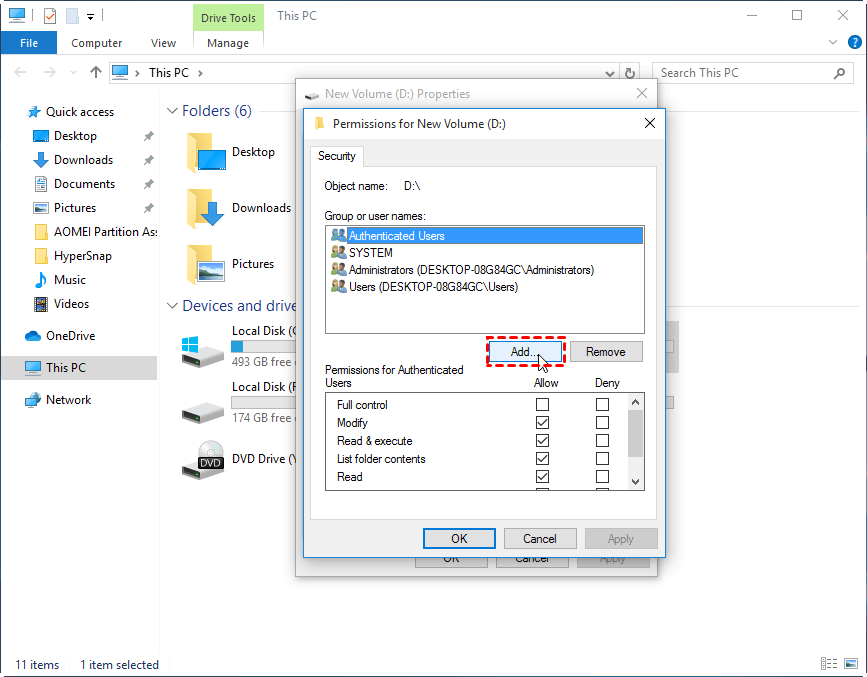
If it is not, click the "Add" option to add the Administrators group to this name list.

Step 3. Then, in the Permissions for Users box, select the "Allow" check box of "Full control". After that, click "OK" to apply the changes.
4. Click "OK" to save all the changes and close the Properties dialog.
At last, you can see if the “Access Denied” error disappears when shrinking or extending the volume.
Windows users can check the drive for errors and fix them manually by going through the hard drive properties.
Step 1. On the remote PC, go to This PC.
Step 2. Right-click the external hard drive and choose Properties.
Step 3. Go to the Tools tab and click on “Check”.
Please wait patiently for the scan to complete and follow the instruction given if there is an error found after the check.
Besides scanning for errors, you can change the drive letter of the drive to access it on your computer.
Step 1. On the remote PC, right-click "This PC" and choose "Manage".
Step 2. Choose Disk Management and right-click the external hard drive from the list.
Step 3. Click the "Change Drive Letter and Path" option and click Change to assign a new drive letter for the drive.
Step 4. Mark the drive as active and exit the Disk management to check whether or not the error is solved.
If you still meet with the error, you can also try a free partition manager-- AOMEI Partition Assistant, which not only can help you avoid the “Access is denied” error but also help you easily resize the partition, remove the partition, clone the partition, merge partition and so on.
Step 1. Install and launch the freeware. Right-click on the partition you want to shrink or extend and choose "Resize/Move Partition".
Step 2. On the next screen, you can enter the new size of the partition or drag the slider leftwards to shrink or extend the partition.
Step 3. At this stage, the program has done nothing to your disk but allows you to preview the partition layout after the operation. If it is not what you want exactly, you can easily undo the operation and modify it. Till it meets your needs, click “Apply” to put the operation in the process.
After shrinking or extending a volume successfully, you will get an unallocated space, with which you can create a new partition or extend another smaller partition via the “Merge Partitions” function of the AOMEI Partition Assistant Standard.
Step 4. Apart from that, you can delete Partitions, get Disk Clone and Disk Backup with Partition Assistant.
For most cases, we would choose RDP to help us remote access Disk Management. However, some users complain that there are too many limitations of RDP because 2 PCs should be limited to the same LAN, which is not convenient. For this reason, we recommend a remote access freeware-- Anyviewer to let the remote access to Disk Management more convenient.
Step 1. On the host computer, install and run AnyViewer; click "Log in" and click "Sign up".
Step 2. Filling all the necessary information to create an AnyViewer account and then you'll be logged in to AnyViewer. If you have already signed up an account from its official website, you can sign in directly.
Note: The device will be assigned to the account automatically be assigned to the account you've logged in to.
Step 3. On your local PC, log in to the same account as the remote PC and then go to "Device". Locate the distant computer, click it and choose "One-click control" to take full control of the PC.
Step 4. Now the connection will be established. Press “Win + R” and then type in “Diskmgmt.msc” on the remote PC. And then you can use Disk Management on the remote computer.
Step 5. Now you can use Disk Management on the remote PC.
Now you must know how to troubleshoot the remote Disk Management Access denied error. By using the solutions shown above, the error must disappear. If the issue remains, you can try AOMEI Partition Assistant to free you of the problem. Apart from that, we also provide you with ways how to access Disk Management on a remote PC with AnyViewer, which can make your remote access to Disk Management easier.