To fix Remote Assistance not working in Windows 10/11, you can take one or more methods in the post. Or switch to another remote desktop software to offer support.
Remote Assistance can help you to control another computer to fix some technological computer problems over the internet. But have you faced some problems when you use Remote Assistance? Have you gone through this situation?
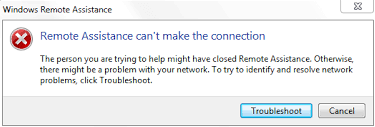
"When I was ready to connect to my friend’s computer after I press the connect button, the pop-up window 'Remote Assistance can’t make the connection' appeared."
It's frustrating to find Remote Assistance not working when you need to use it for remote support. Usually, the issue occurs as Remote Assitance isn't enabled on the computer that needs help. To fix Windows Remote Assistance not working in Windows 10 1909, 20H2, Windows 11 21 H2, and other versions of Windows 11/10, you can refer to these four methods to enable remote connection. Before using those methods, please make sure the internets of you and your friend are available.
You have to make sure that you allow your computer to use the Remote Assistance function in Windows 11/10. There are steps to set.
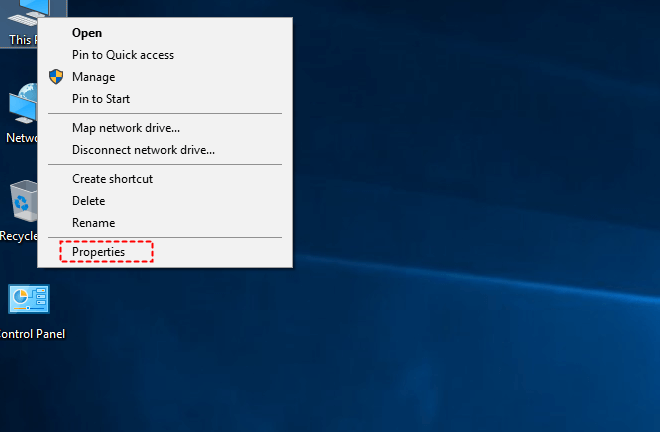
Step 1. Right-click the “This PC” icon on your desktop, then click “Properties” on the bottom of the list.
Step 2. Click the remote settings on the left side of the window
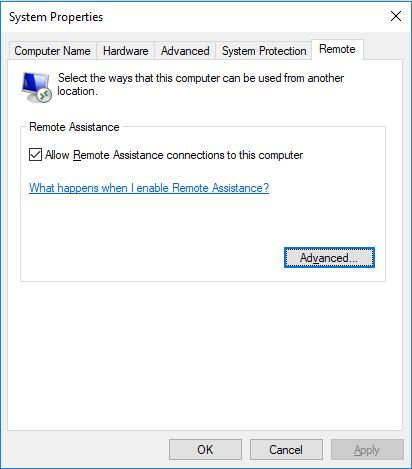
Step 3. In “System Properties” window, go to "Remote" tab first and check "Allow Remote Assistance connections to this computer".
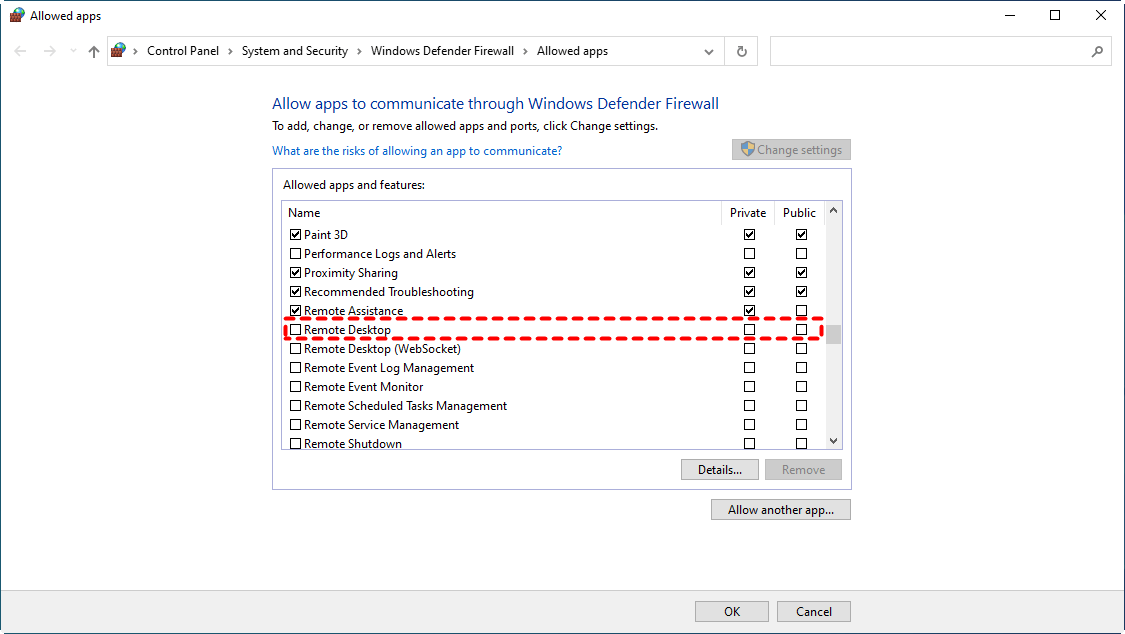
The firewall will automatically intercept those applications that are not in the “Allow Apps to Communicate through Windows Firewall” list, so you have to add Remote Assistance to the list.
Step 1. Press R and Window key, enter “control panel” in the run box, and click "OK".
Step 2. Click the “Windows Defender Firewall” on the left of the “All Control Panel Items” window.
Step 3. Click the “Allow Apps to Communicate through Windows Firewall” and make sure the “Remote Assistance” check box is checked.
You can also enable Remote Assistance through the Register Editor, here are the specific steps.
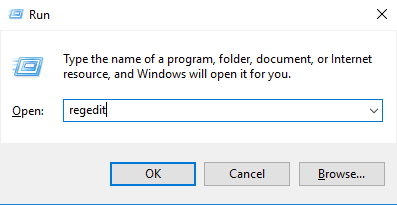
Step1. Press the Window key and R to open the run box, and then type “regedit” and press Enter.
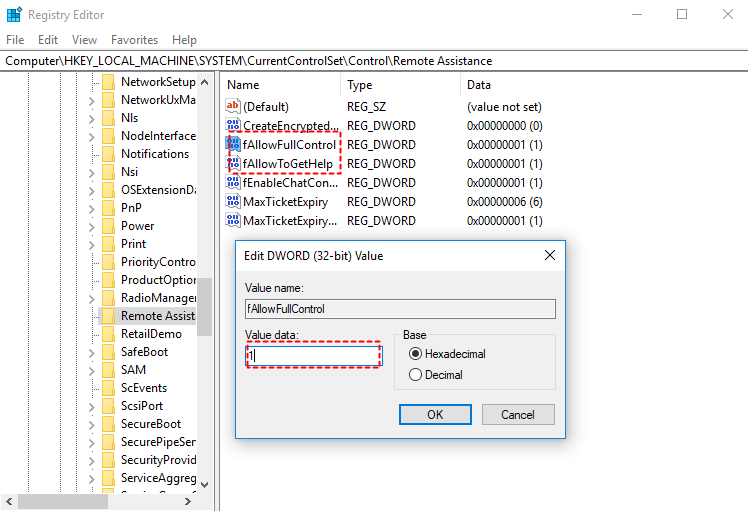
Step 2. Go to HKEY_LOCAL_MACHINE\SYSTEM\CurrentControlSet\Control\Remote Assistance. After double-clicking the "fAllowFullControl" and "fAllowToGetHelp", change their value to 1. If you want to disable Remote Assistance, change the value to 0.
Here is another method to enable Remote Assistance in Windows 11/10.
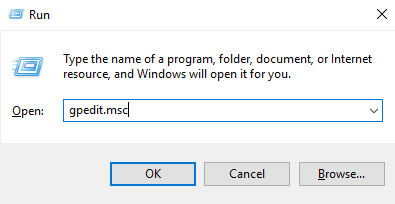
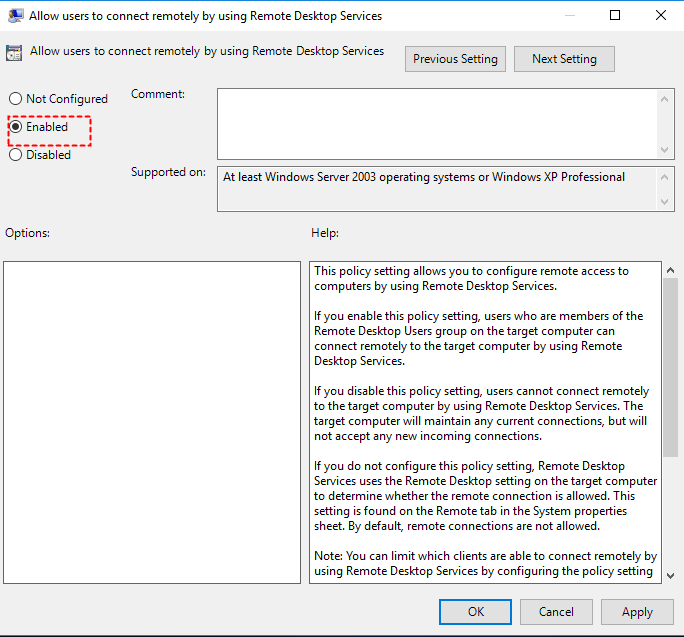
Step 1. Press the Window key and R, and type “gpedit.msc” into the run box to open the “Local Group Policy Editor” window.
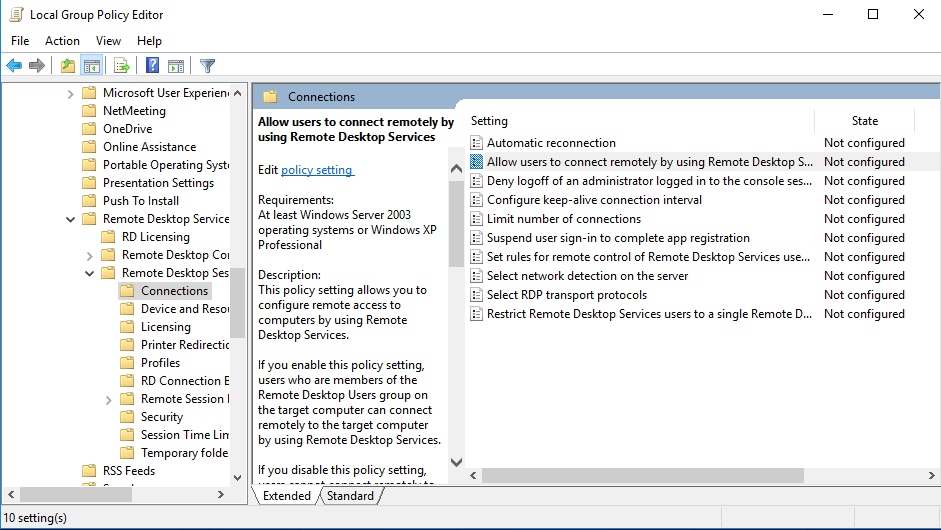
Step 2. Go to "Computer Configuration\Administrative Templates\Windows Components\Remote Desktop Services\Remote Desktop Session Host\Connections", and find the “Allow users to connect remotely using Remote Desktop Services” item.
Step 3. Double-click the “Allow users to connect remotely using Remote Desktop Services” and select “Enabled”; then click "Apply".
If you are tired of those tedious procedures, why not turn to a third-party easy-to-use remote desktop software, AnyViewer? AnyViewer has a clean and concise interface and sample operation system which helps users understand how to use it easily. With this application, you can get rid of those tedious processes and have a better experience.
▪ Easy and quick operation: You can set up AnyViewer on both devices easily and quickly
▪ High security: It adopts ECC algorithm end-to-end encryption to protect the data in remote assistance sessions.
▪ Flexible connection ways: It supports both unattended remote access and attended remote access.
▪ Mobile device support: If there is no computer at your hand, you can use your Android or iPad to take full control of the remote computer and offer remote assistance.
Download, install, and run AnyViewer on your computer and your friend’s computer first. Then follow the below steps to make a connection to your friend’s computer.
Step 1. On the PC that you start the remote session, create an AnyViewer account and log into it.
Step 2. Go to the “Connect” tab, and then you can see the device ID. Ask your friend or family member to tell you the device ID of the computer that you need to control. Then, type the device ID of the remote computer and click "Connect".
Step 3. For the 2 options, choose the first one “Send a control request to your partner”, and then click on “OK”.
Step 6. There will be a pop-up window on the remote computer. The people on the other end needs to click “Allow” to receive remote support. And then the connection will be realized.
Note: If you need to offer Remote Assistance without permission, you can tell the people who needs help to set up a security code and send it to you. To access your own work computer from home or other places, you can assign the devices to your AnyViewer account and then achieve one-click remote access.
Surely you have realized how to resolve Remote Assitance not working in Windows 10 or Windows 11 issue. Actually, if you don't mind downloading a third-party remote desktop software, AnyViewer will be a nice choice to receive/offer remote assistance on Windows 11/10/8.1/8/7.